Creating realistic fruits in UE4 with Substance Suite
Navigator
Introduction
This project features organic materials using Substance Designer and Substance Painter to create both fresh and decayed fruit samples. The references demonstrate an excellent interior lighting setup for product branding and present material details of every fruit type. The overripe fruit can have many variations in materials and shape structure, which brings challenges in sculpting geometry. Furthermore, another challenge will be the methods controlling accurate subsurface scattering value in Unreal Engine 4.
Style references
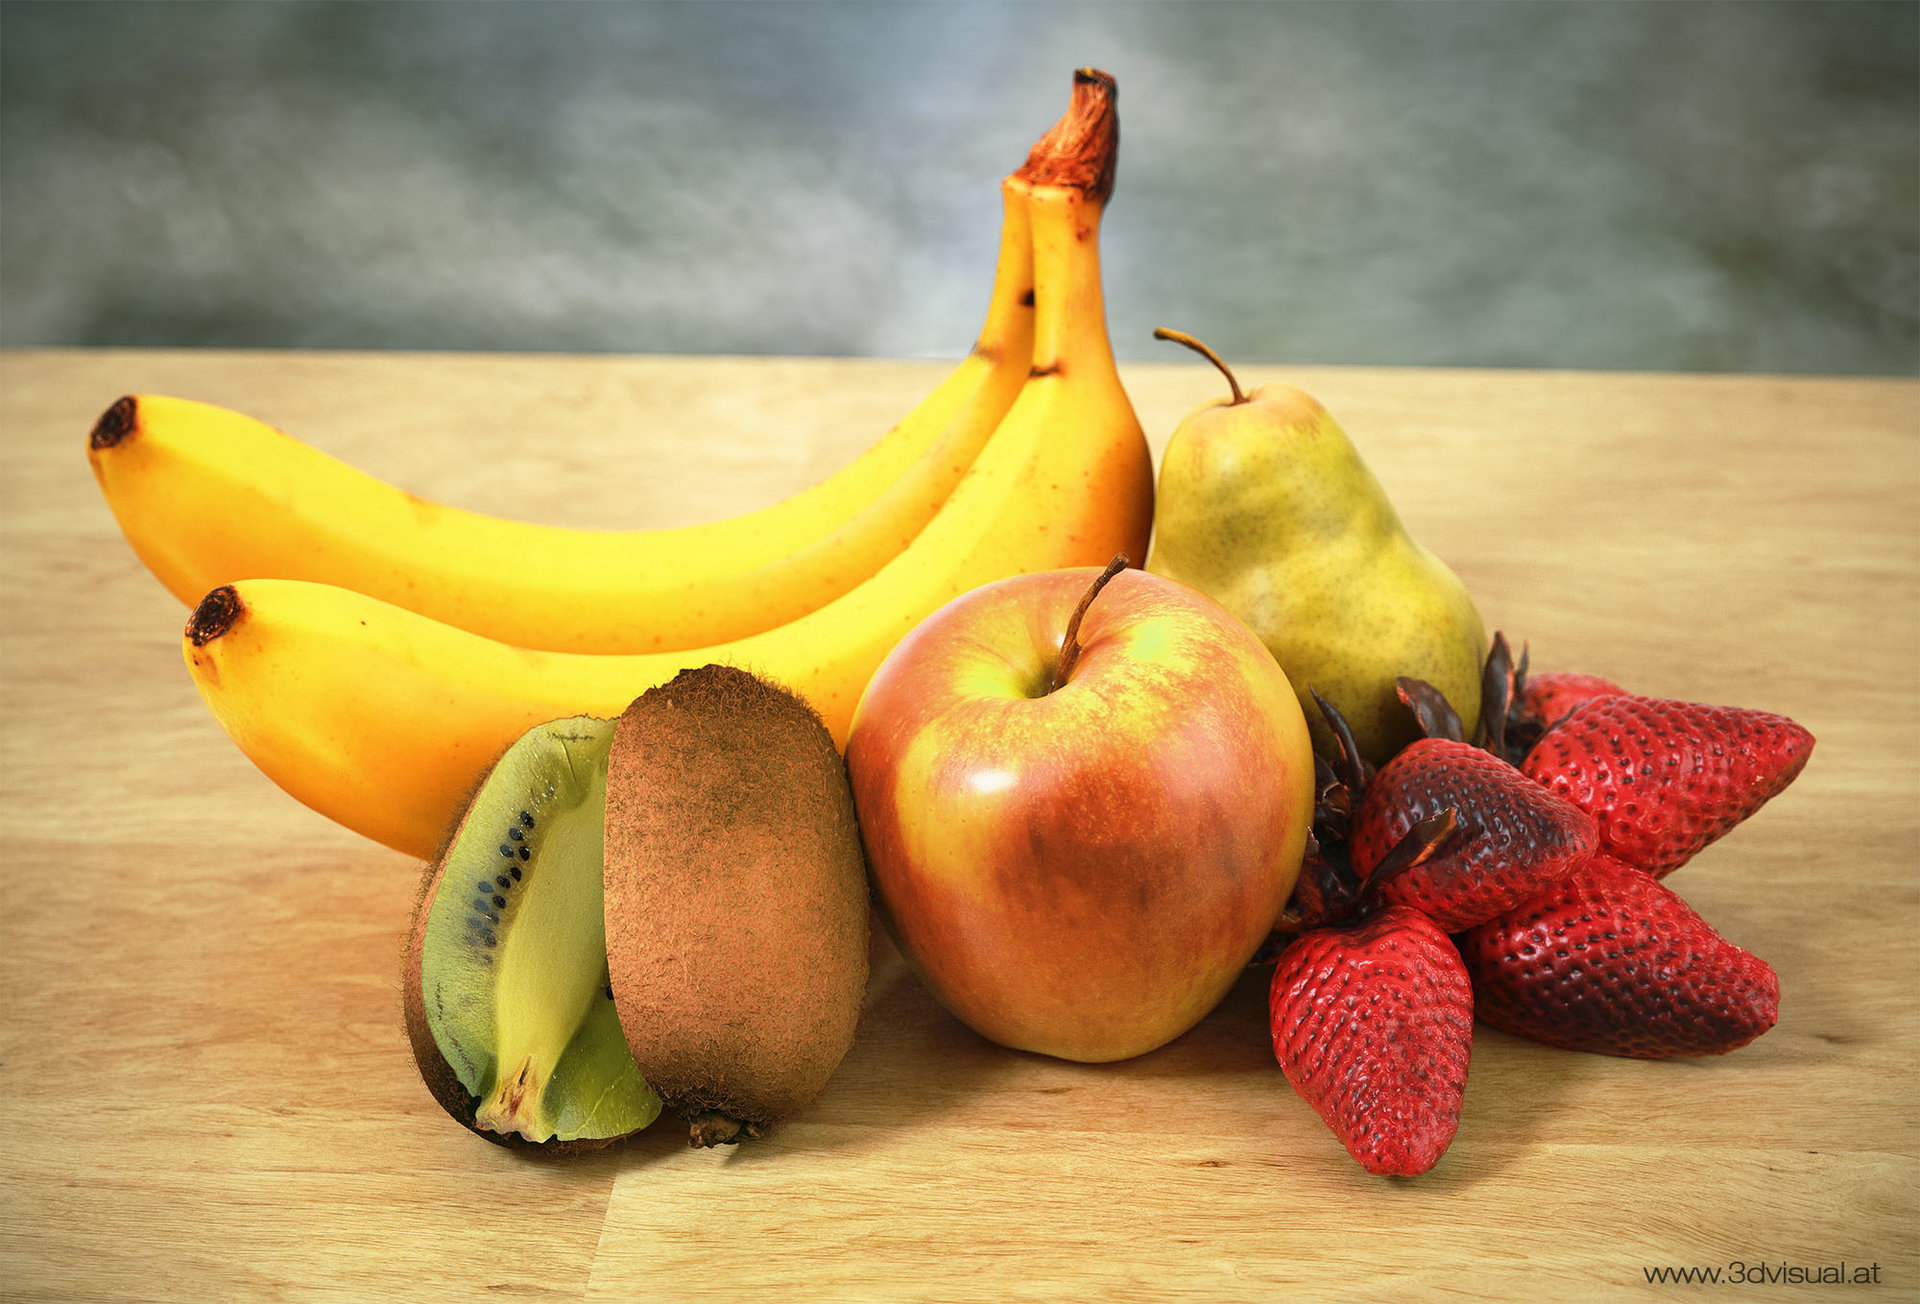
Reference 1
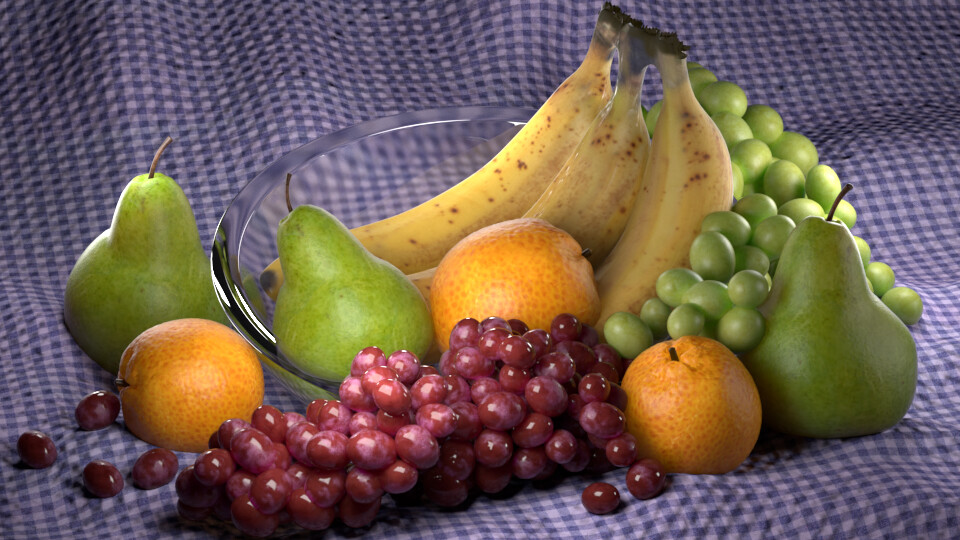
Reference 2
Final screenshots
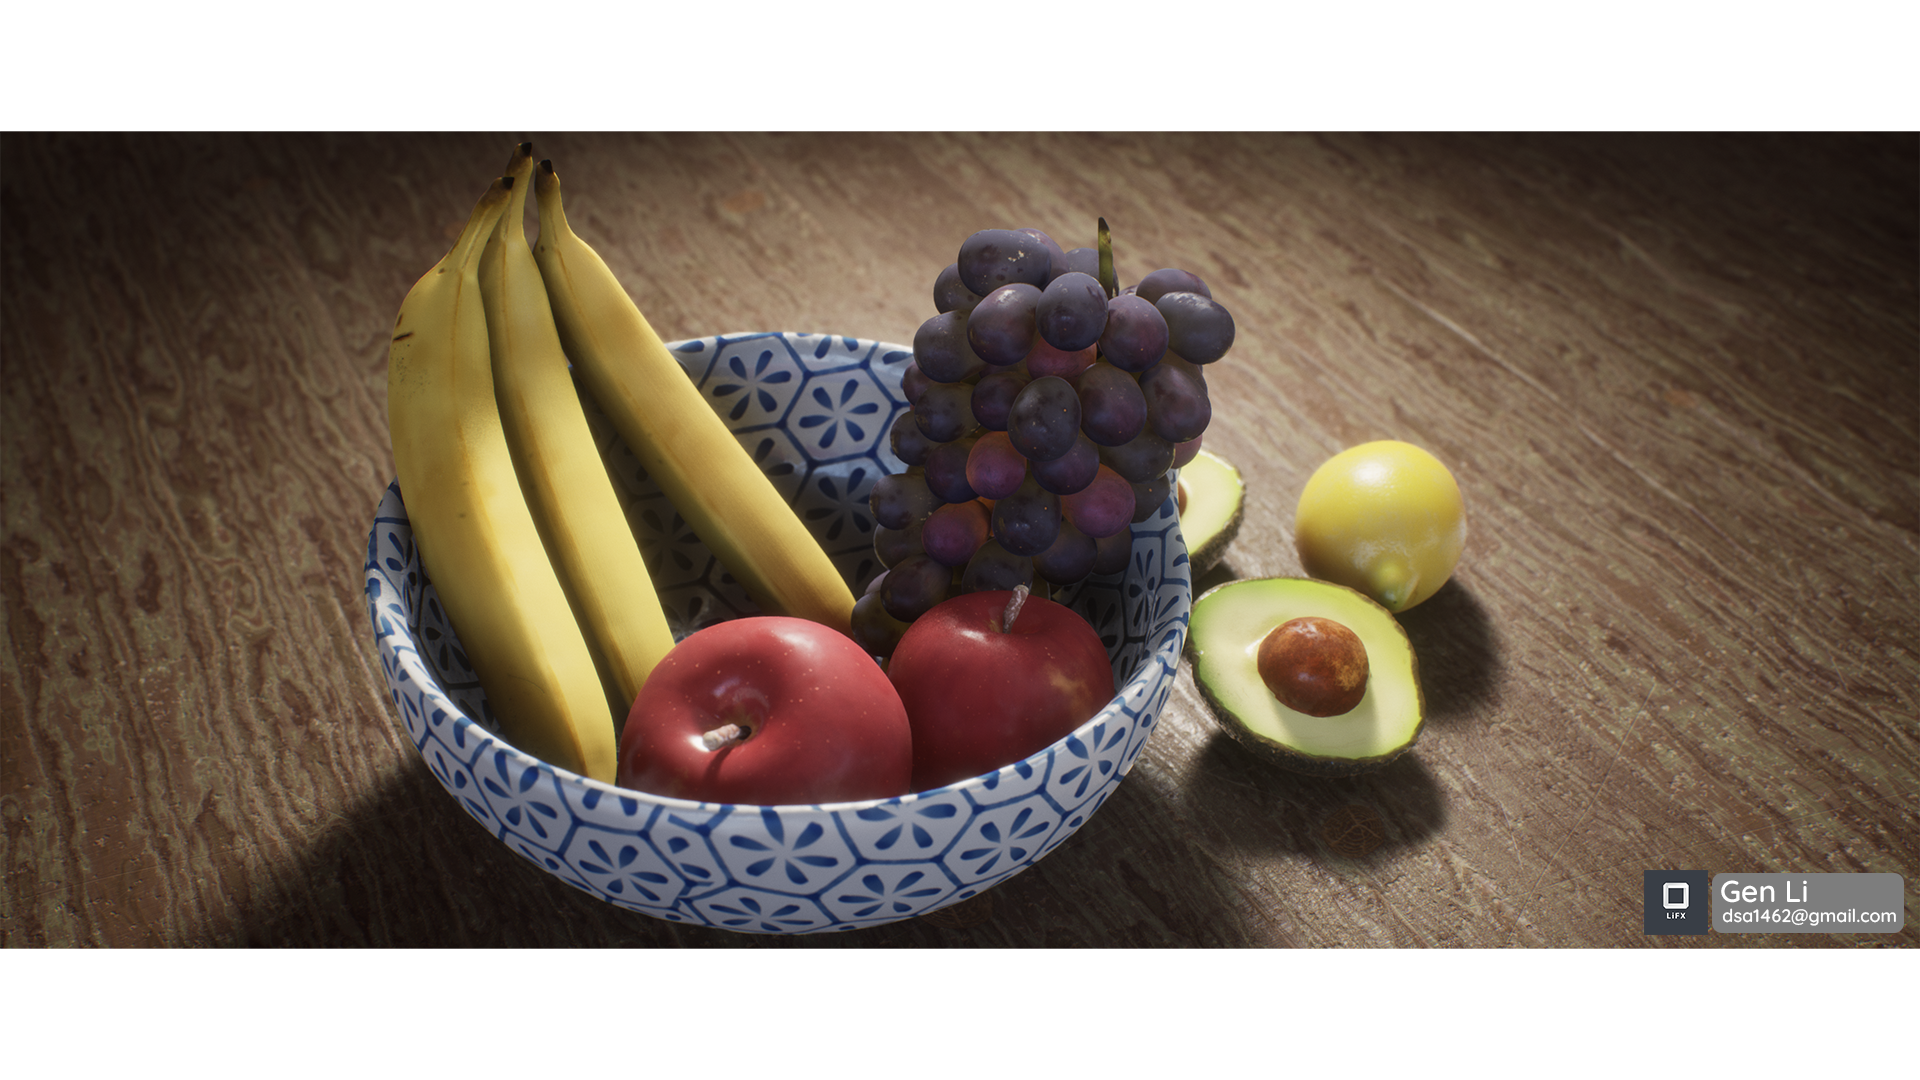
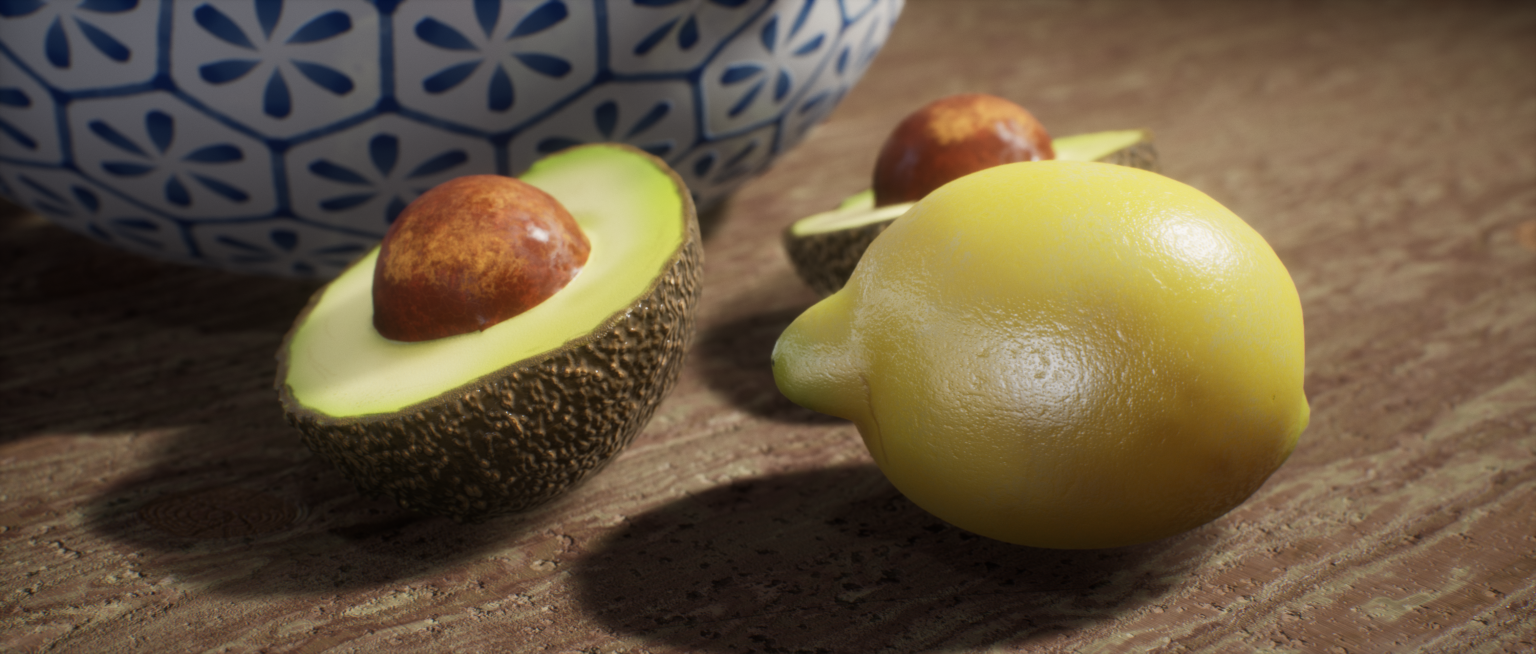
Fresh version
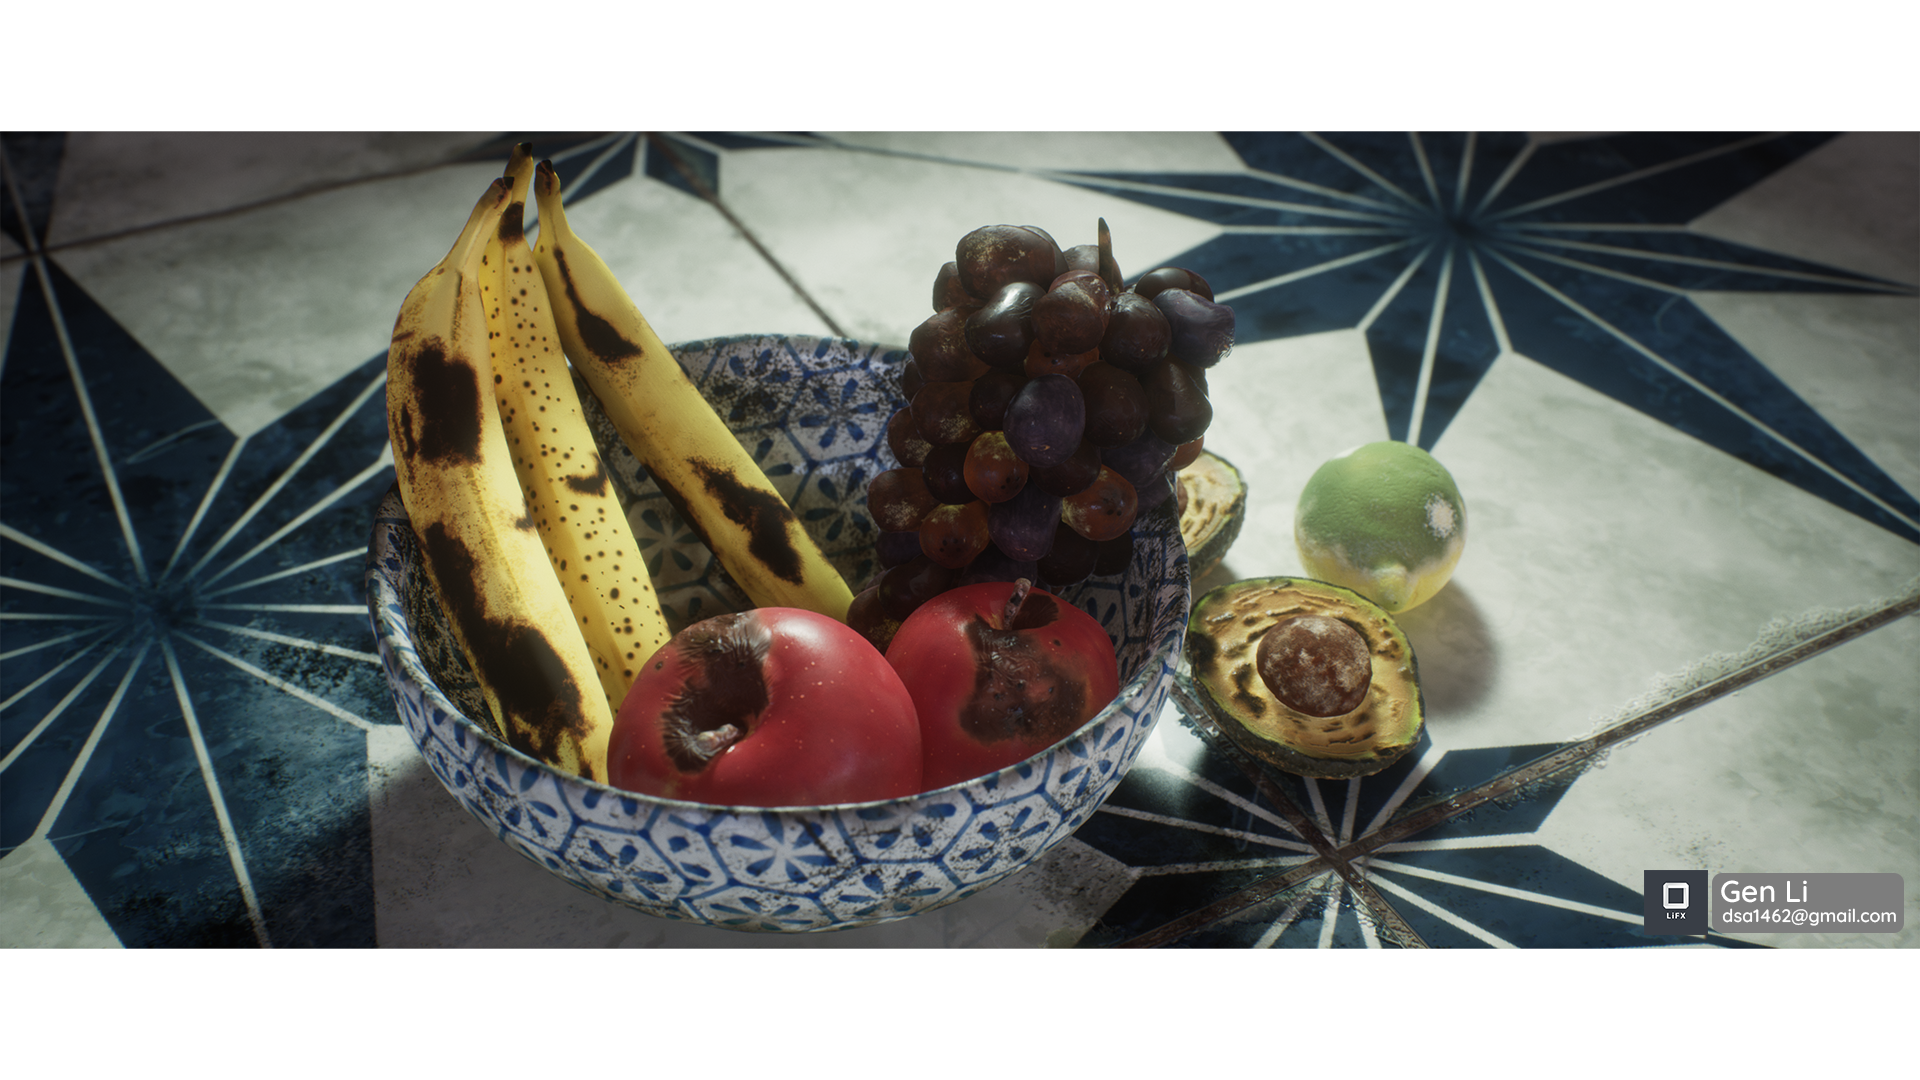
Decayed version
Video
Technique breakdown
1. Researching individual references
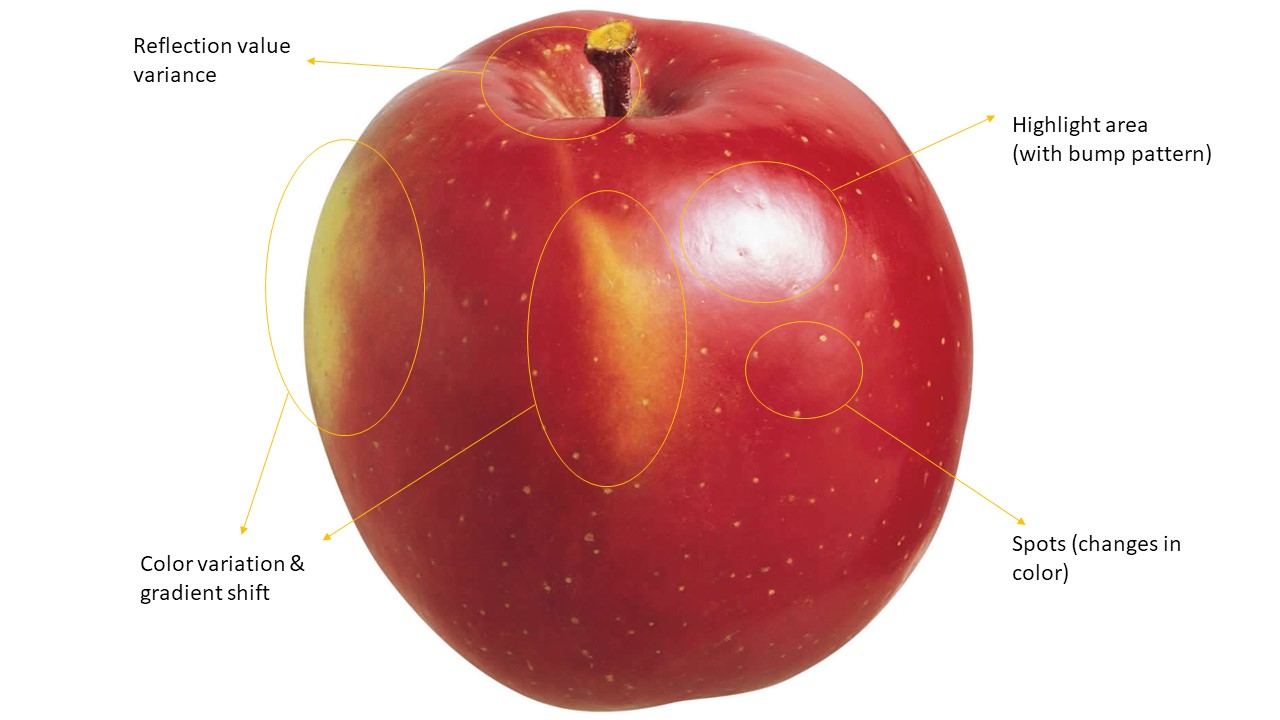
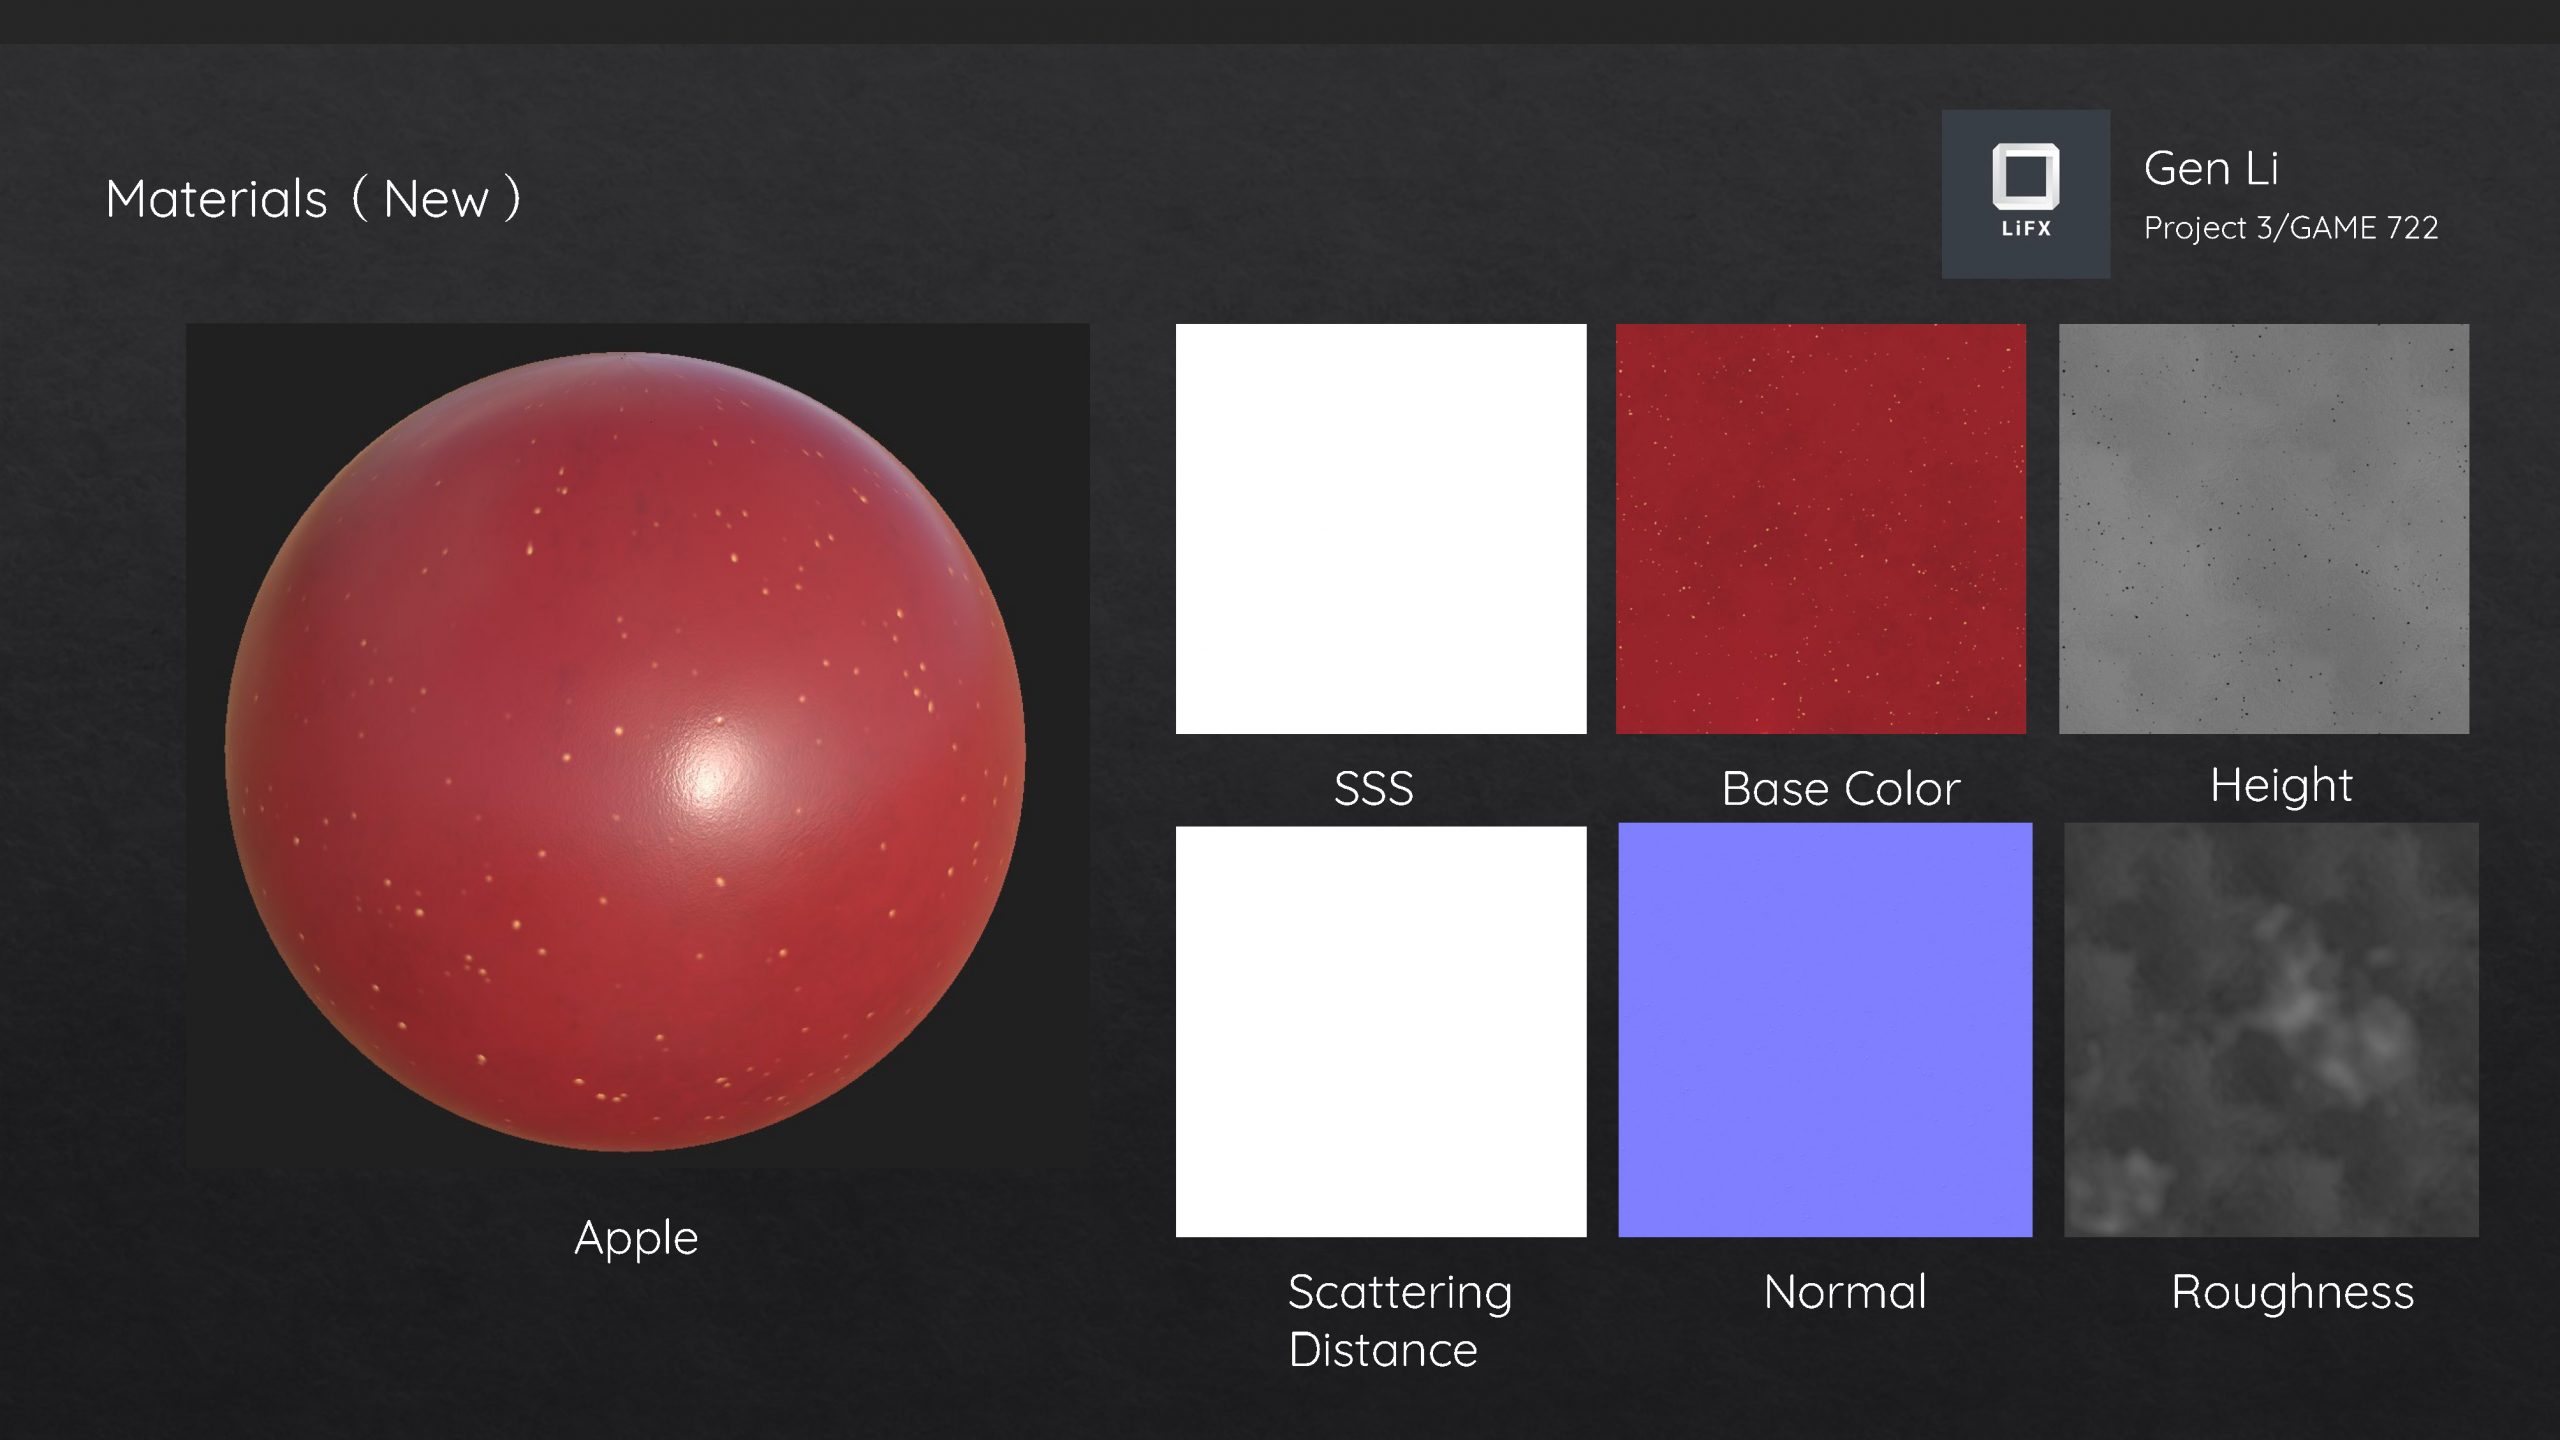
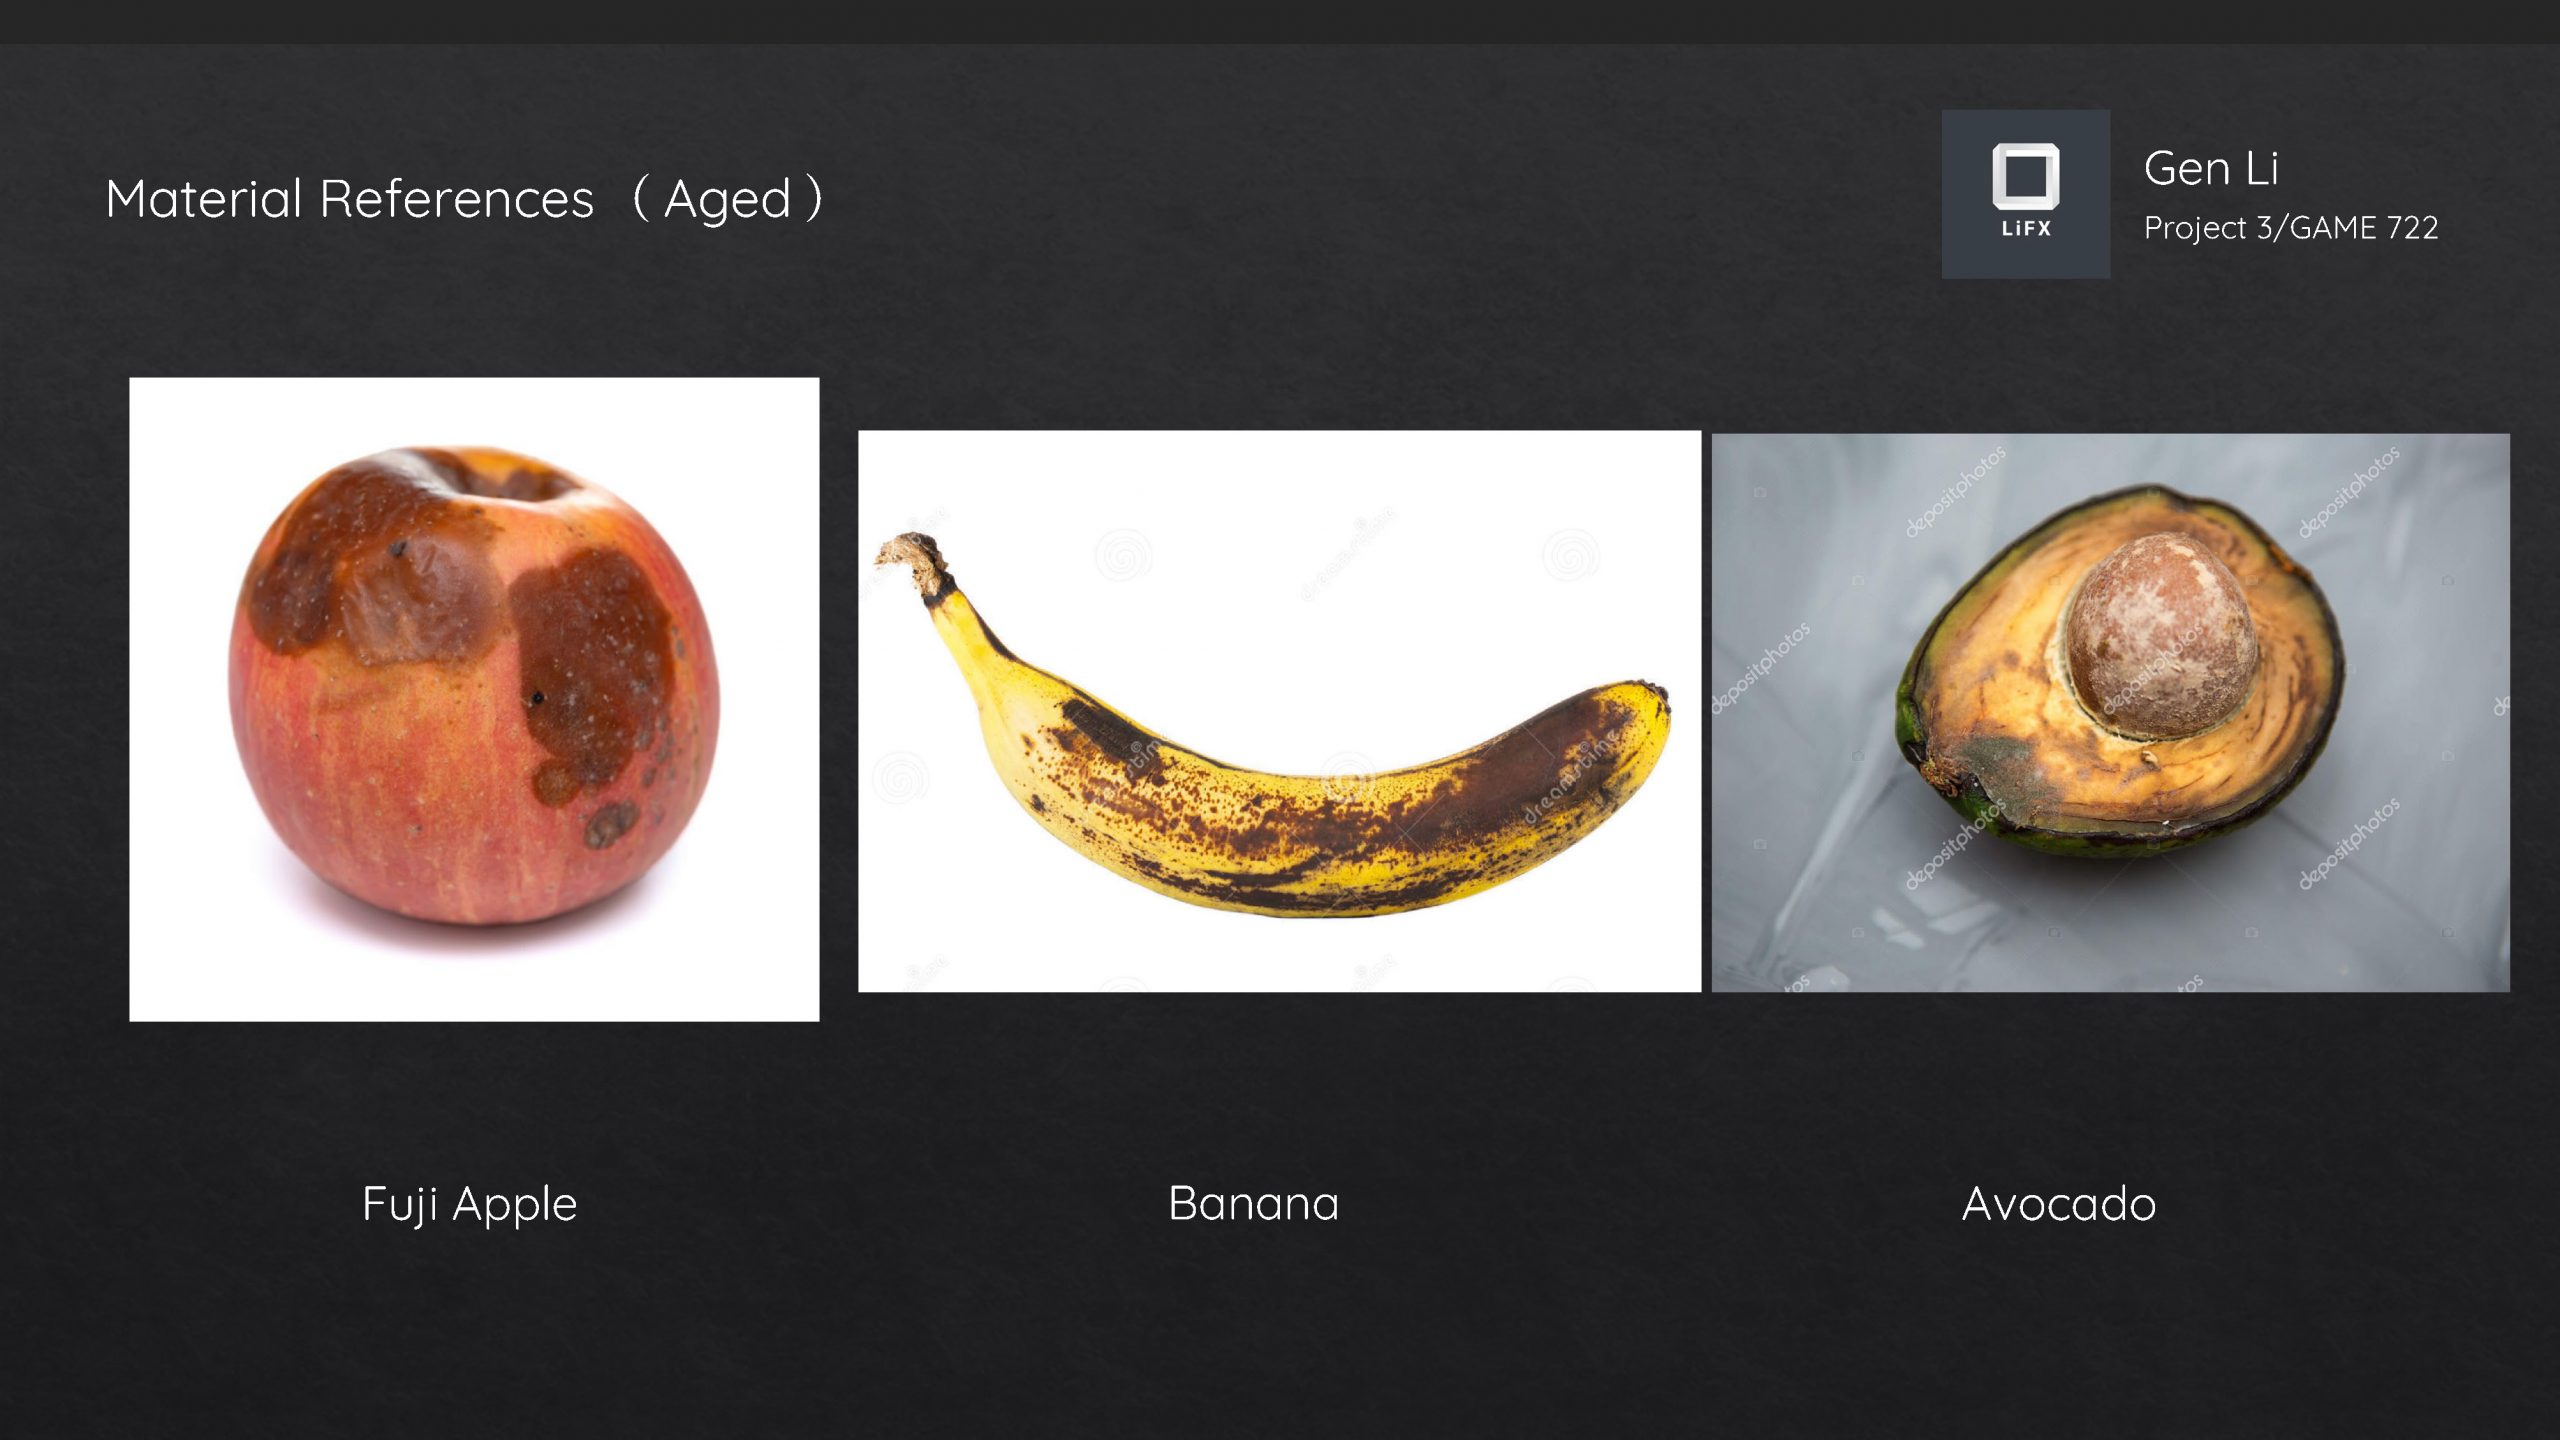
Since this project required at least six different materials in total, I decided to research several fruit types to meet the requirements. Starting with the apple, the one reference that I found using Google presents some material characteristics on a Fuji apple’s surface. With a directional light casting highlight to the apple, clearly we could notice the existence of bumping patterns that generate high roughness value. Besides, many yellow spots are scattered around the apple surface, with color variations and gradient changes from tan to dark red. Reflection variance can also be explicitly noticed in top areas.
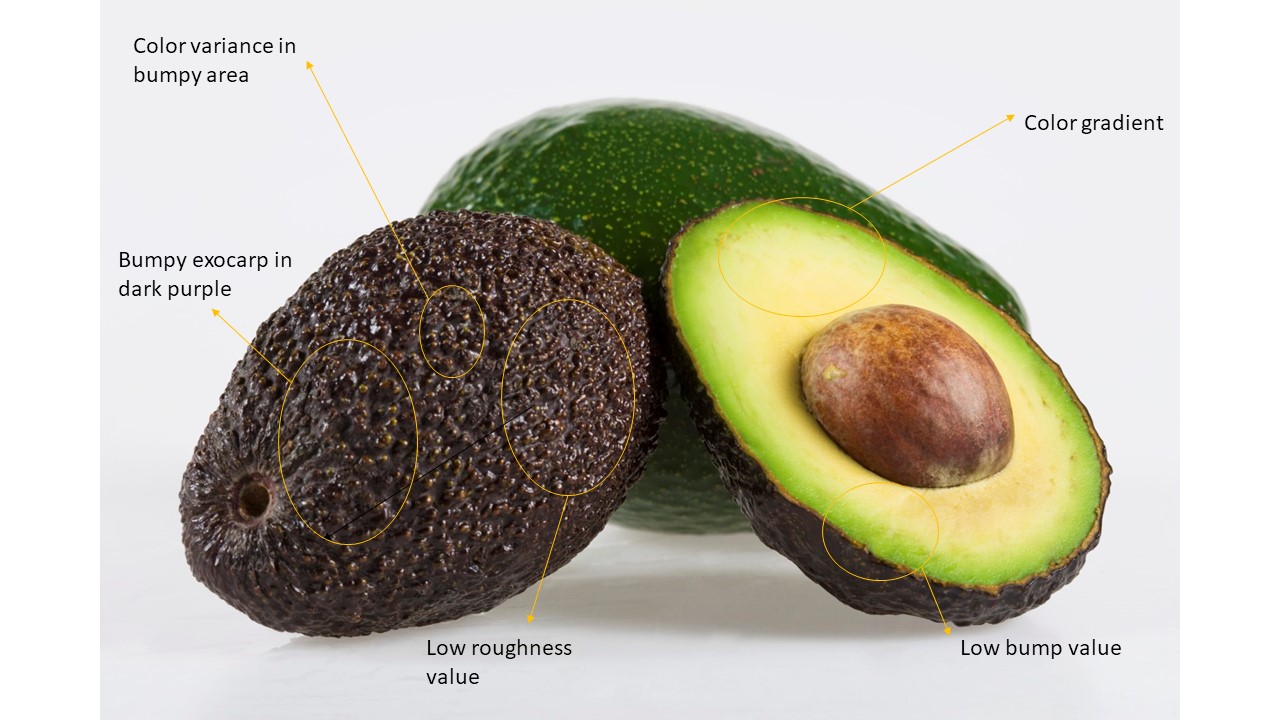
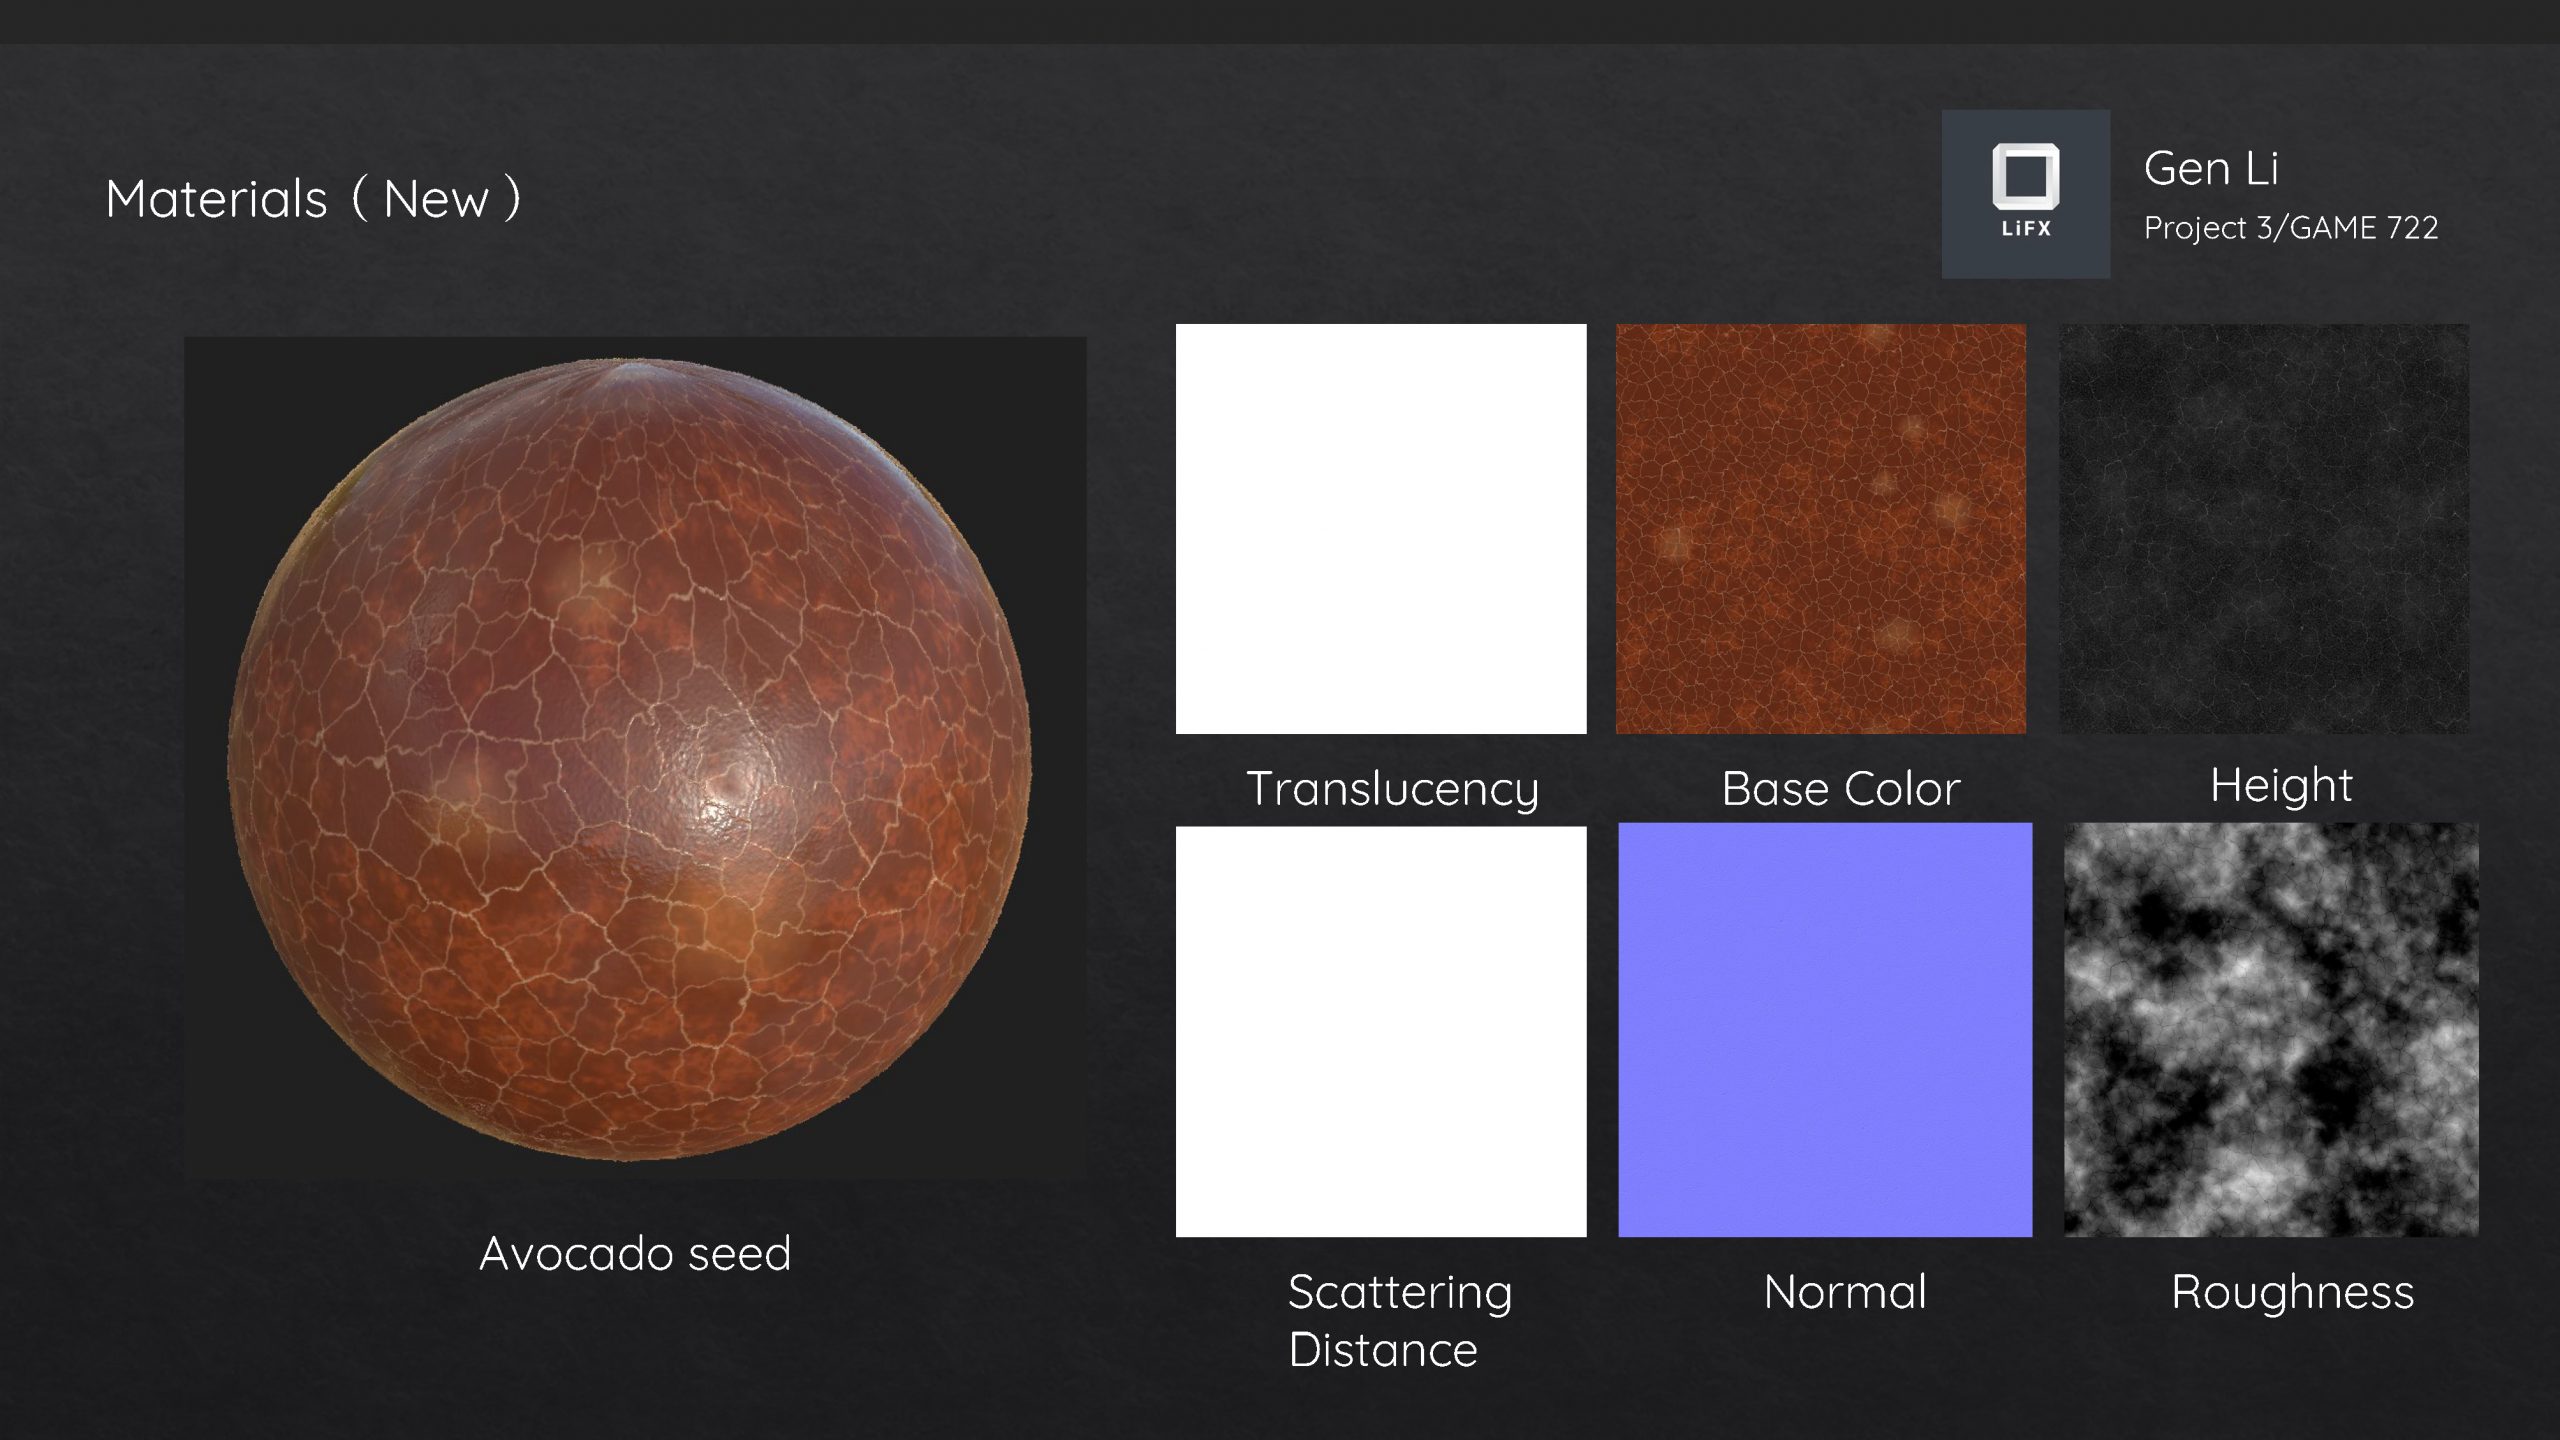
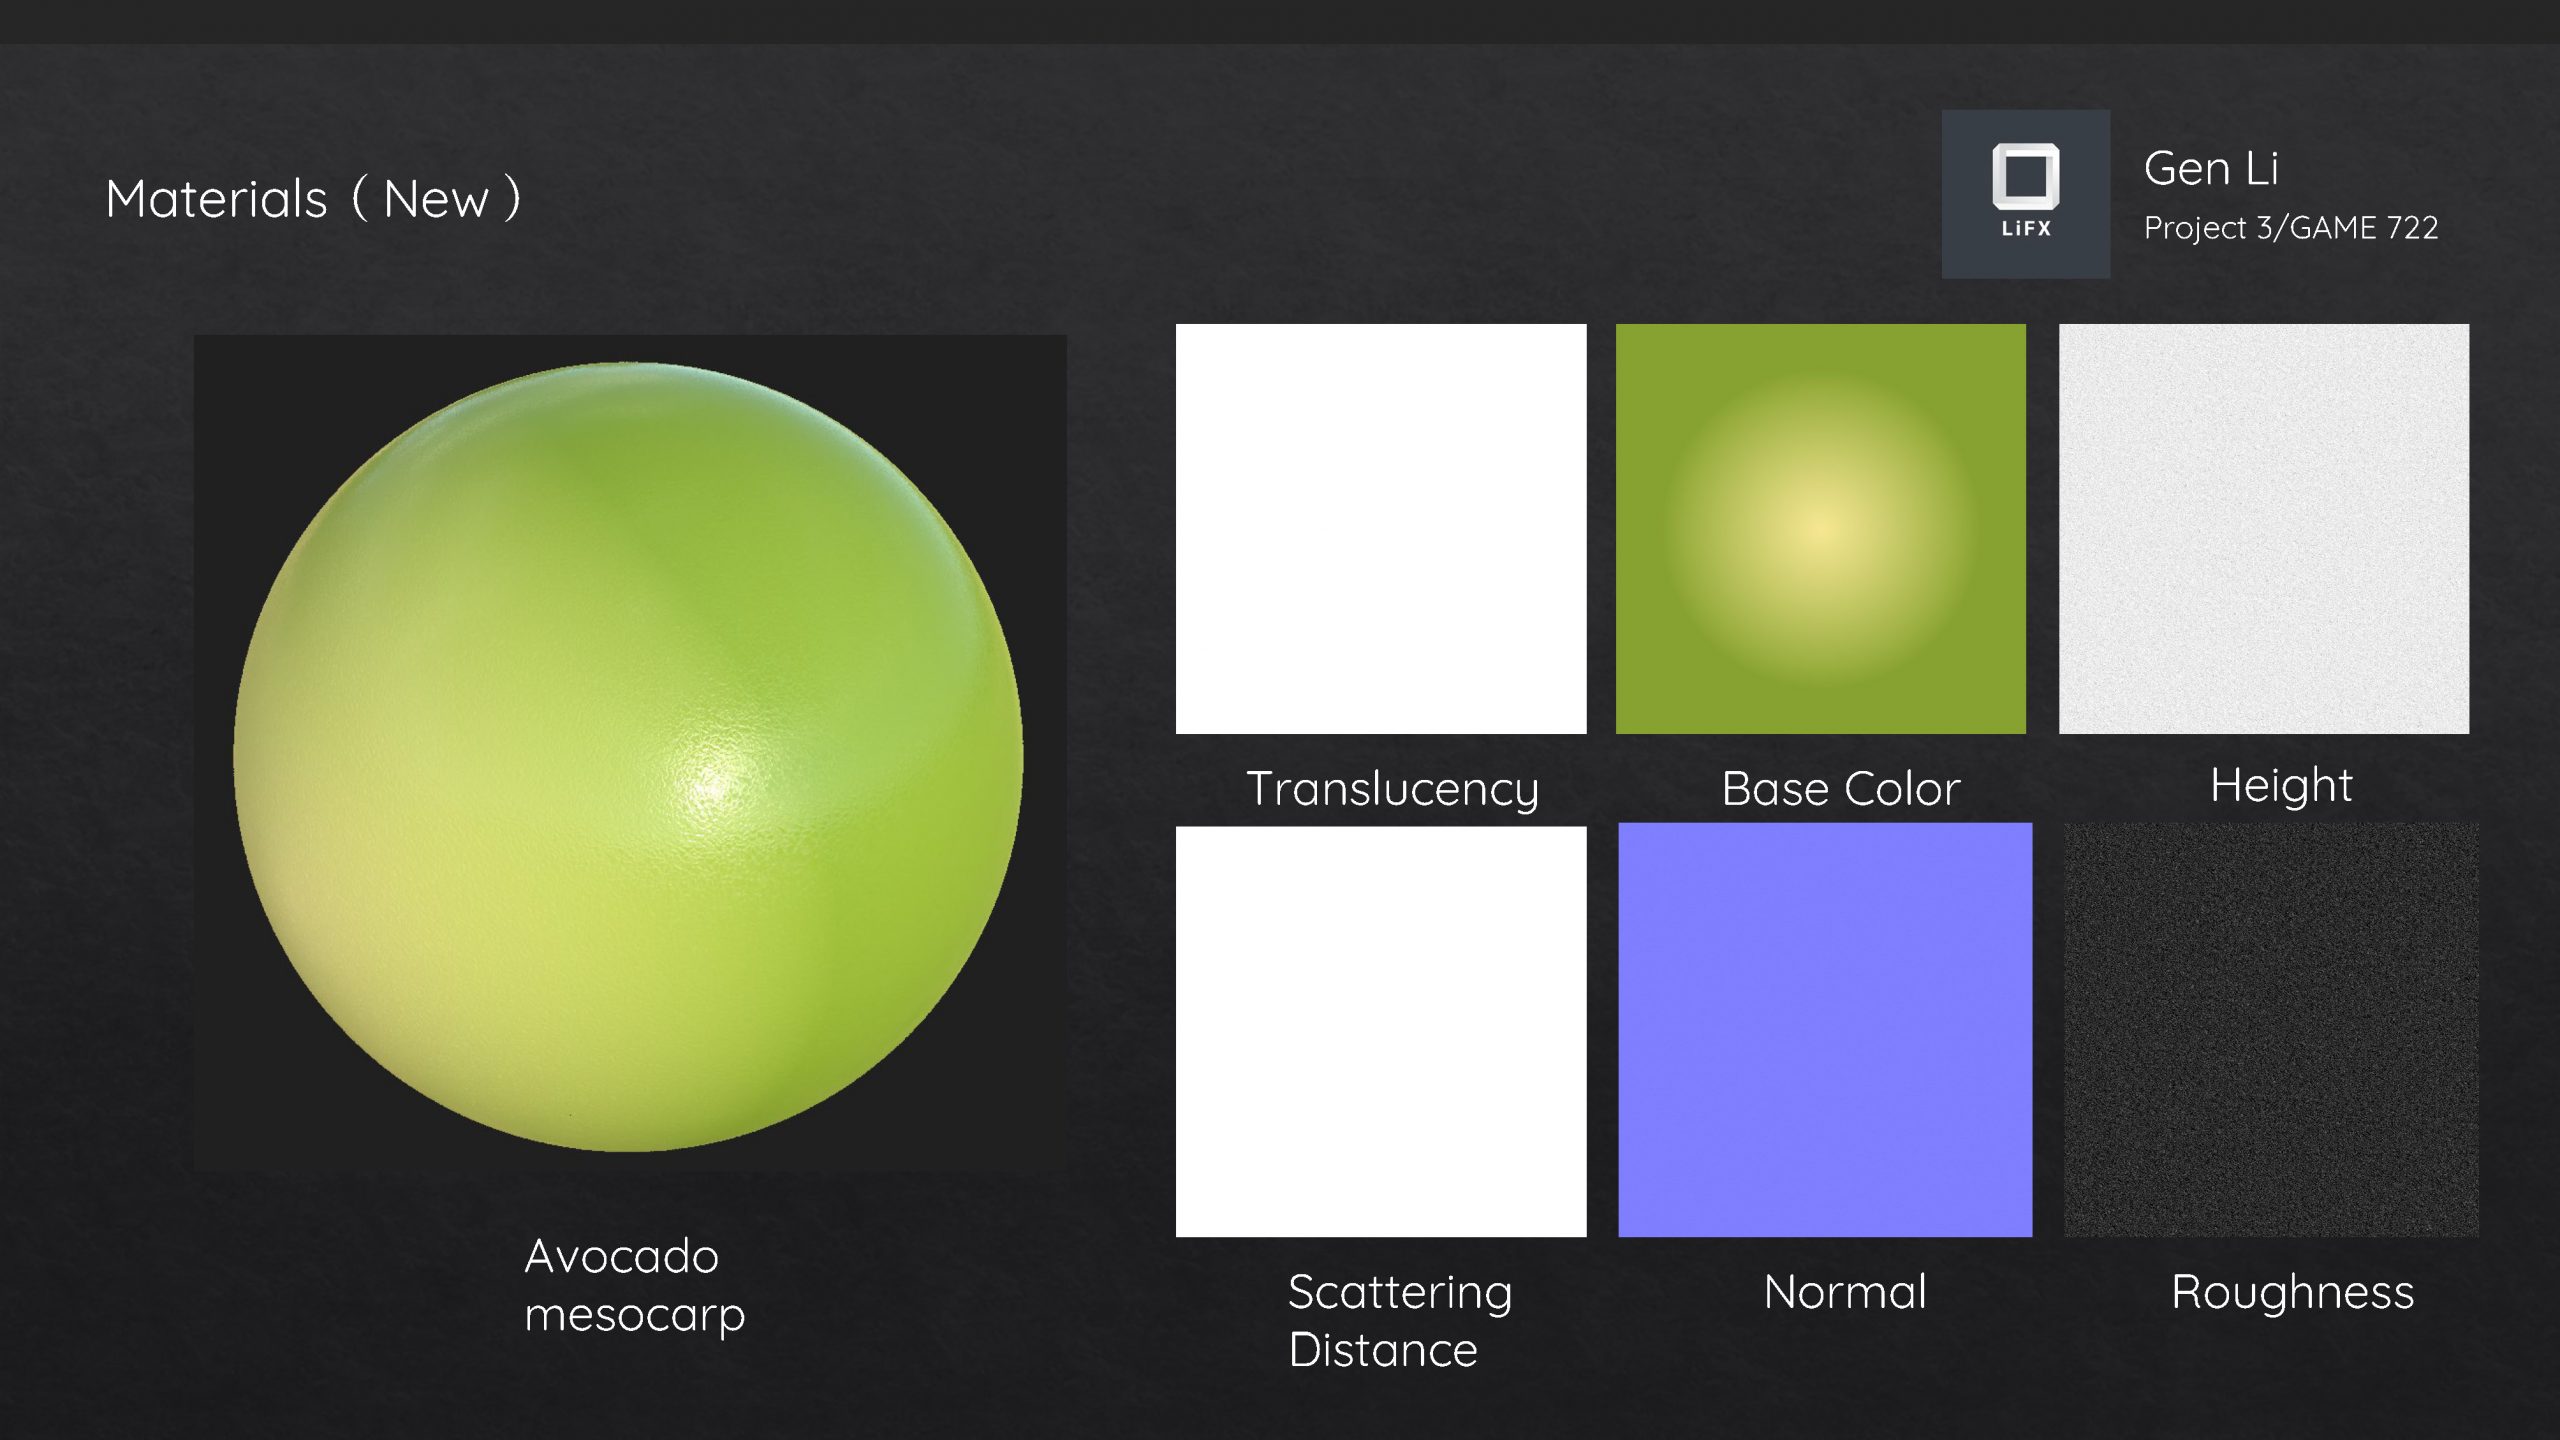
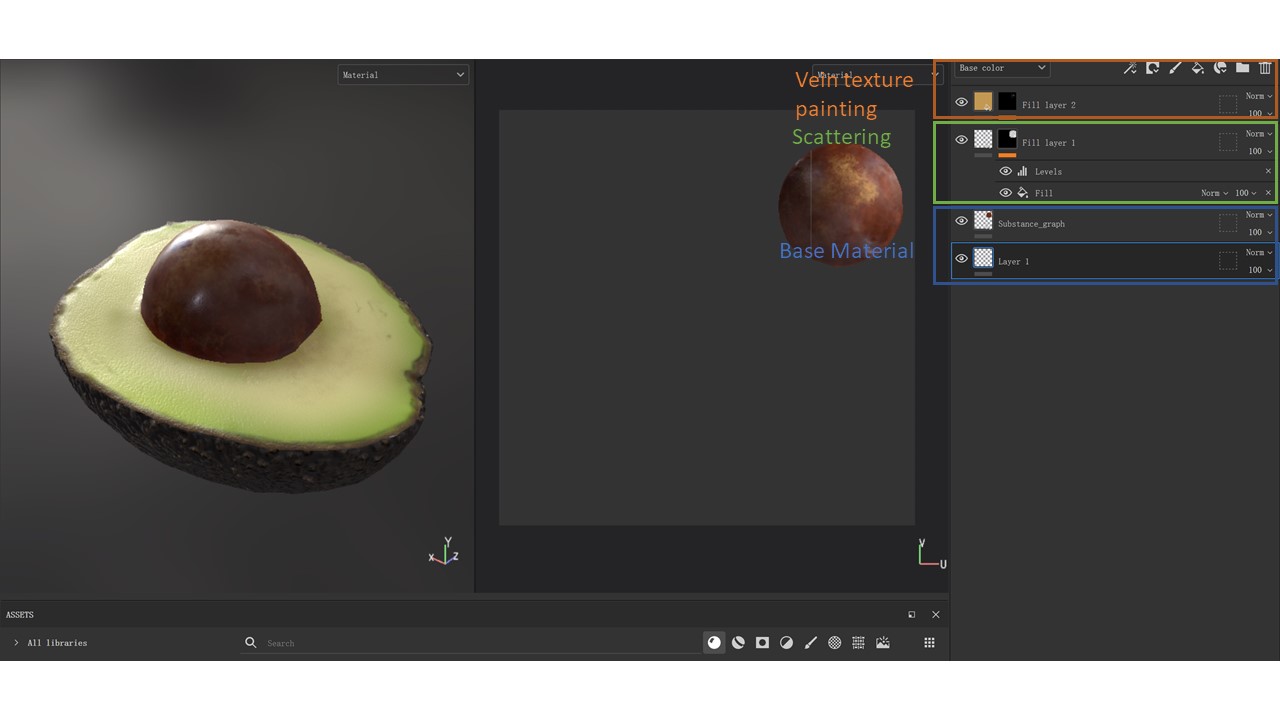
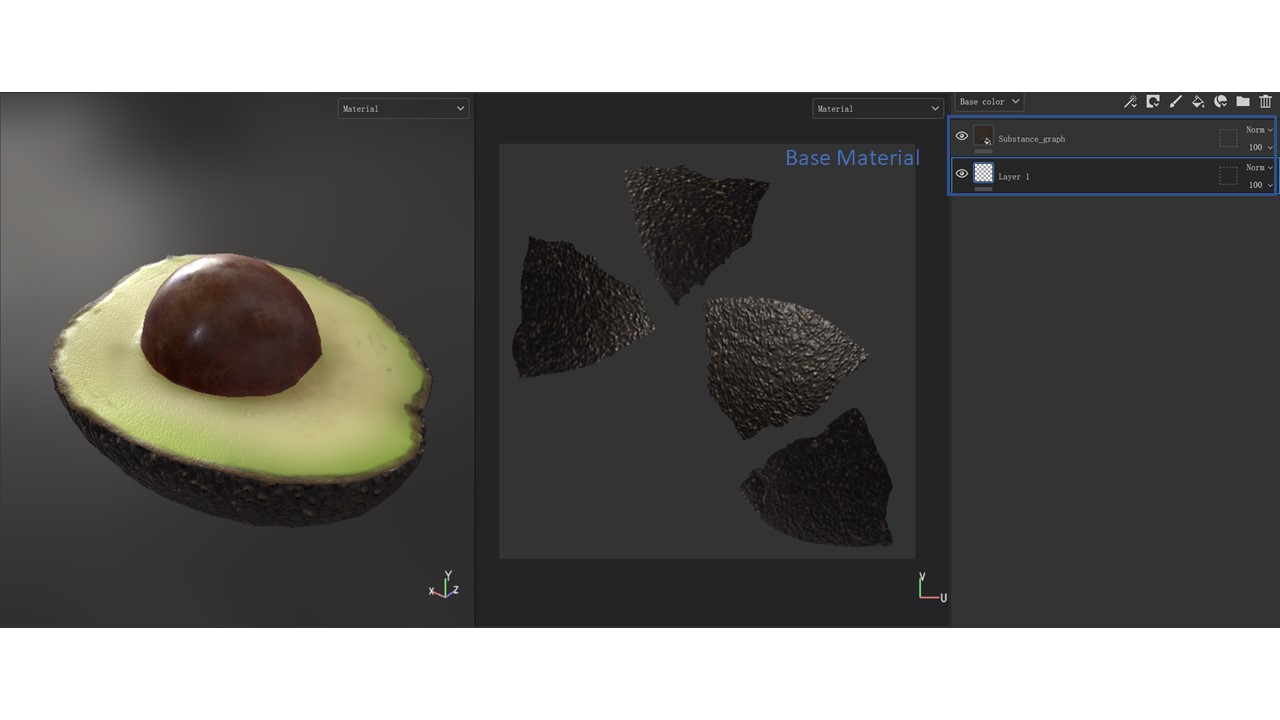
The avocado is an interesting example of combined materials in one object. The exocarp of avocado can have plenty of color types depending on their sub-species. The specific reference that I used has a bumpy surface with a Worley noise pattern and low roughness value. Most exocarp colors are dark purple with brown value in bump areas. The mesocarp presents a blurred gradient in base color when looking at the inside, starting from the edge. A slight bump value also can be seen when we pay attention to the highlighted area. The seed can be recognized as a “layering” surface, with the noisy cracking shape at the top and some dark “vein” patterns at the bottom. The general color of the seed goes towards dark brown.
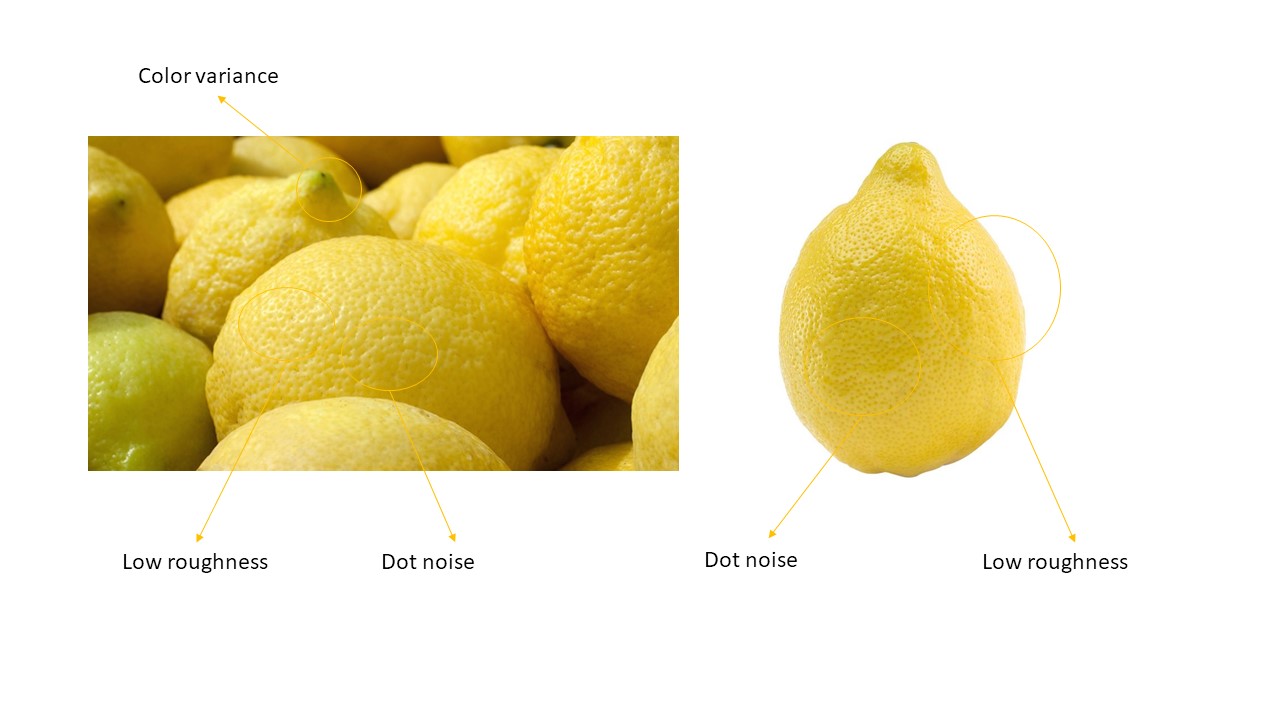
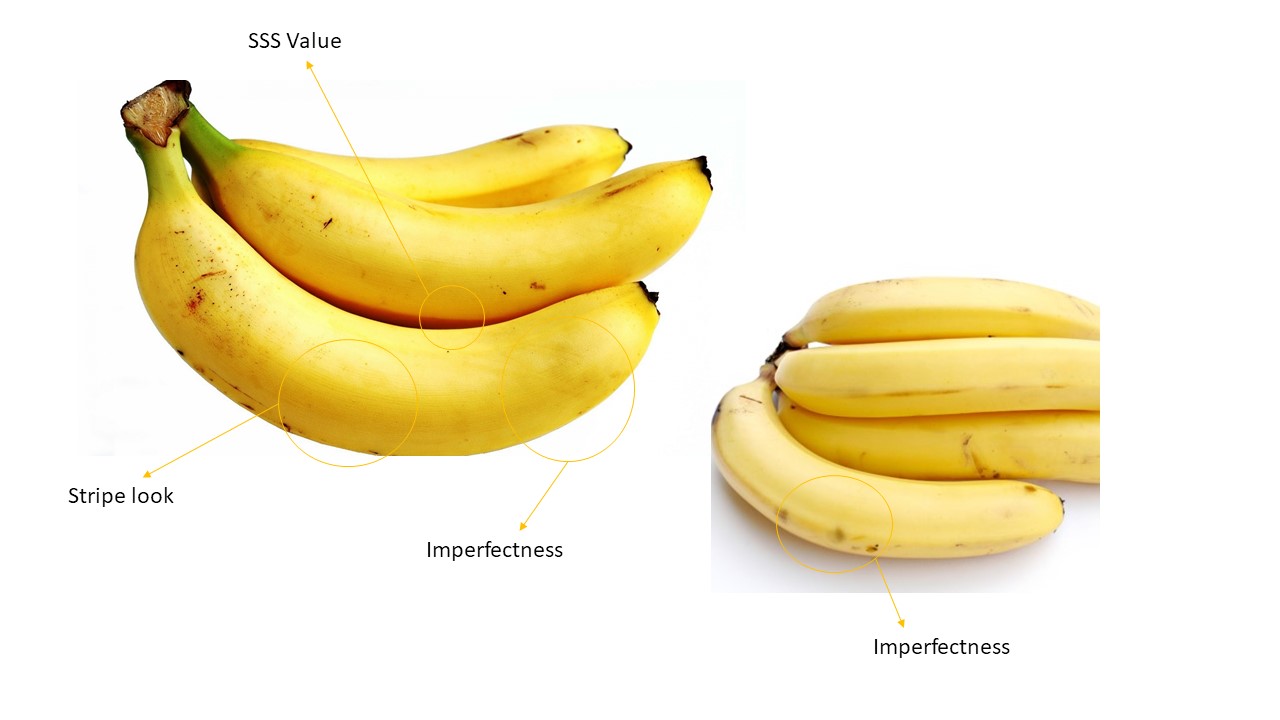
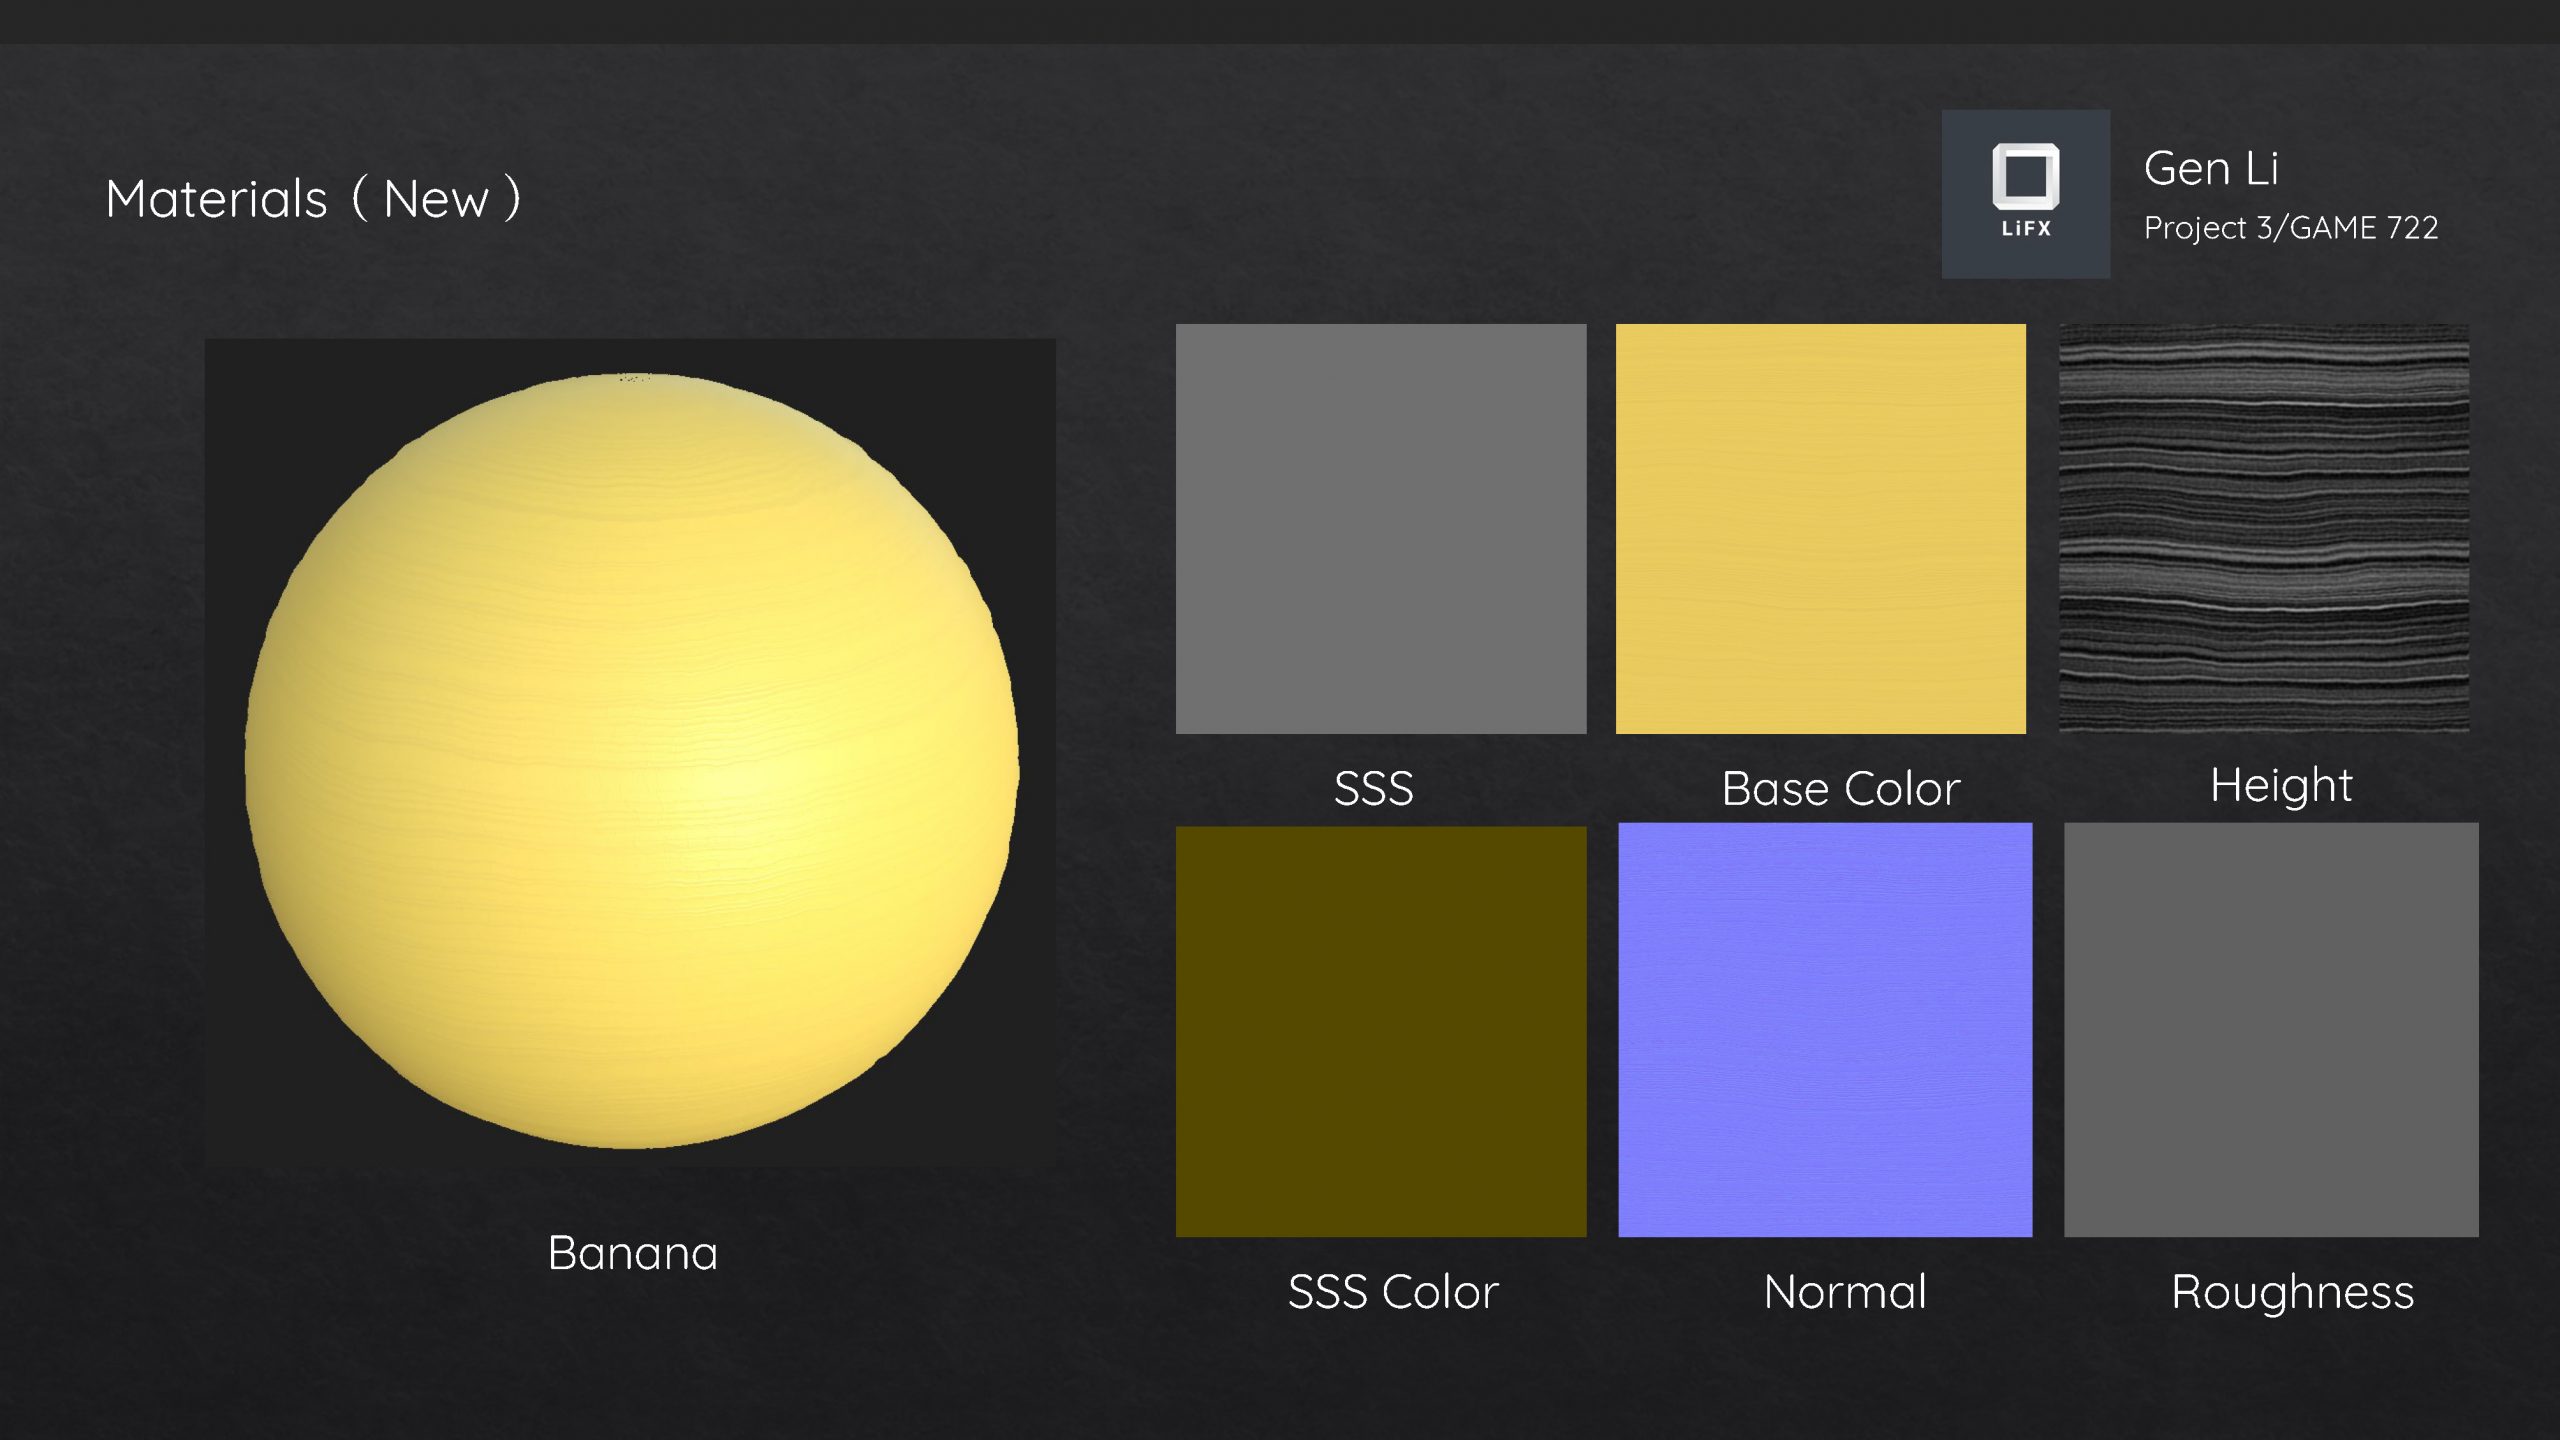
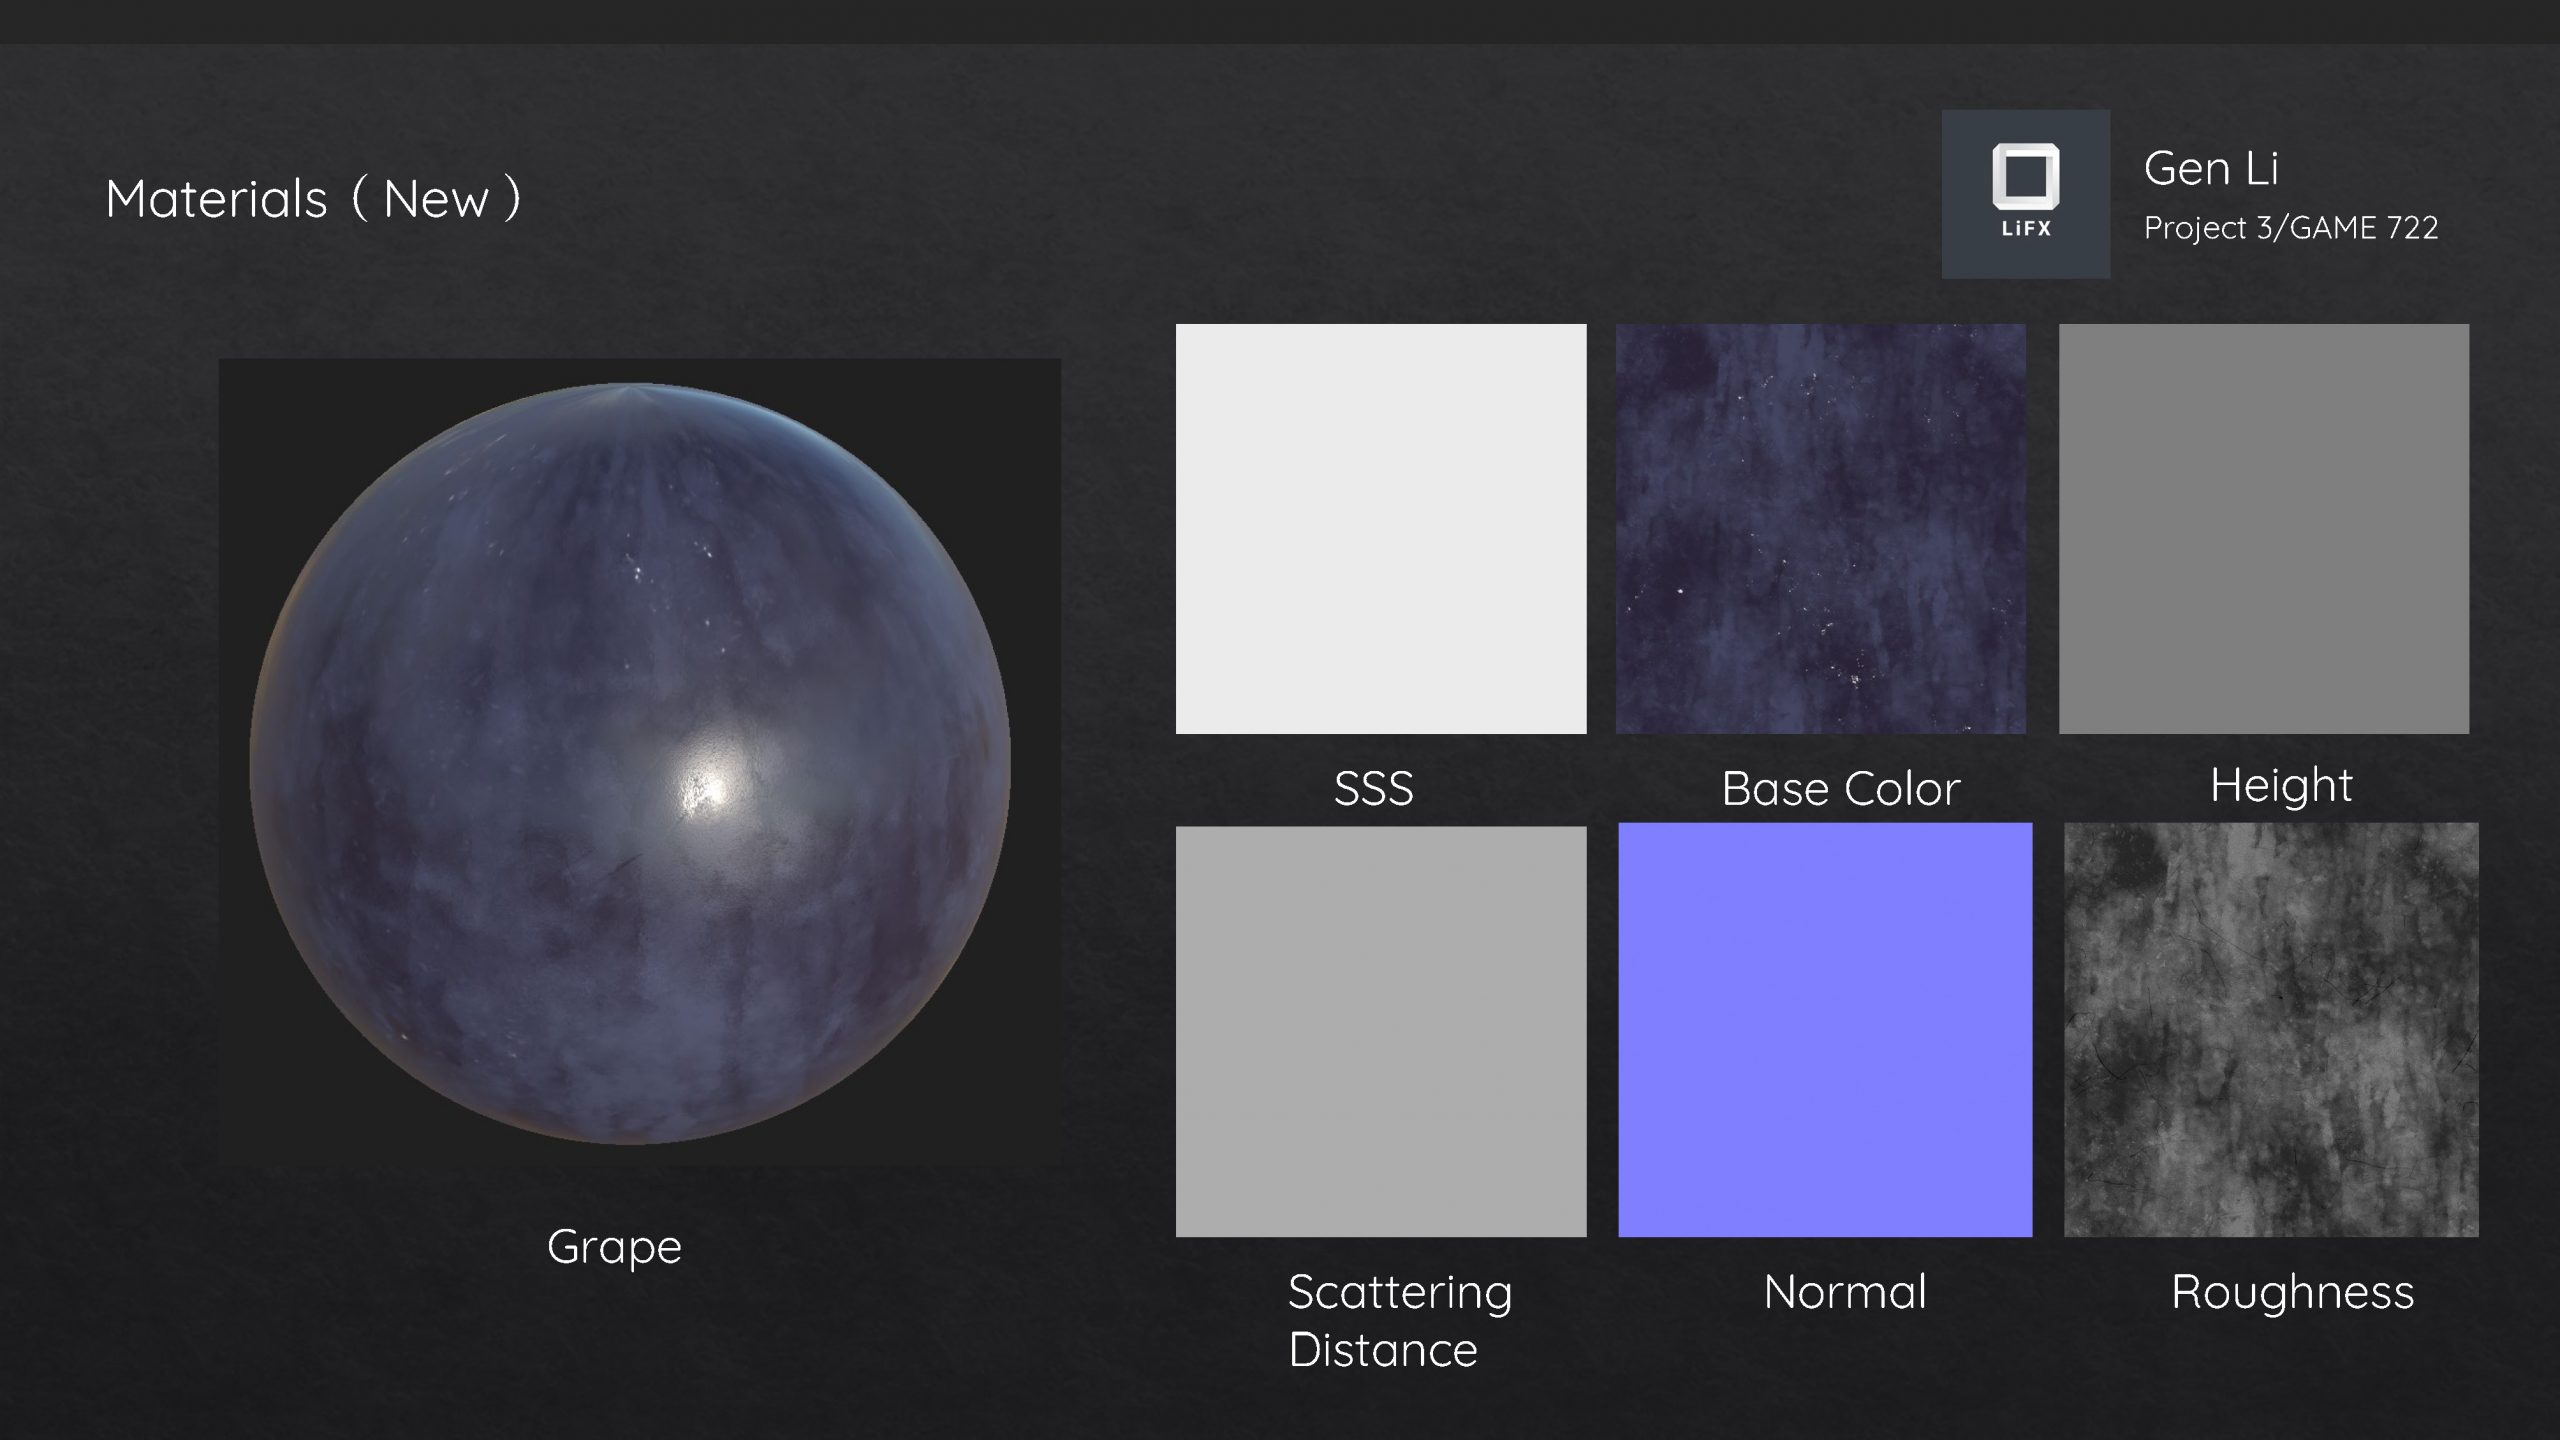
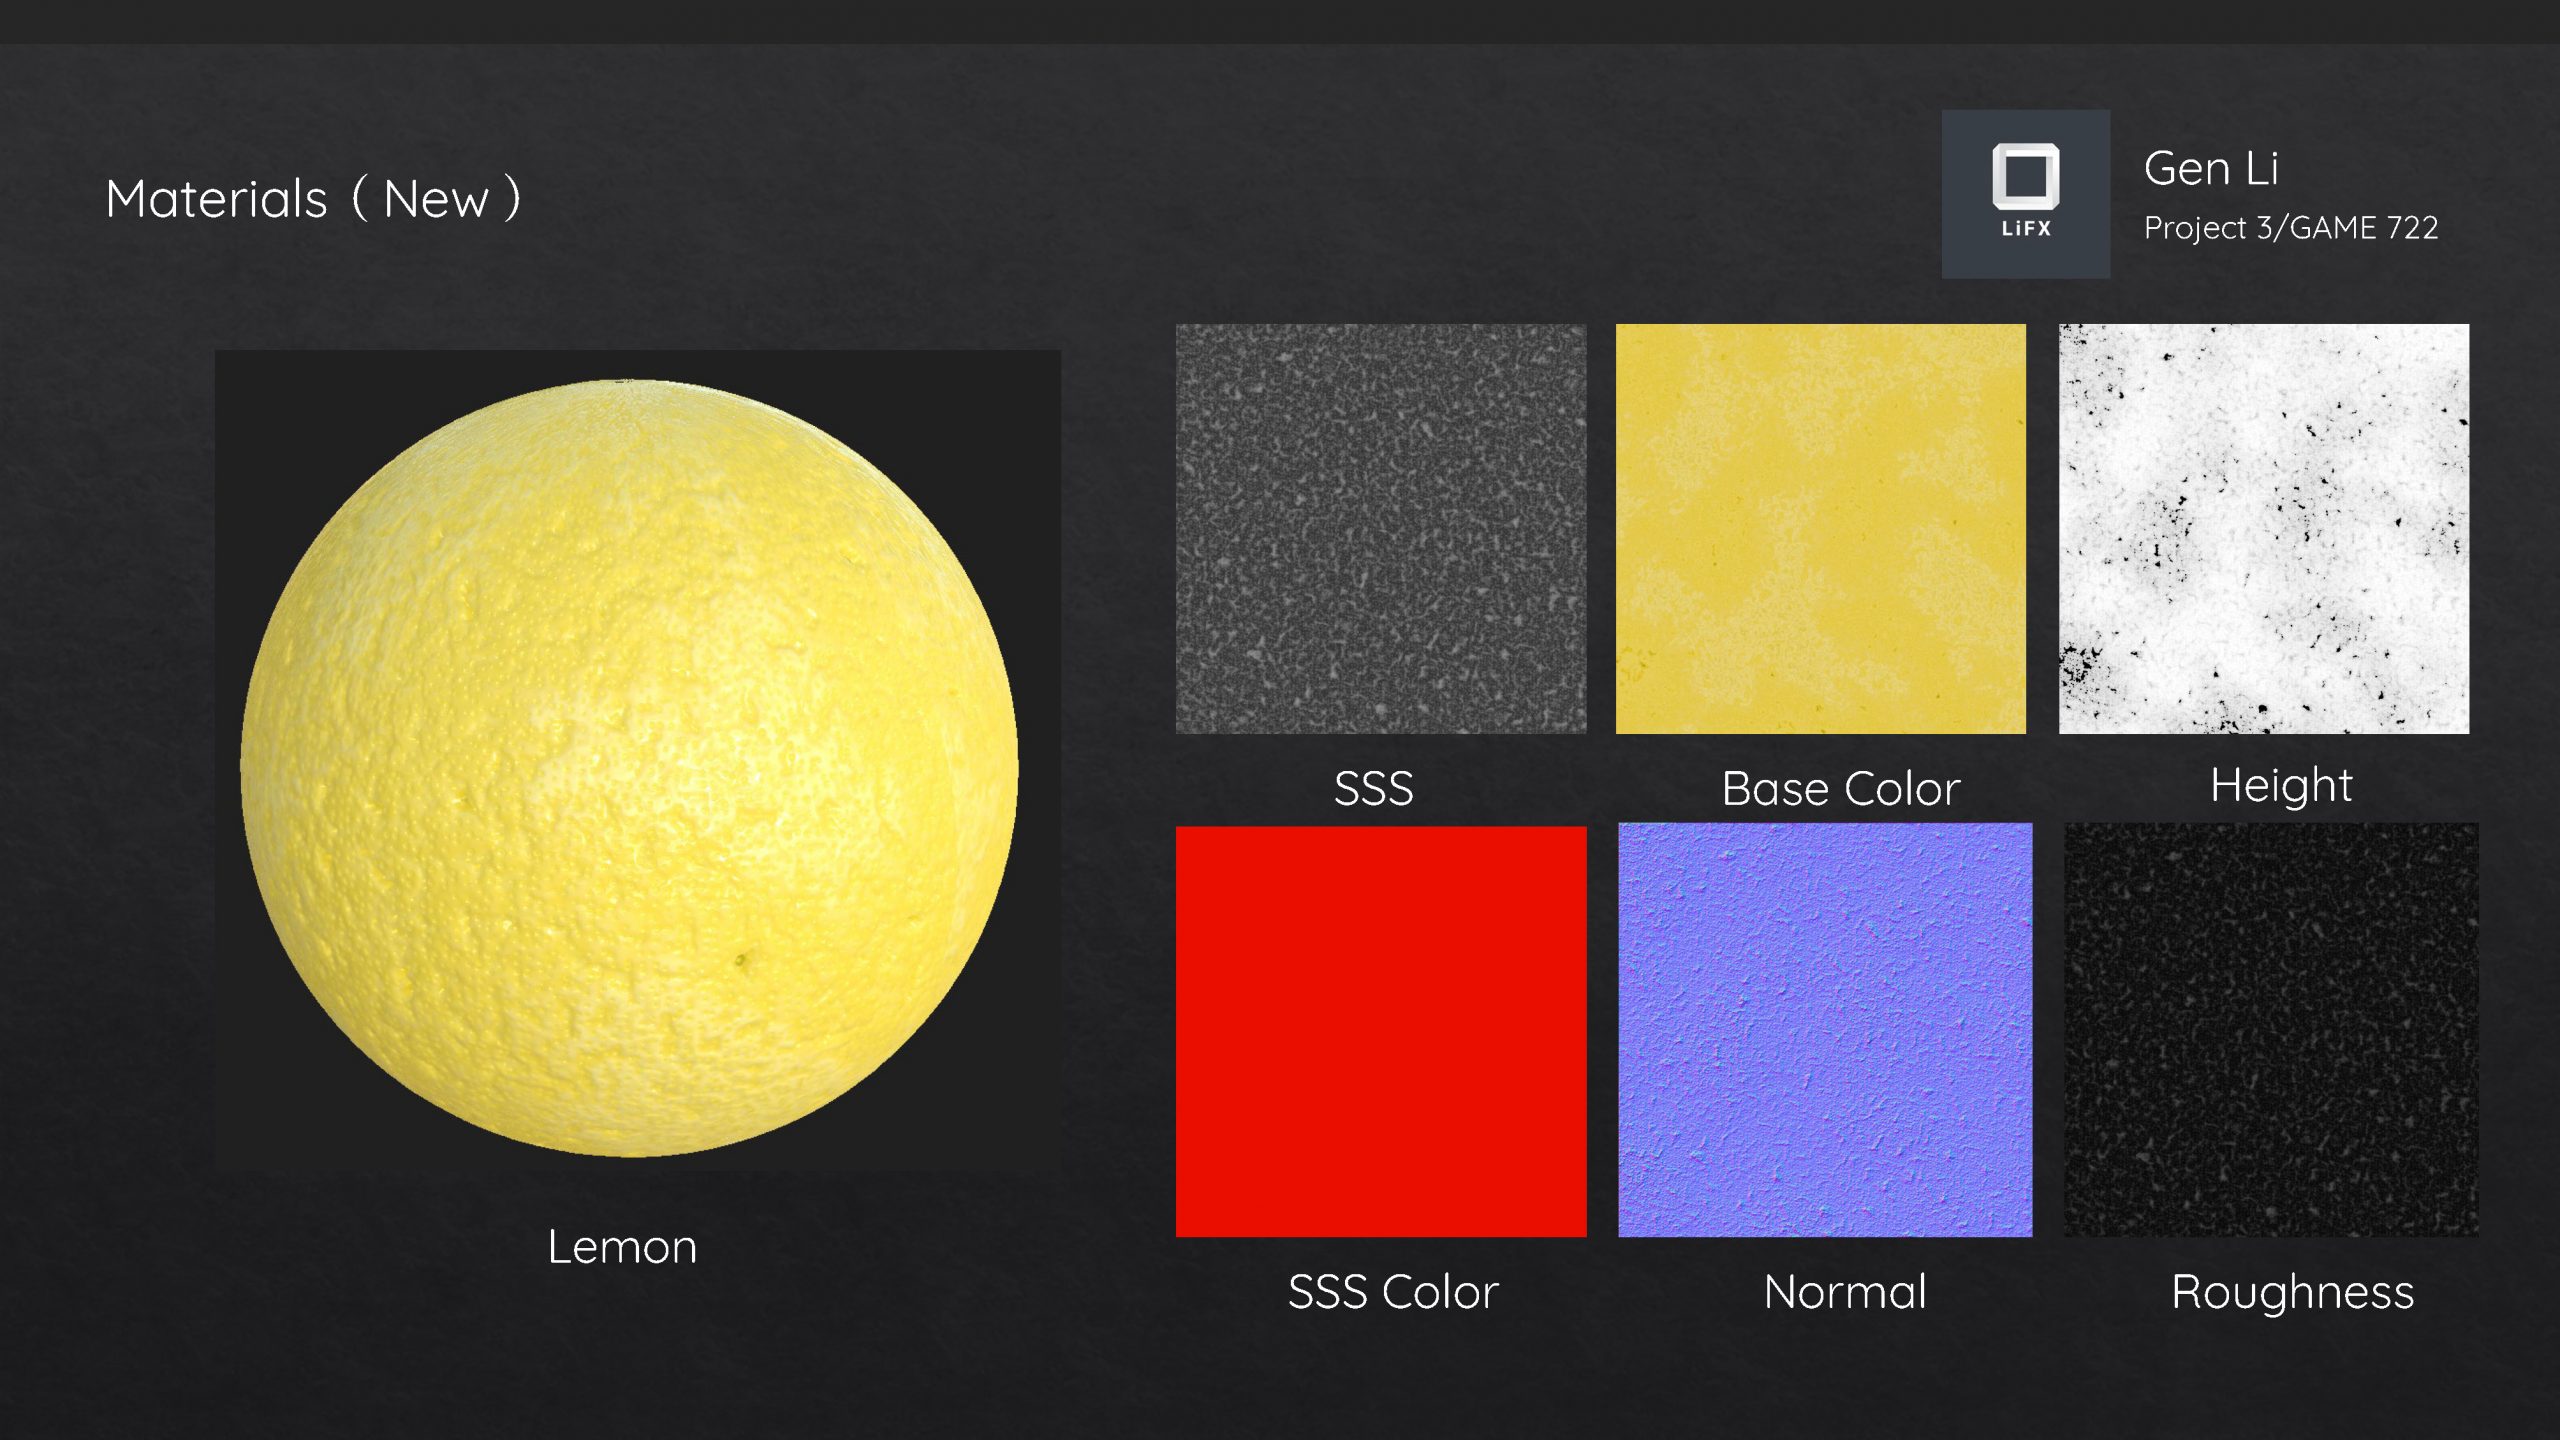
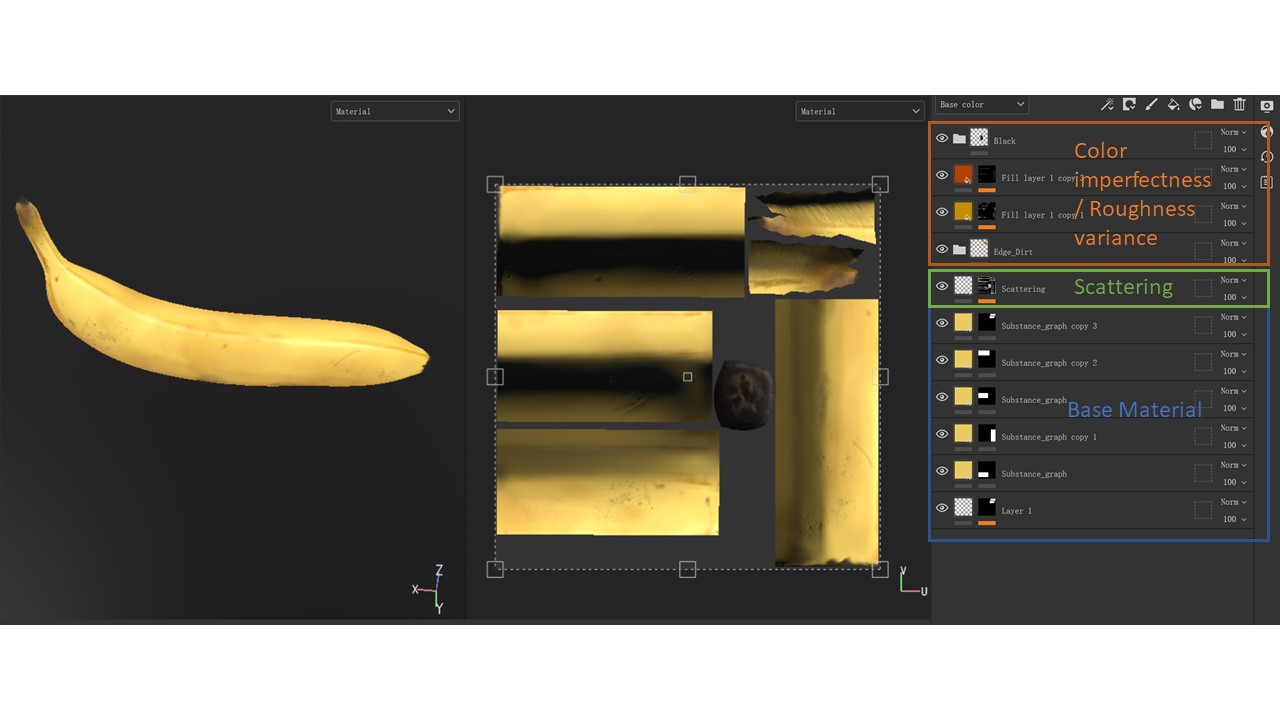
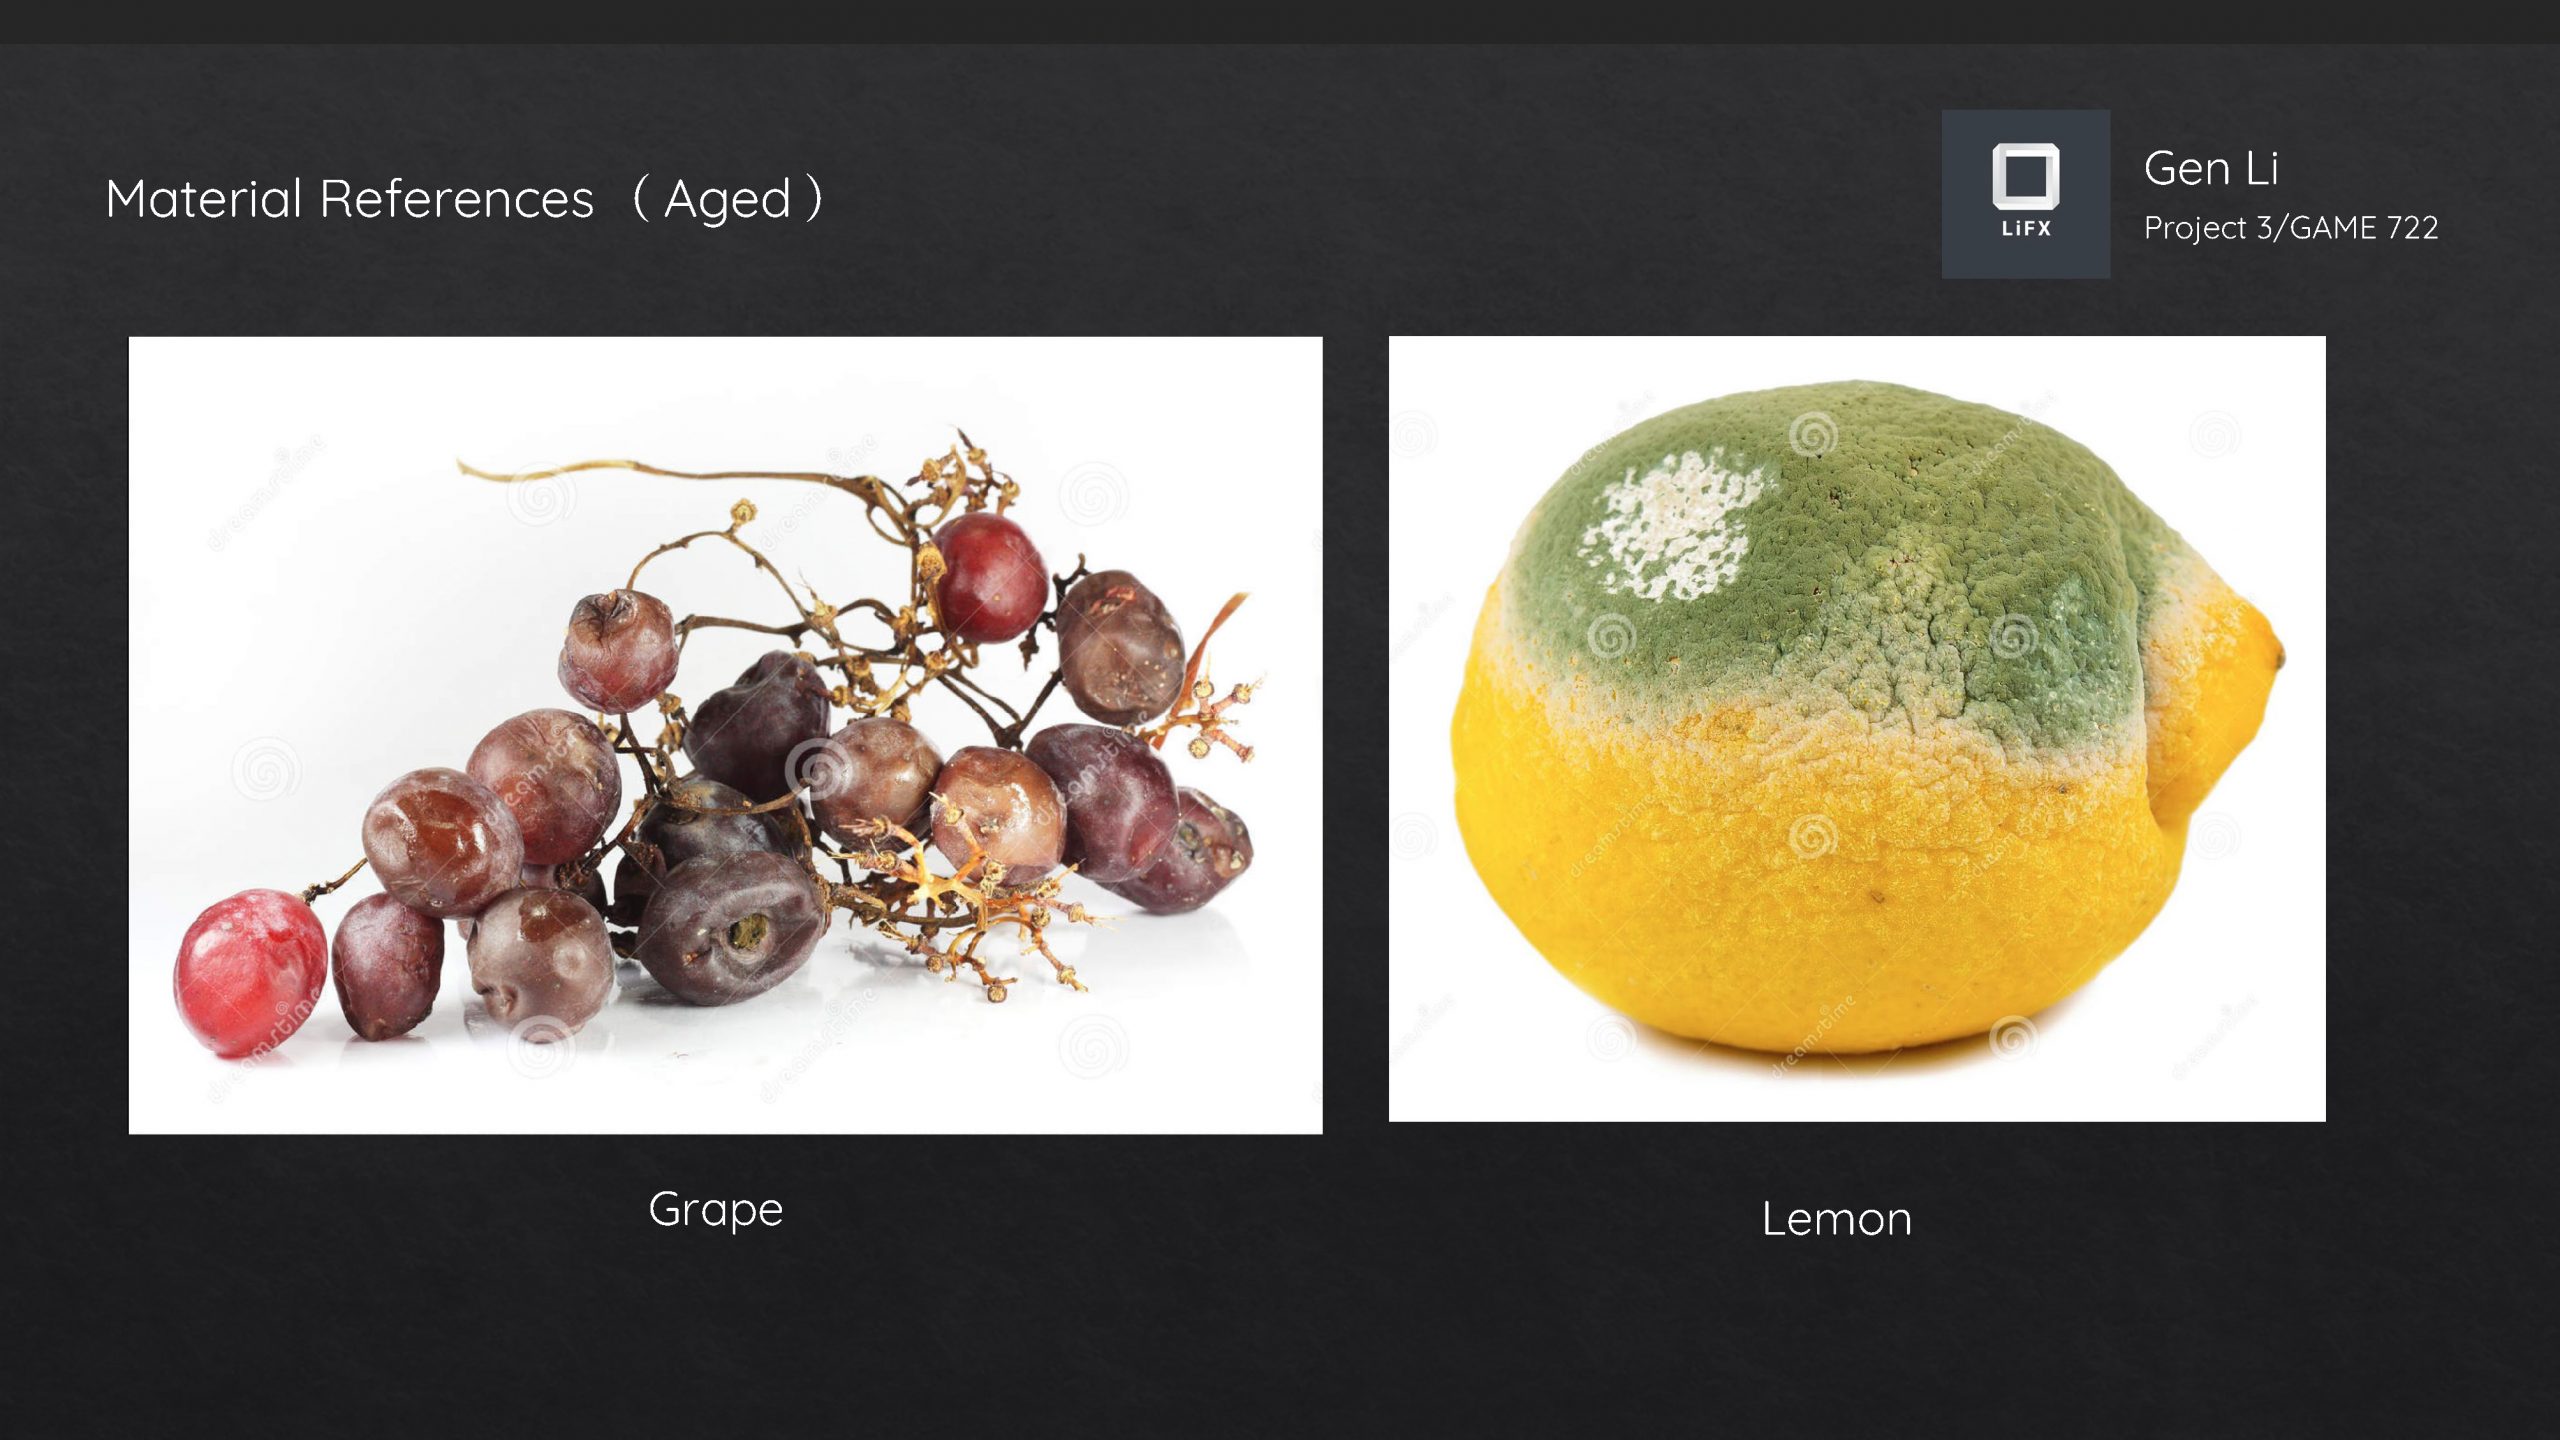
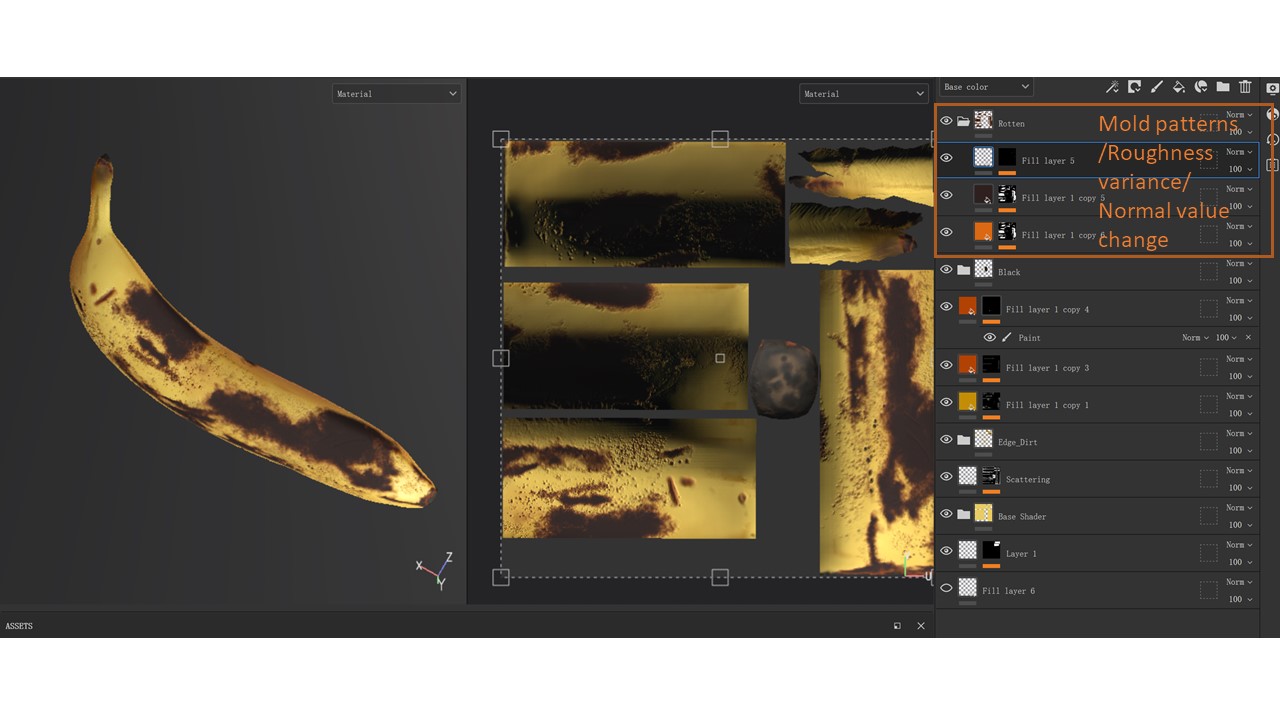
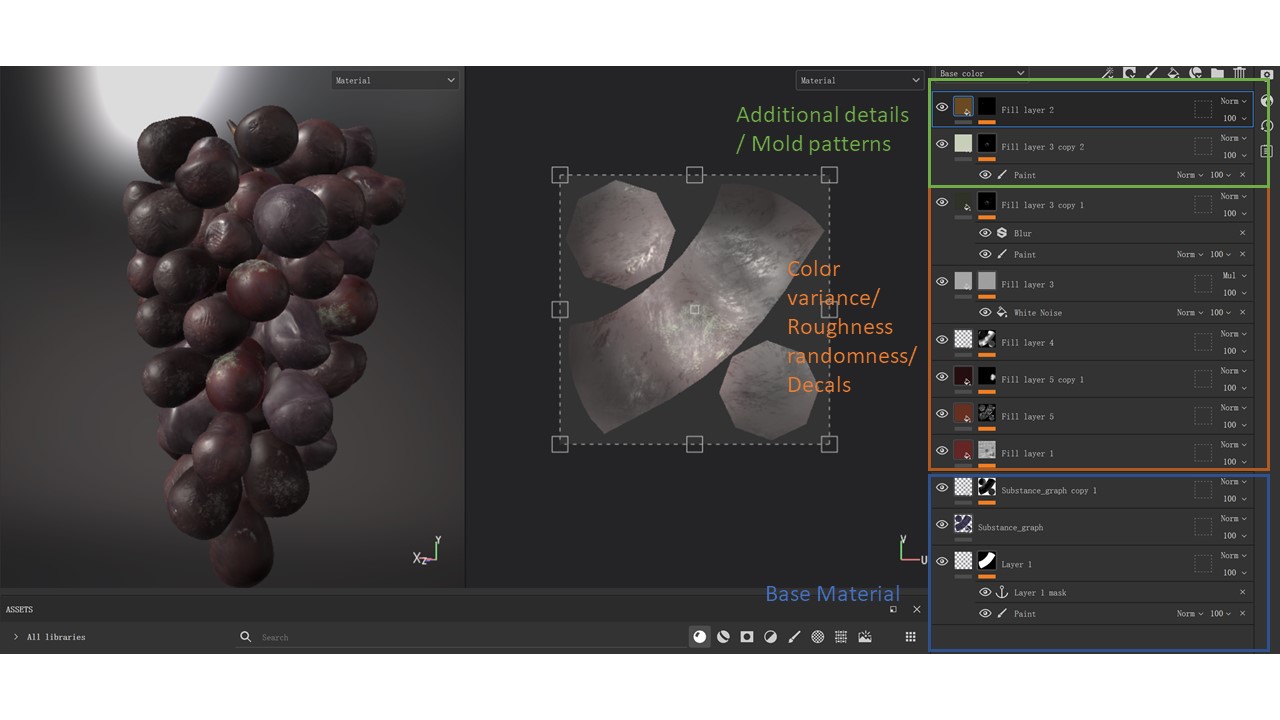
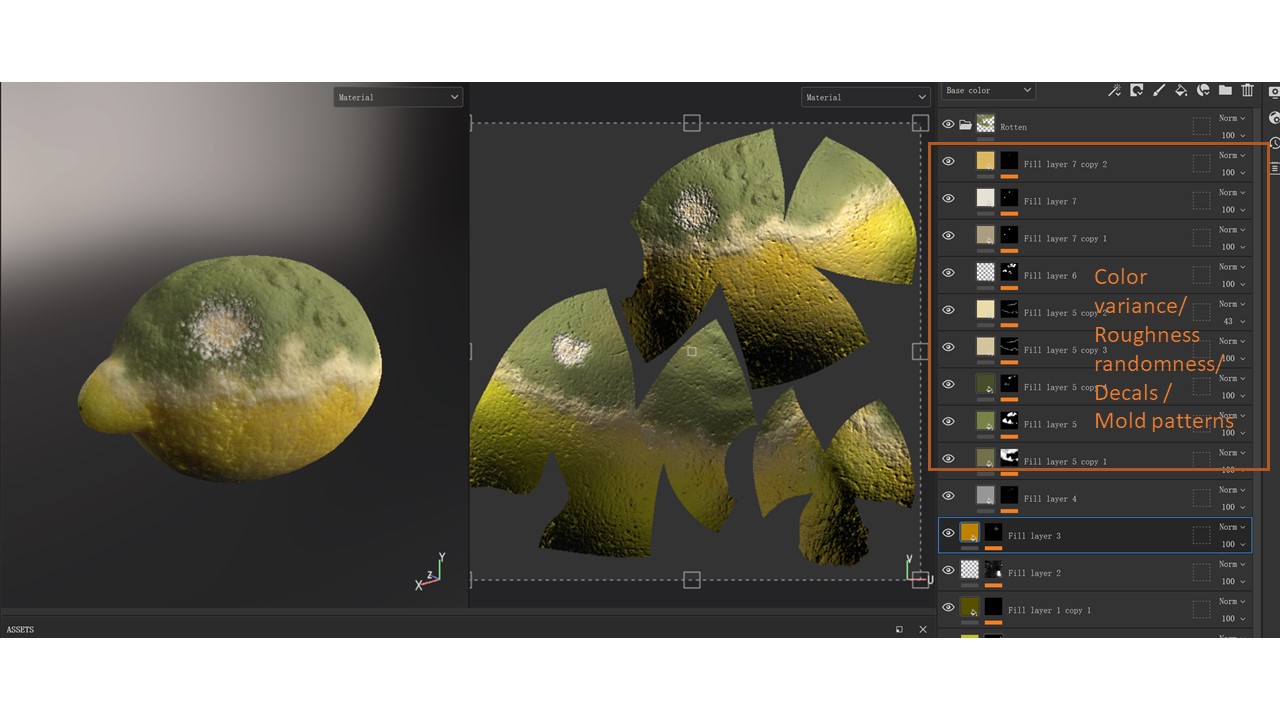
Most bananas have a general bright yellow look at a glance. But if we get closer to the surface, we could notice the stripe details and some imperfectness like dark spots. The roughness value is much higher than the avocado surface in general. One of the references shows a considerable subsurface scattering value under a backlighting condition for the grapes. A large roughness value change can be discovered in every grape unit, and imperfectness such as white spots and dust layer is also displayed in other reference pictures. For lemons, the surface has a general dot noise formulating a shrinky shape, and the roughness value is lower than a fresh banana in total. Some area shows a light green color because of the unfinished ripening process.
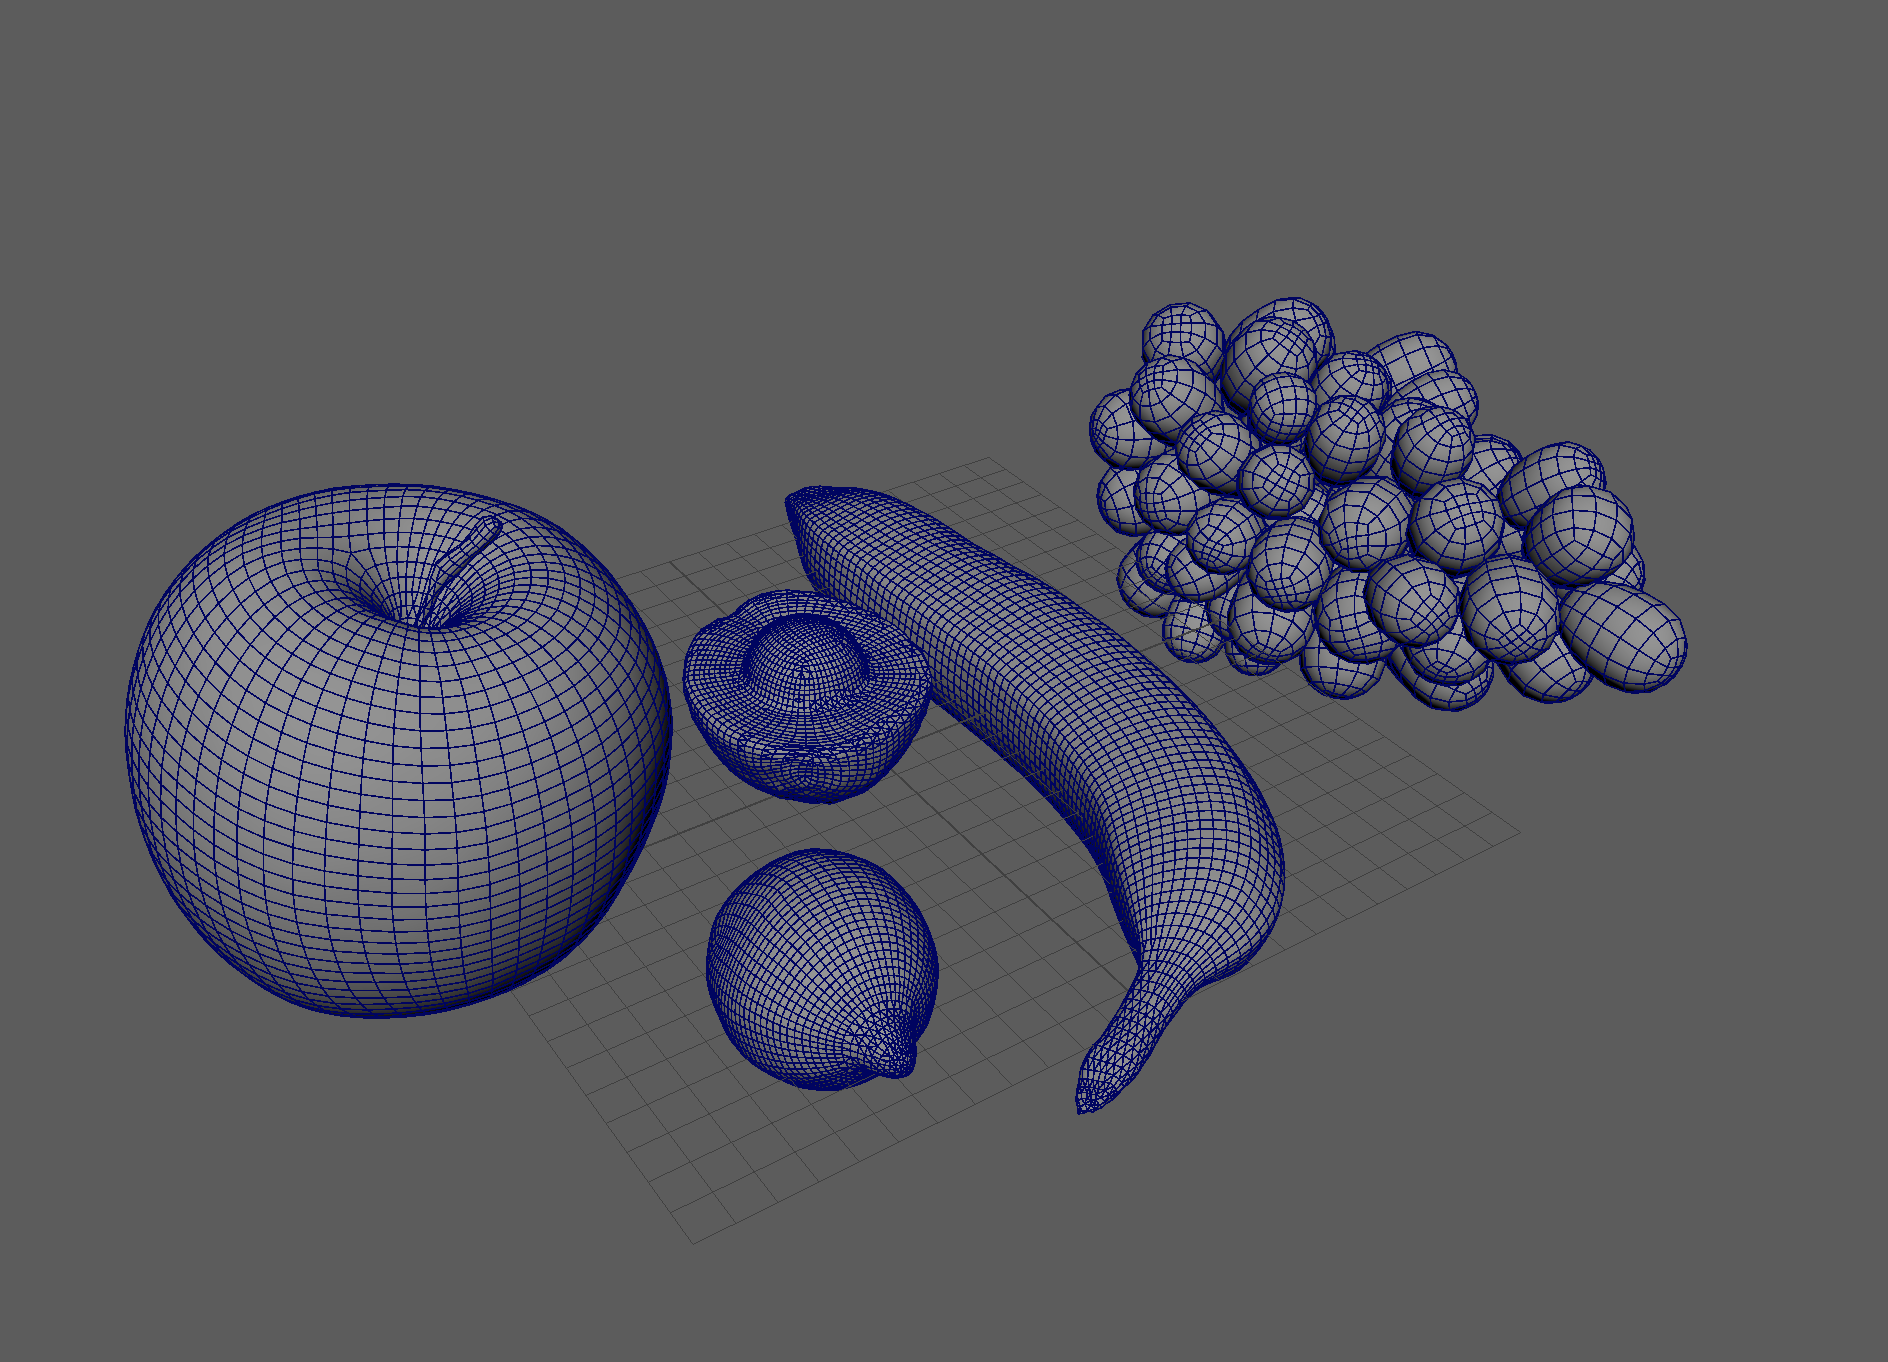
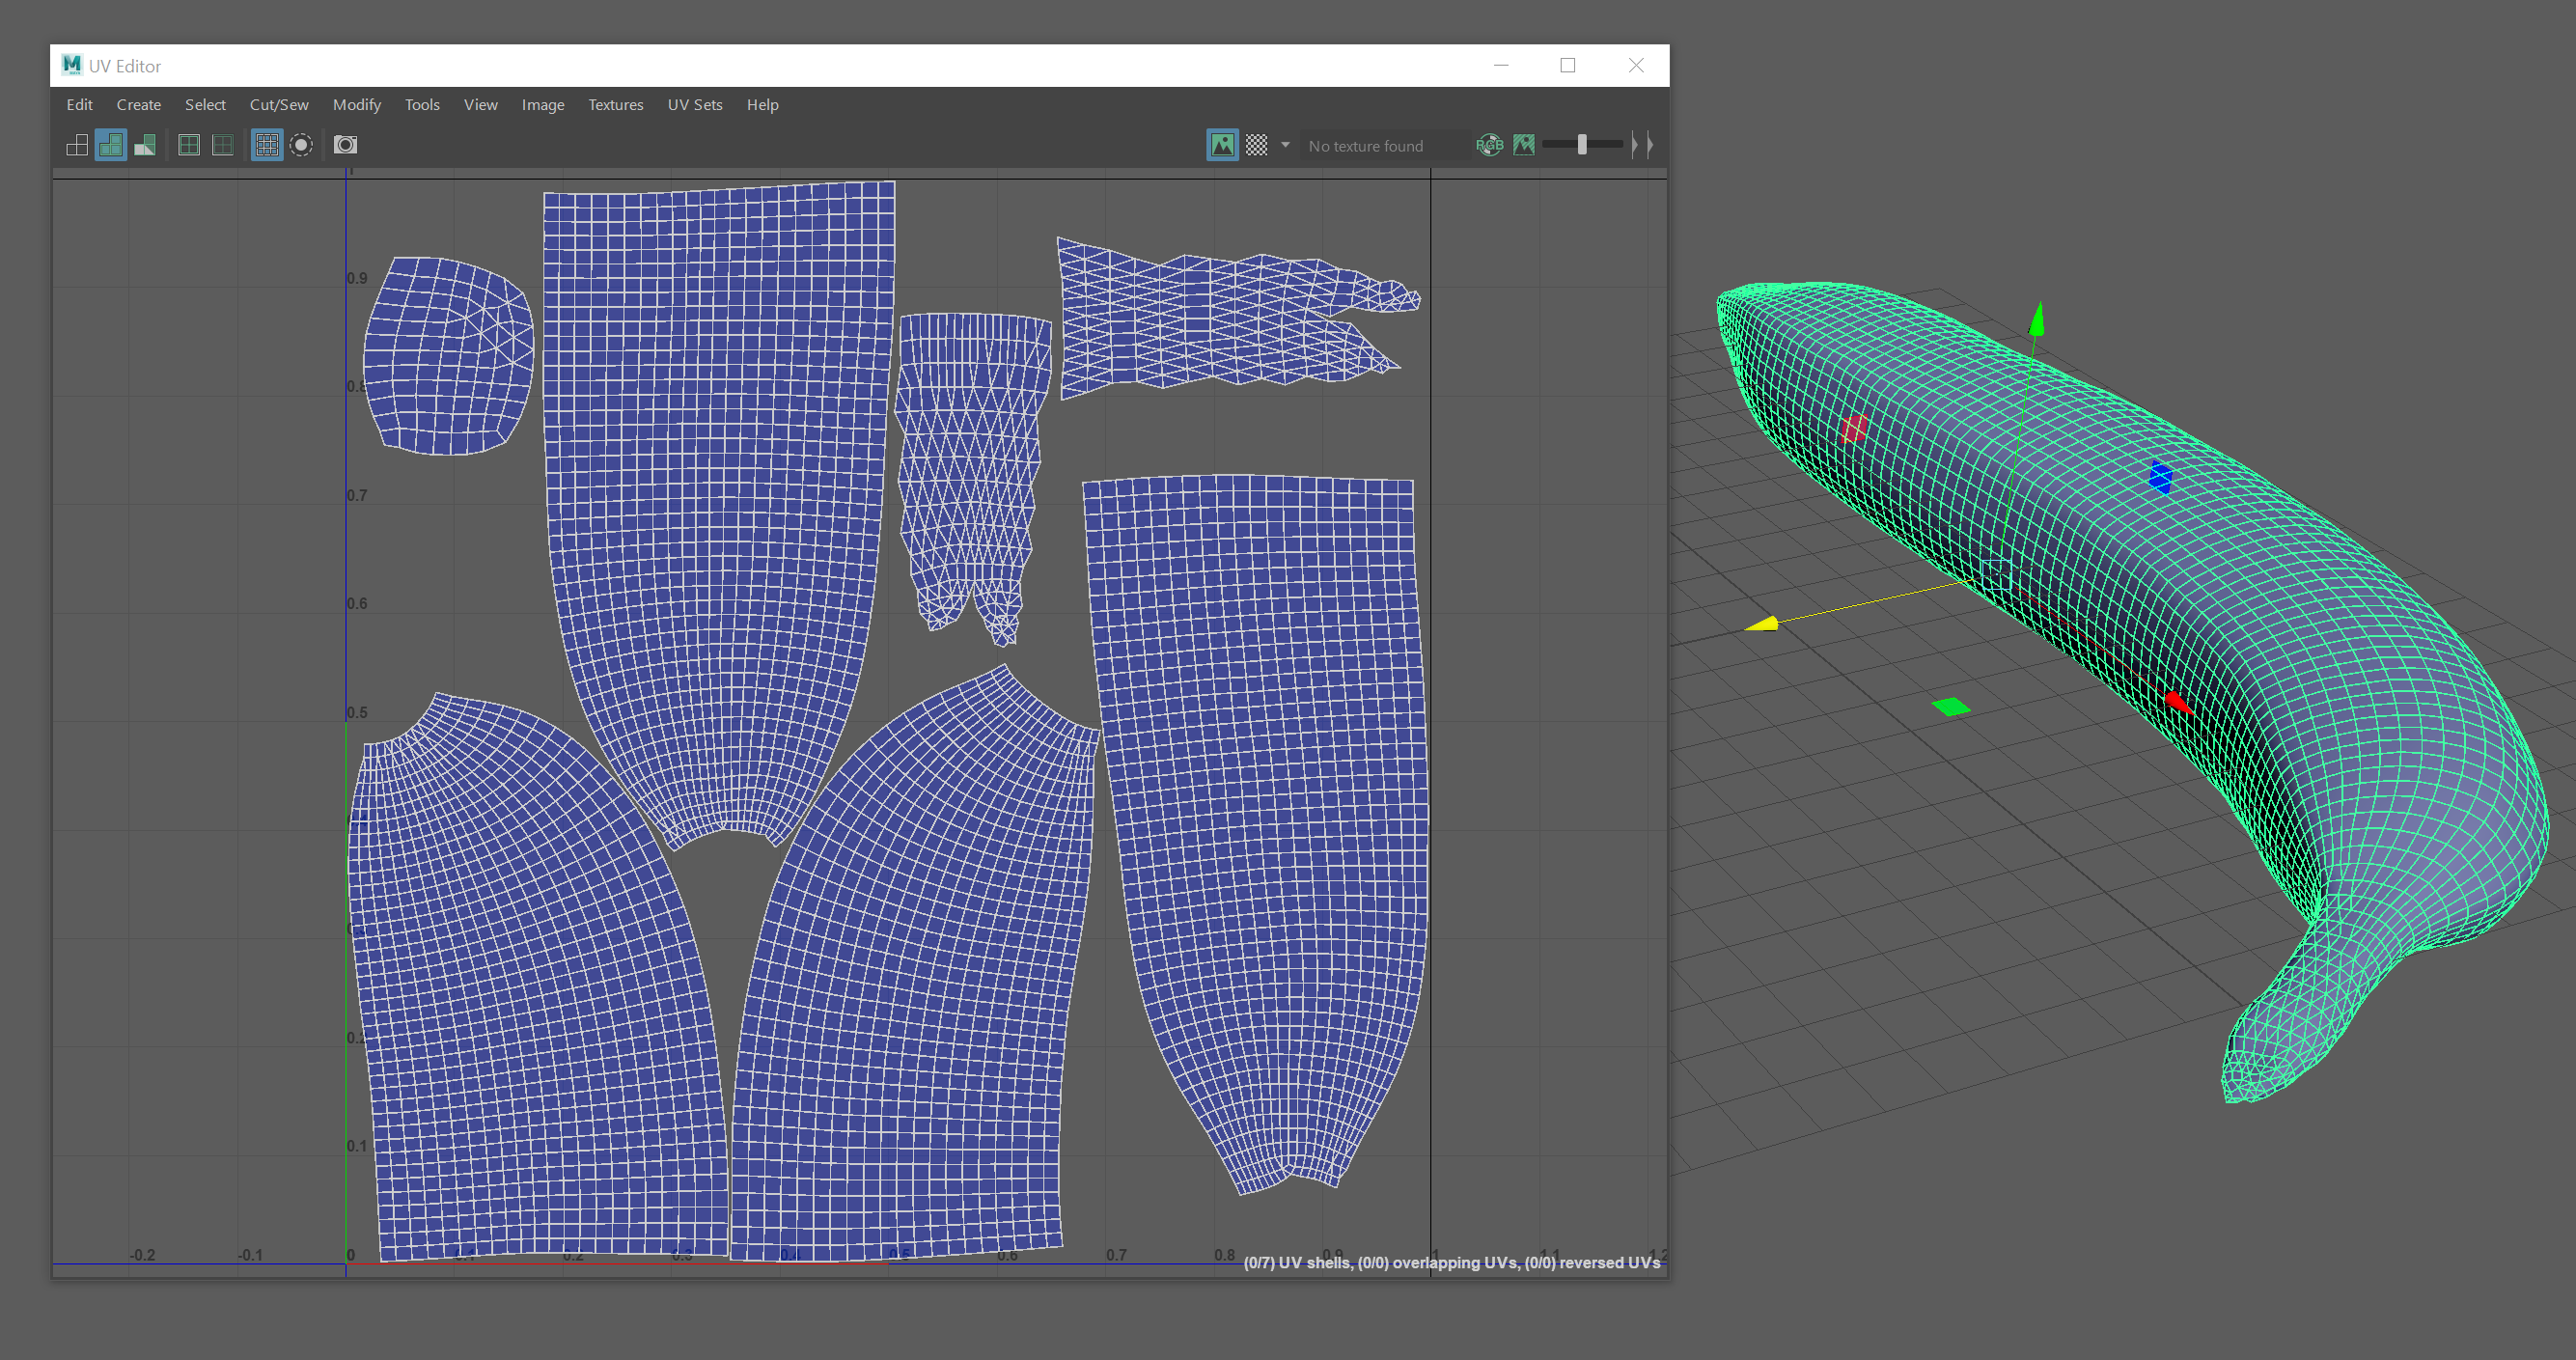
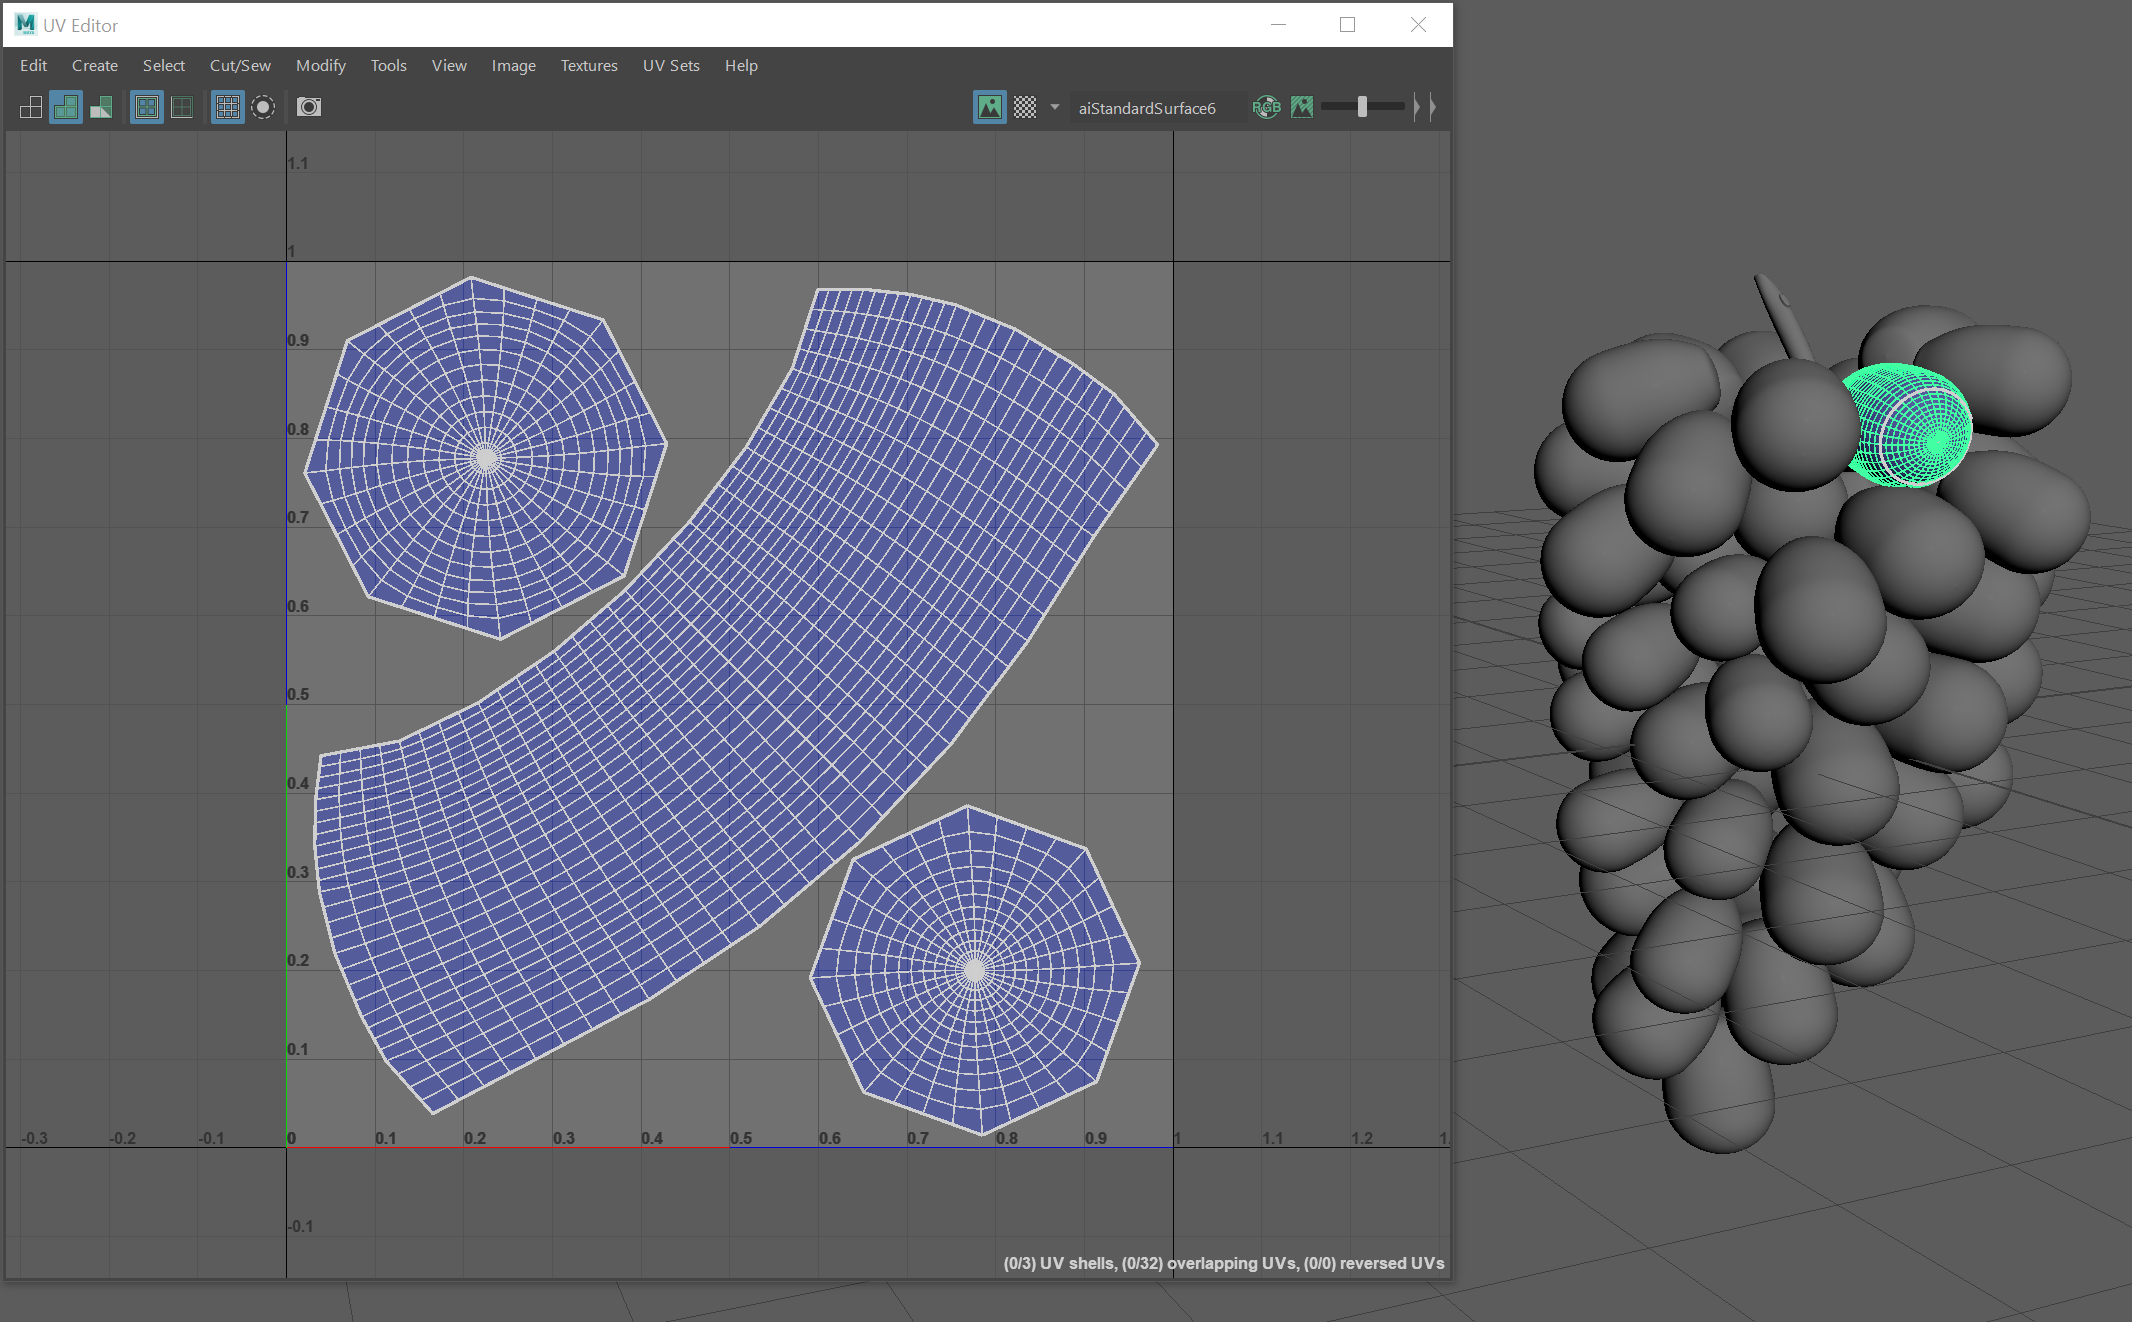
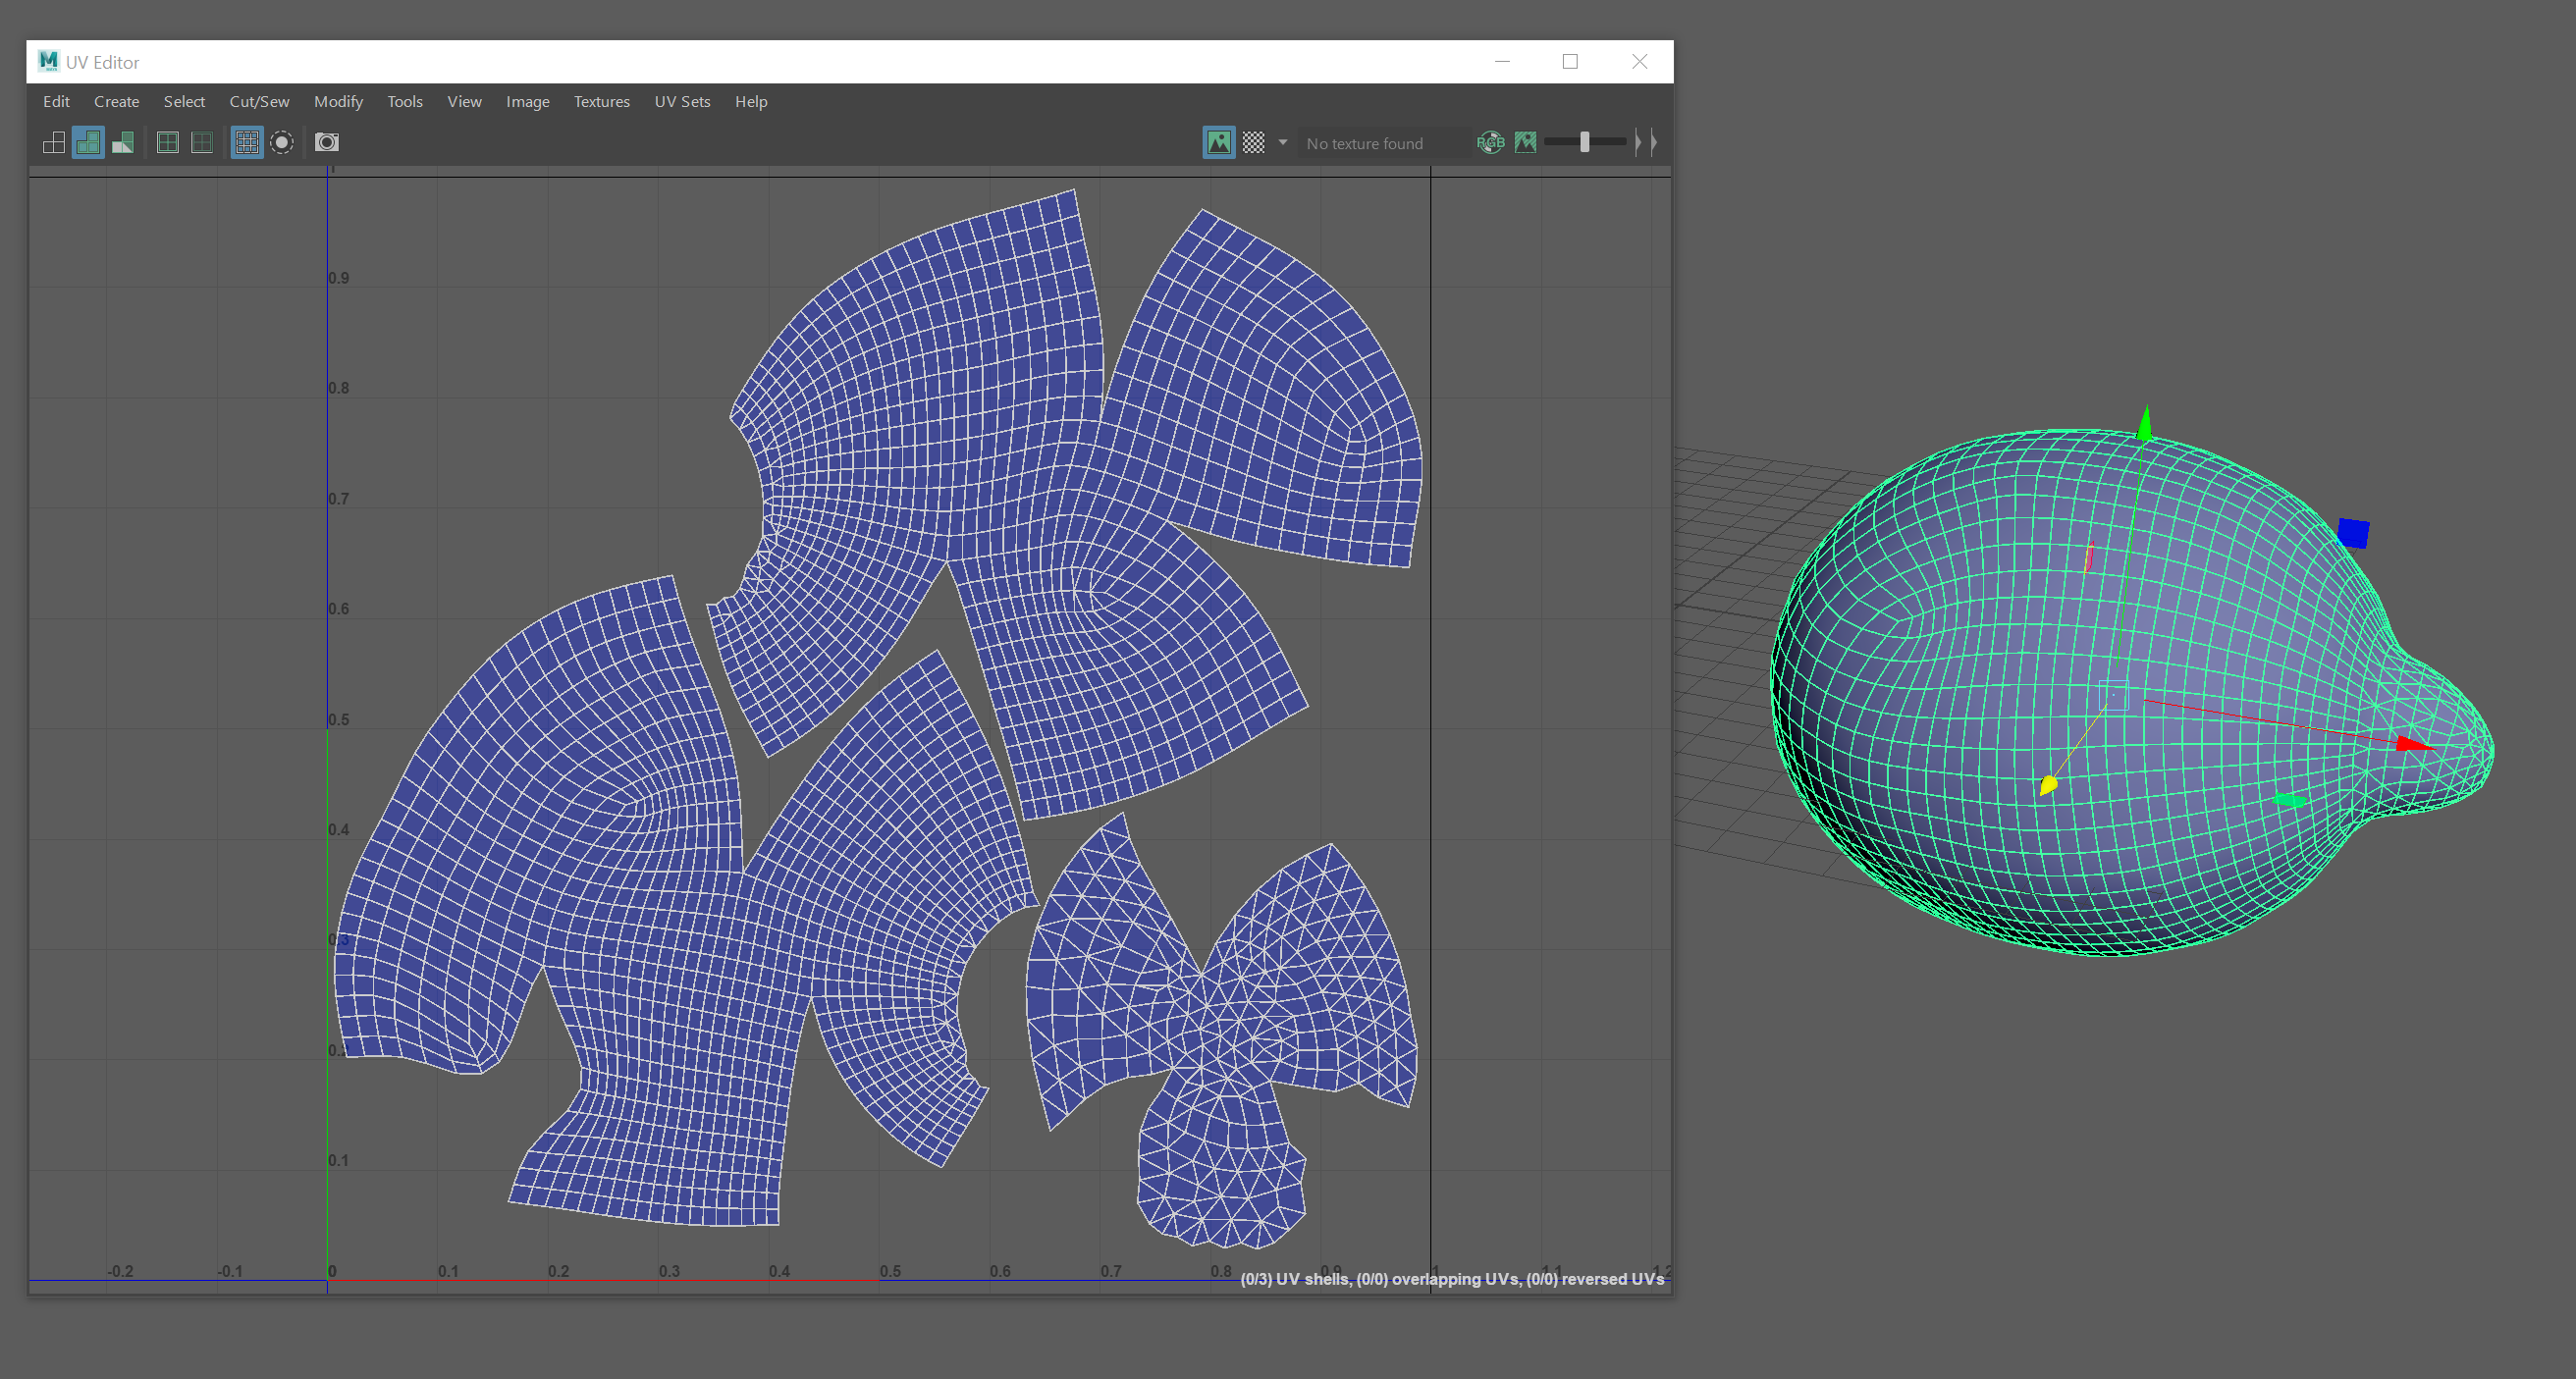
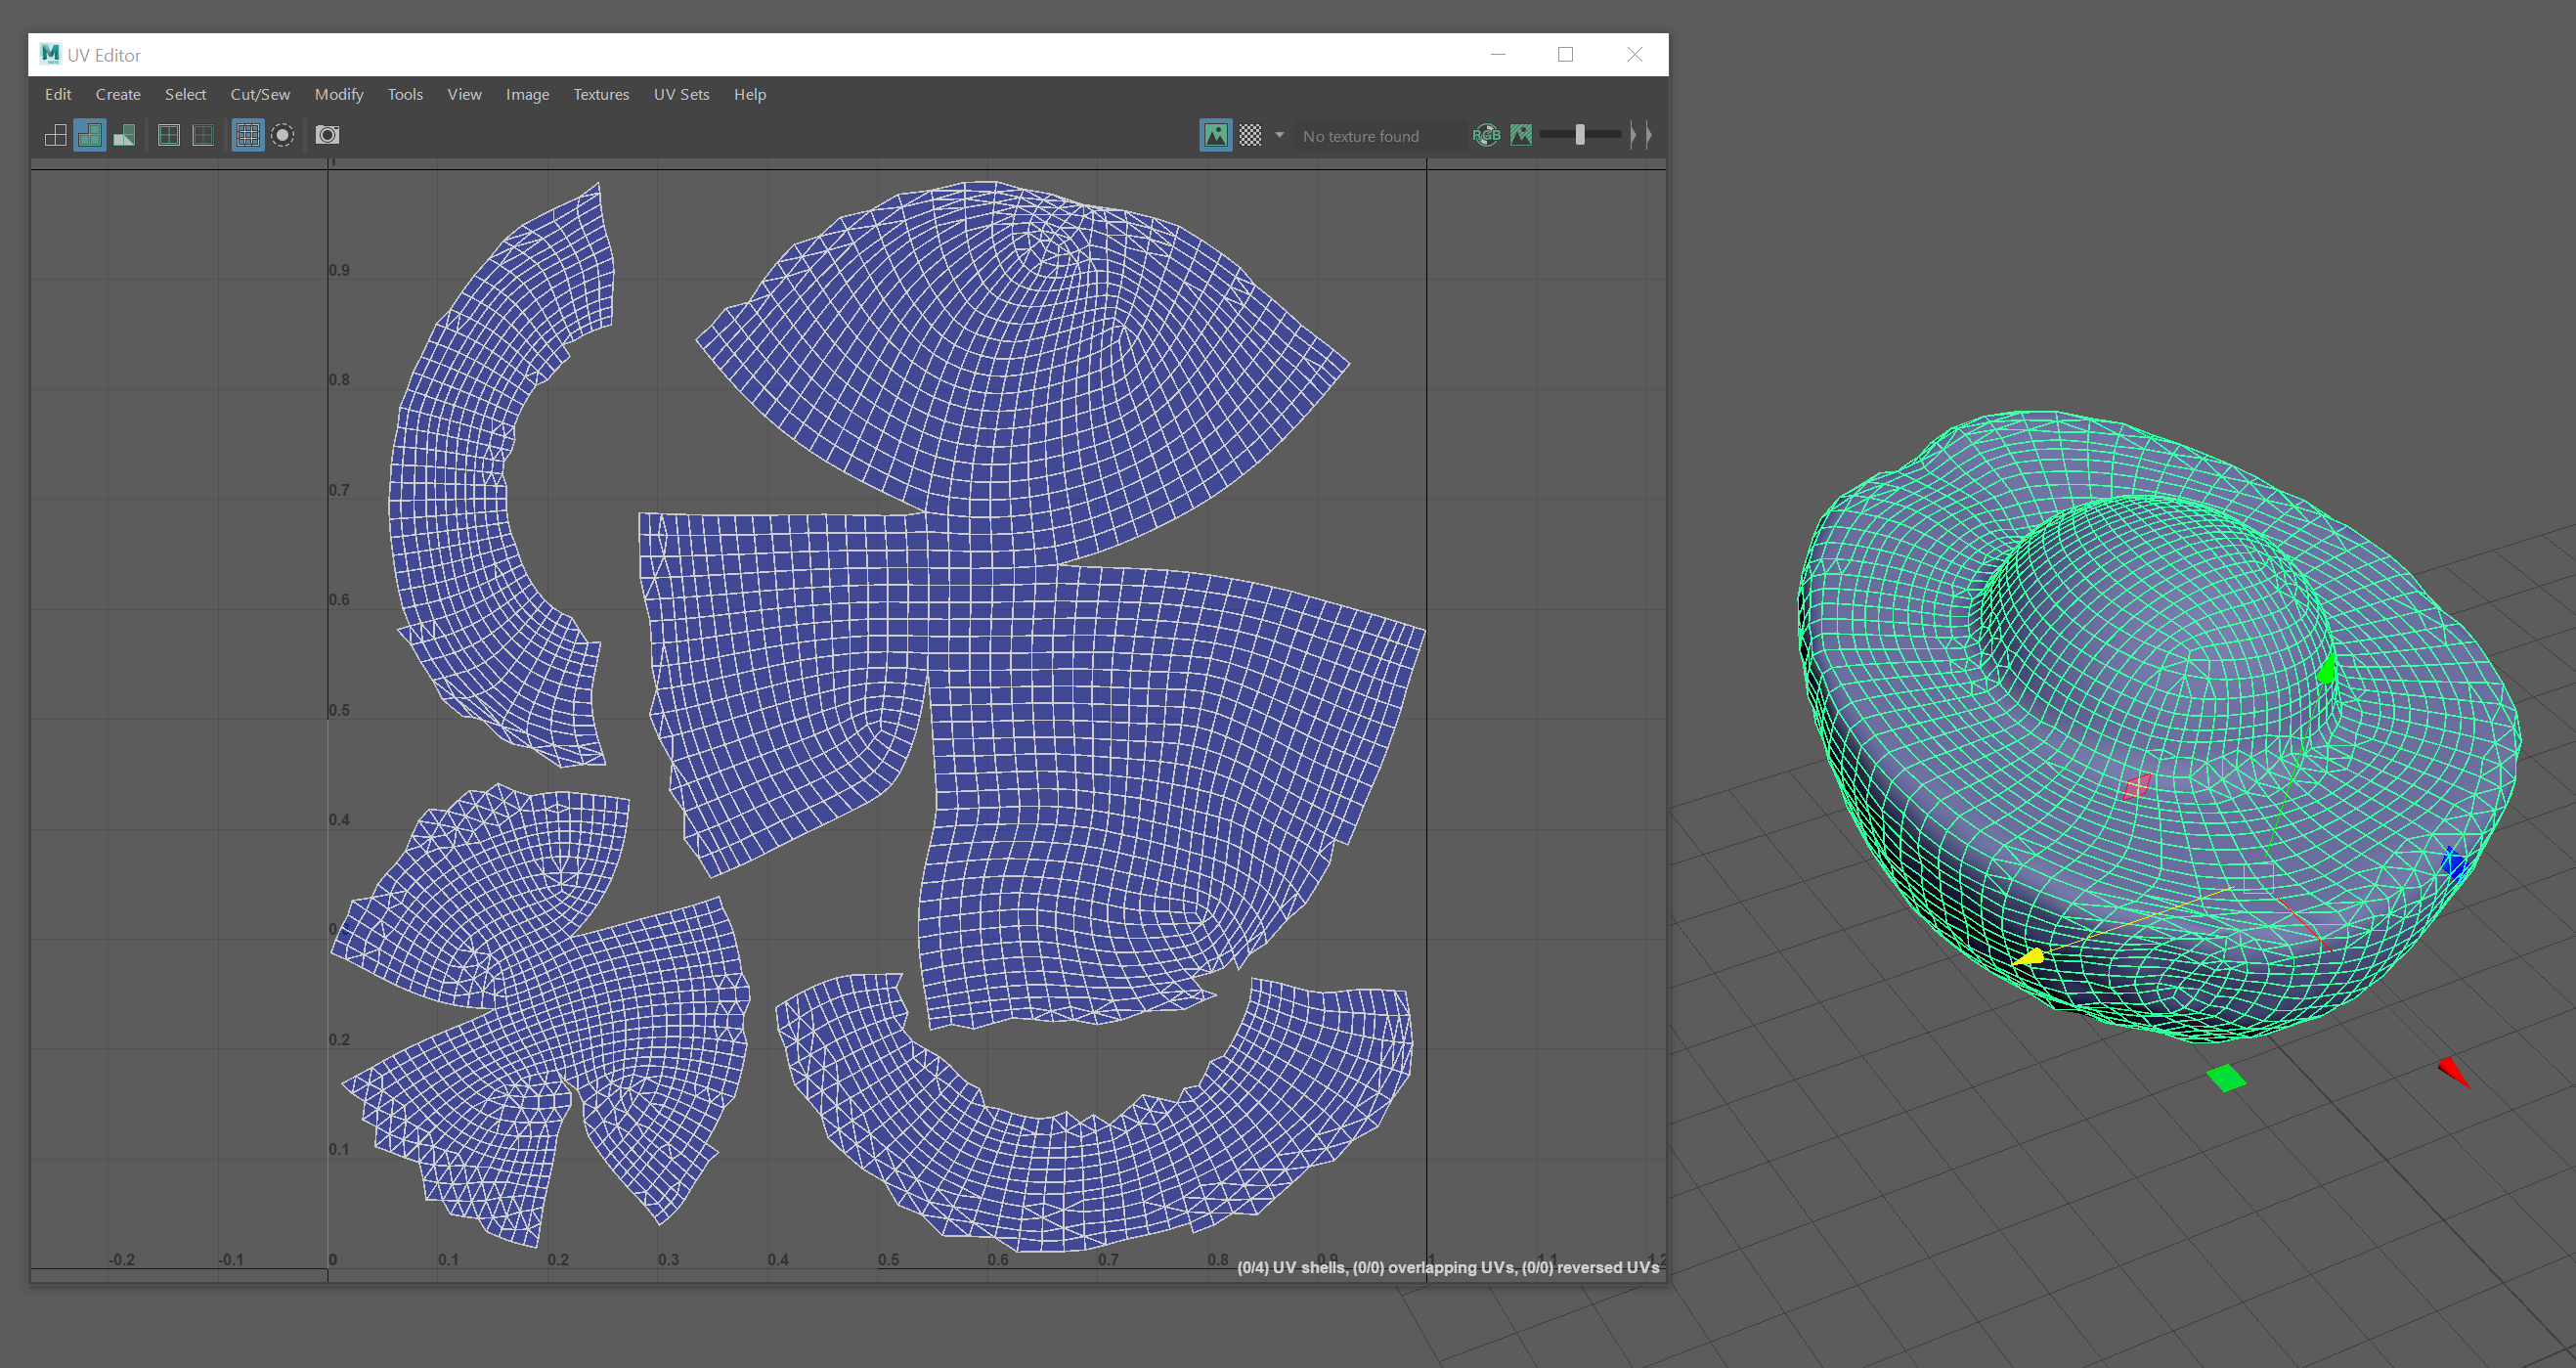
The 3d models used in this project are from Quixel Megascan mainly. Since their assets are optimized primarily for games and the topology of those models is not quad in general. I have reimported them into Houdini and retopo them into quads for texture painting purposes. Furthermore, all the models are UV mapped using UV layout, which is very convenient to use for beginners. The only thing is that each grape unit shares a similar UV for better texture density rather than unfolding them in a single UV shell area. (Usually from 0 to 1)
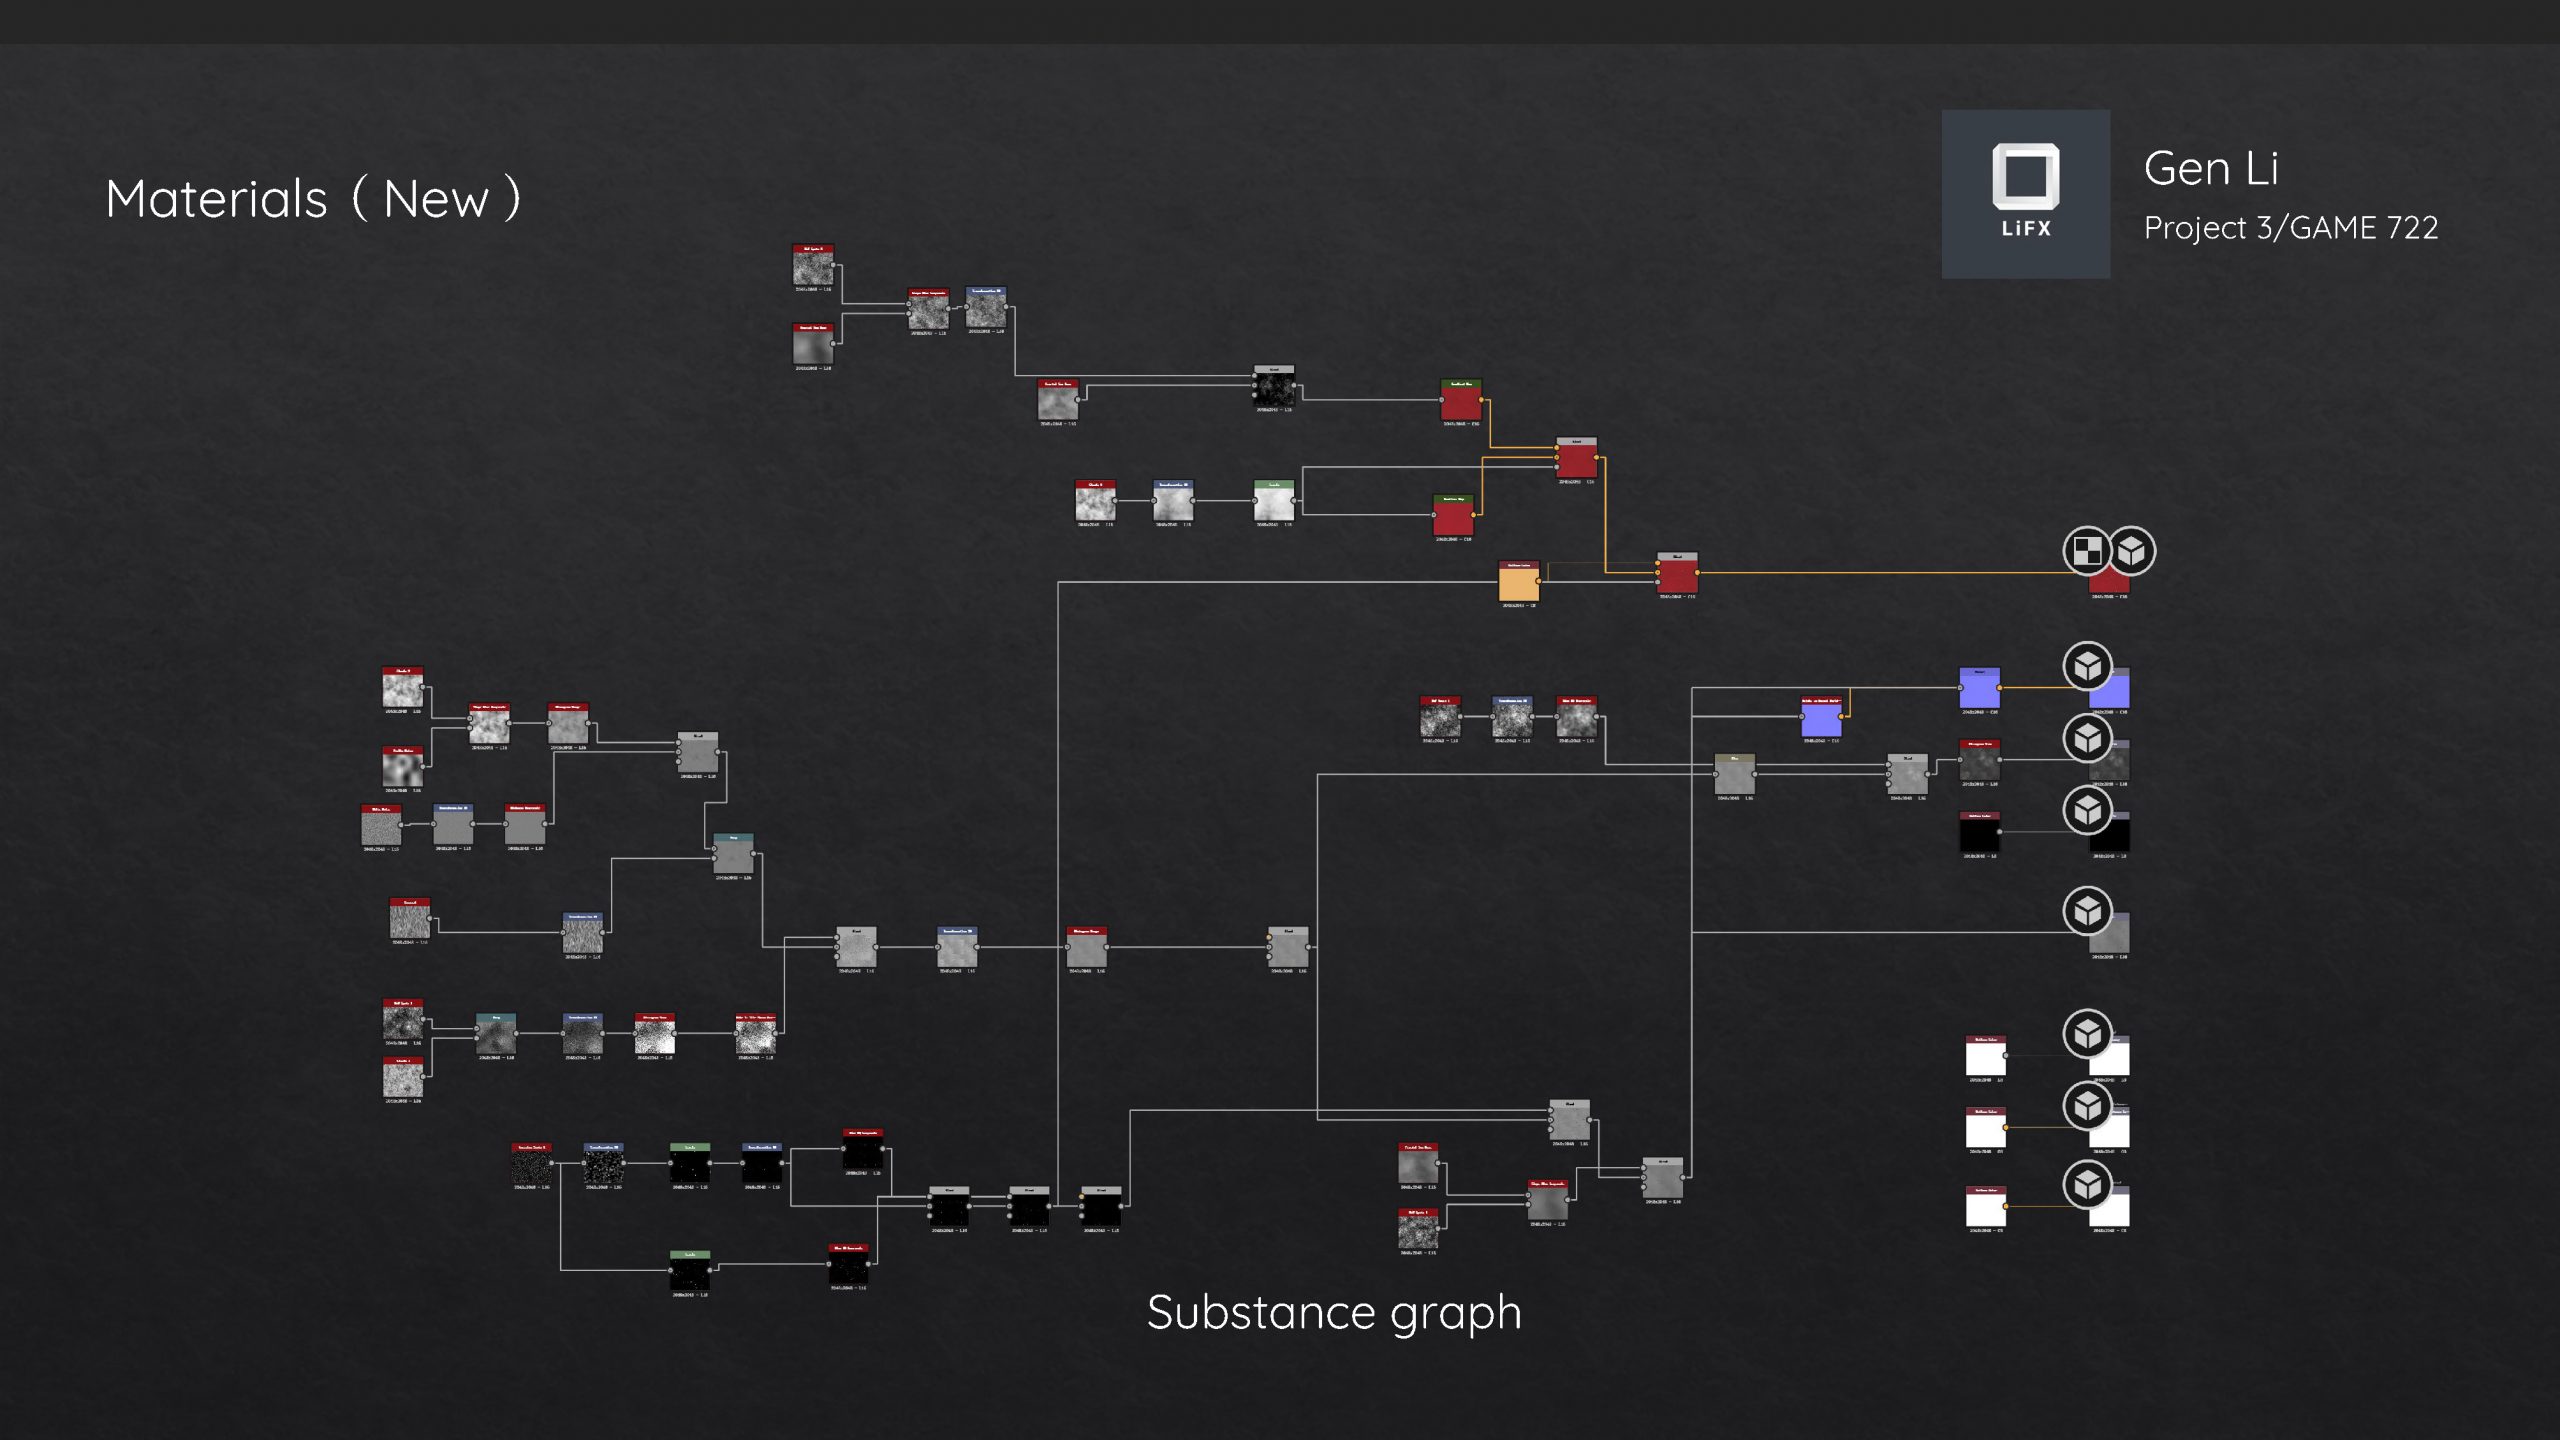
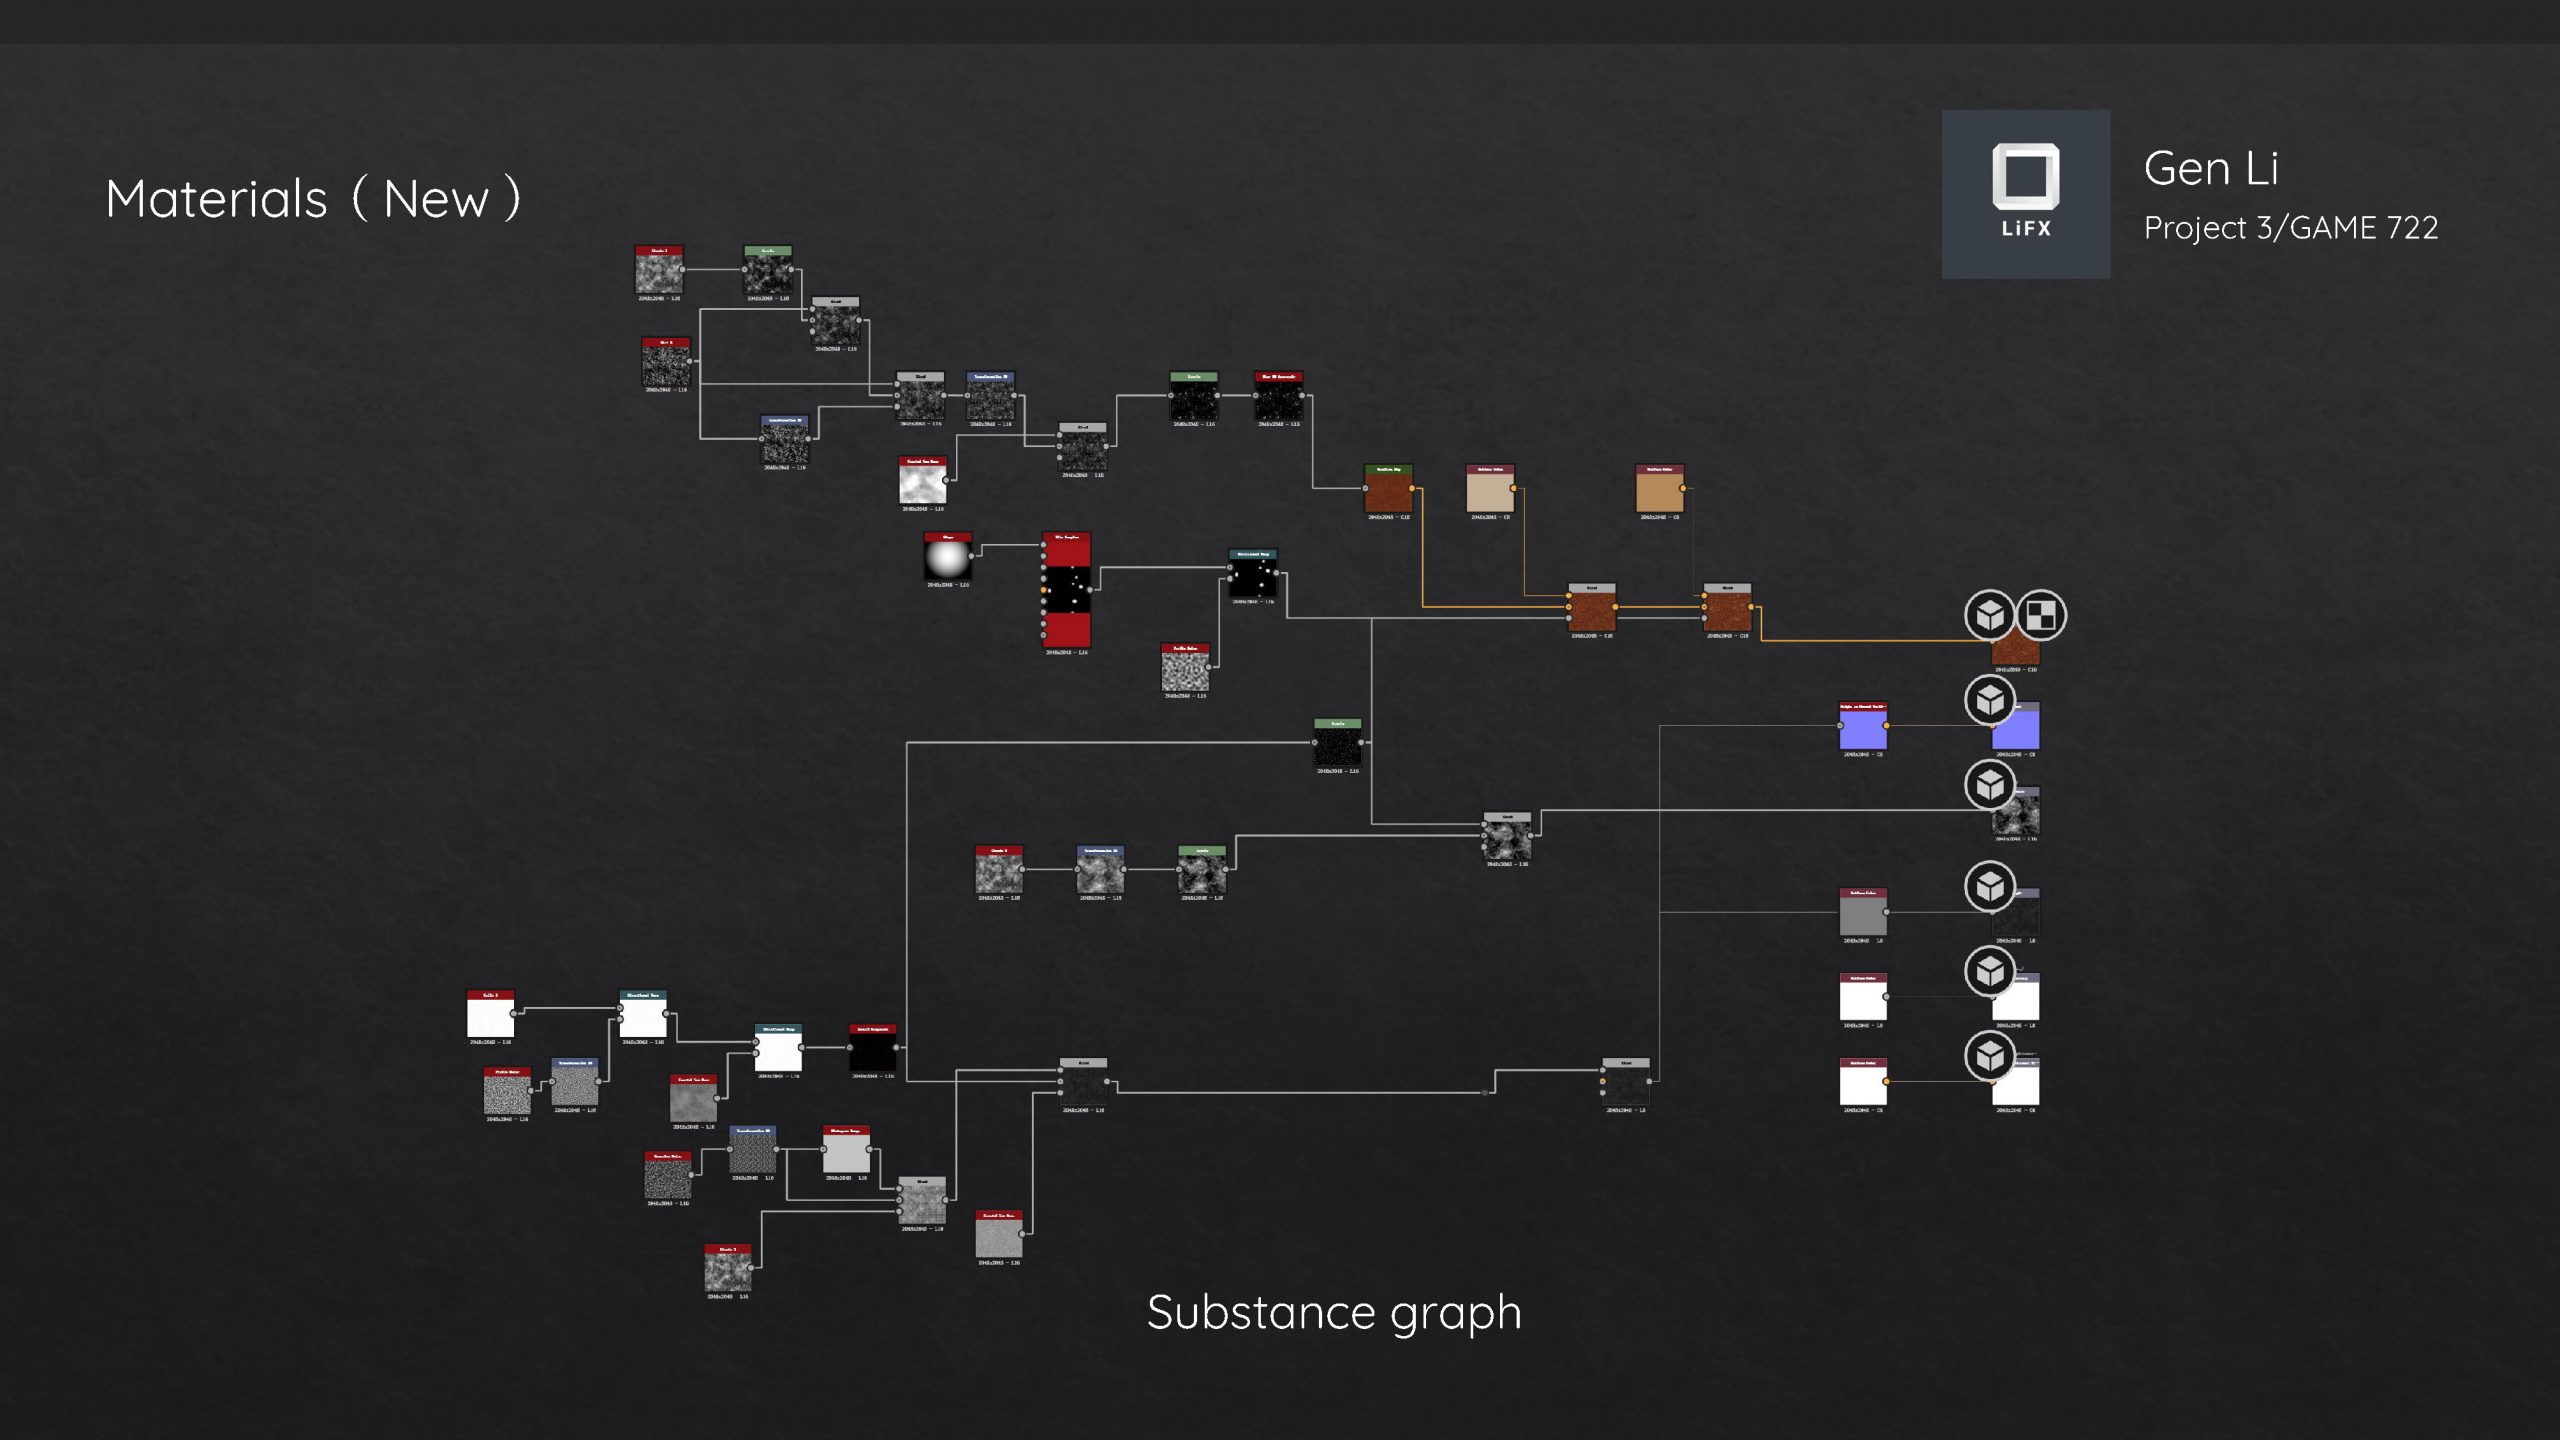
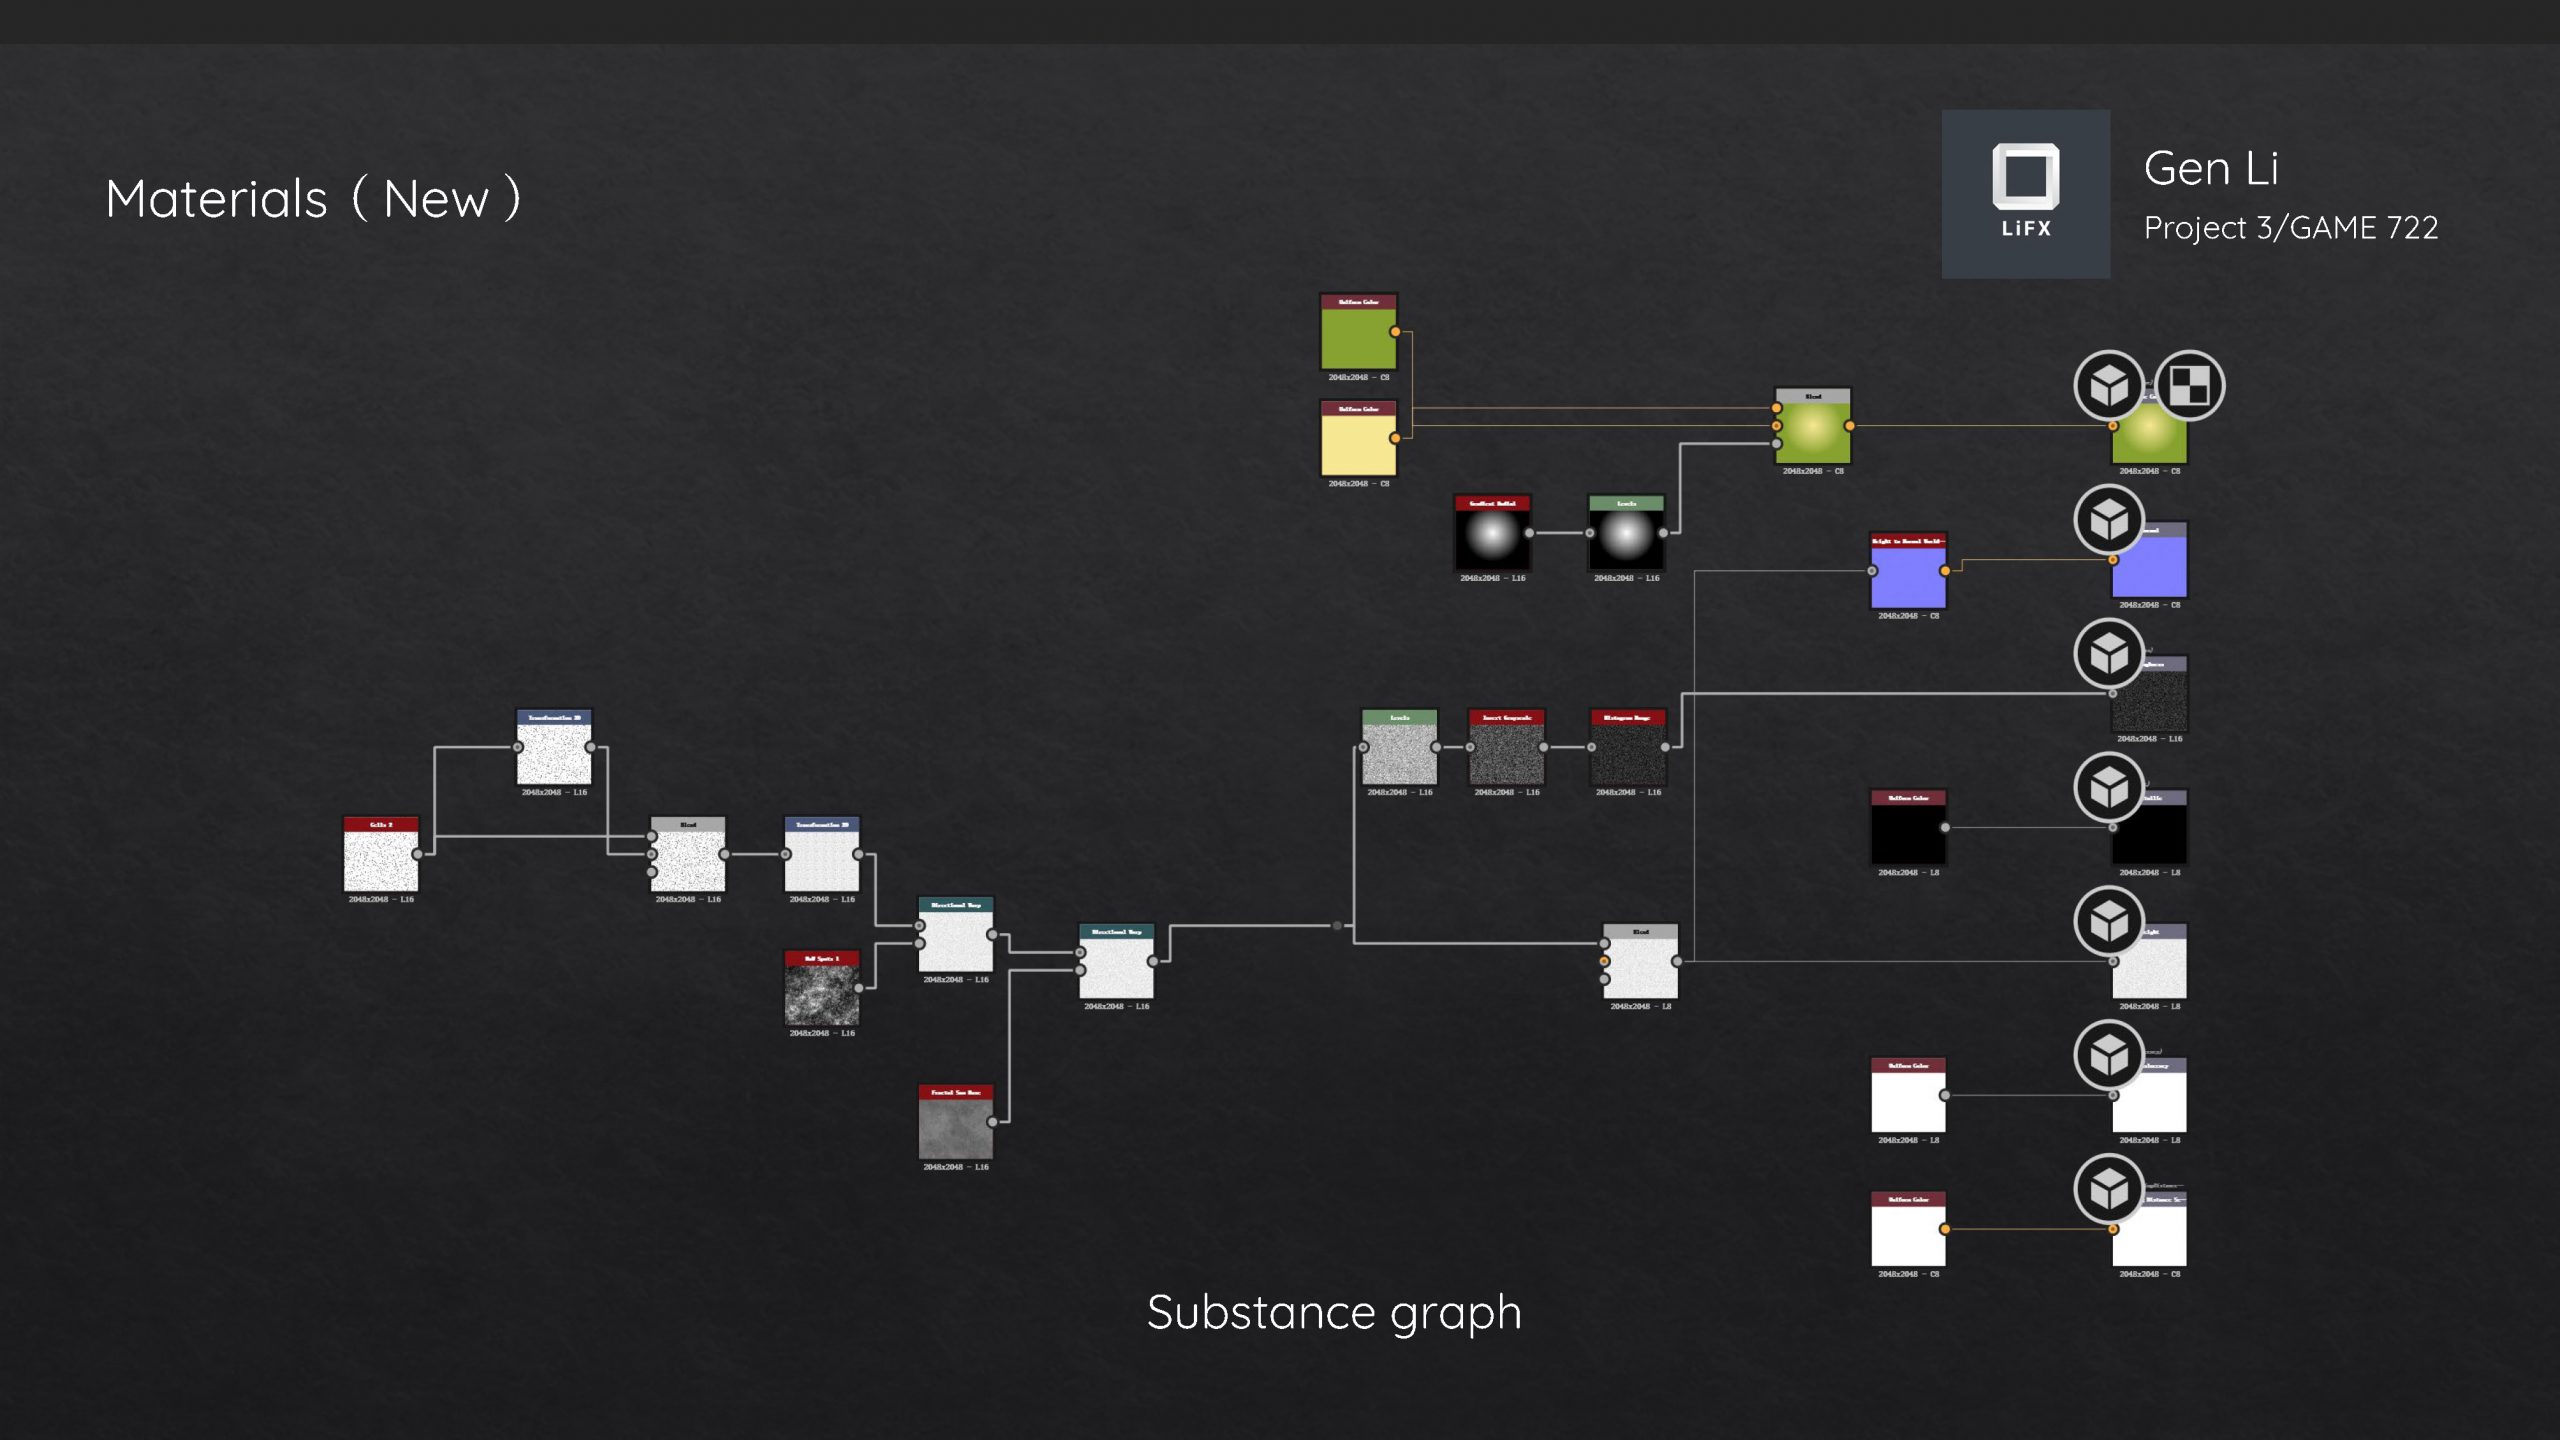
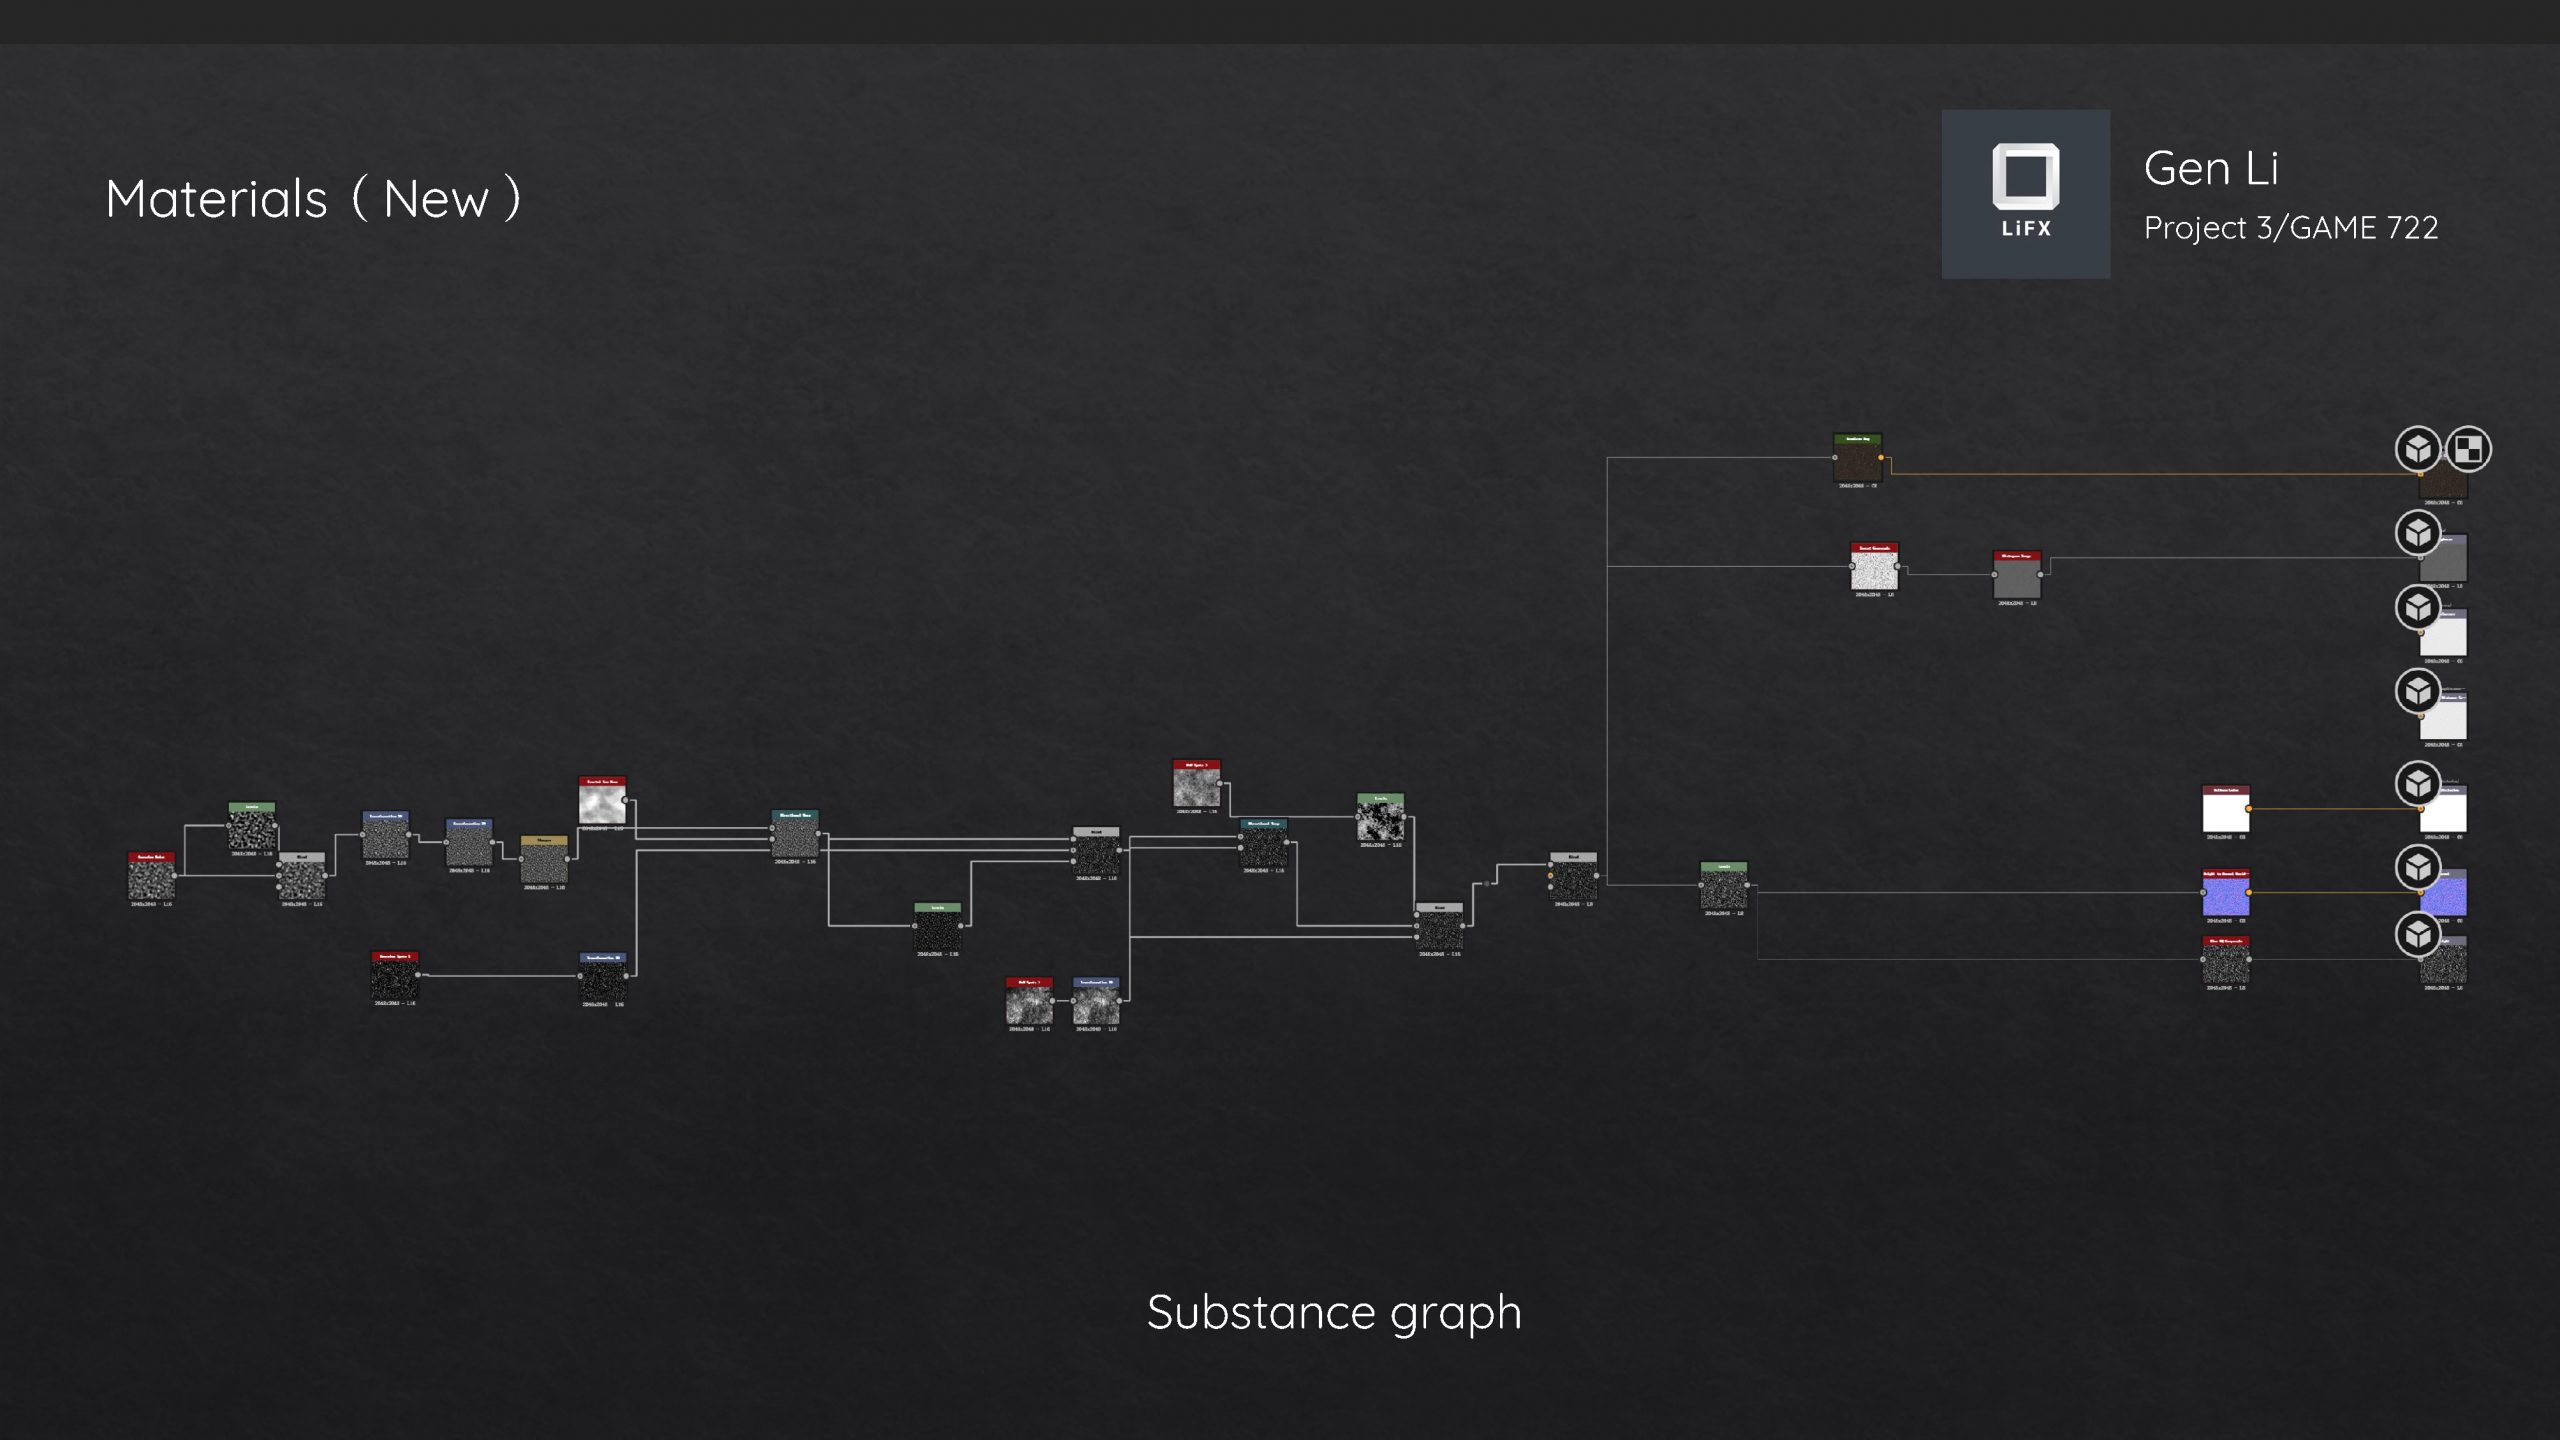
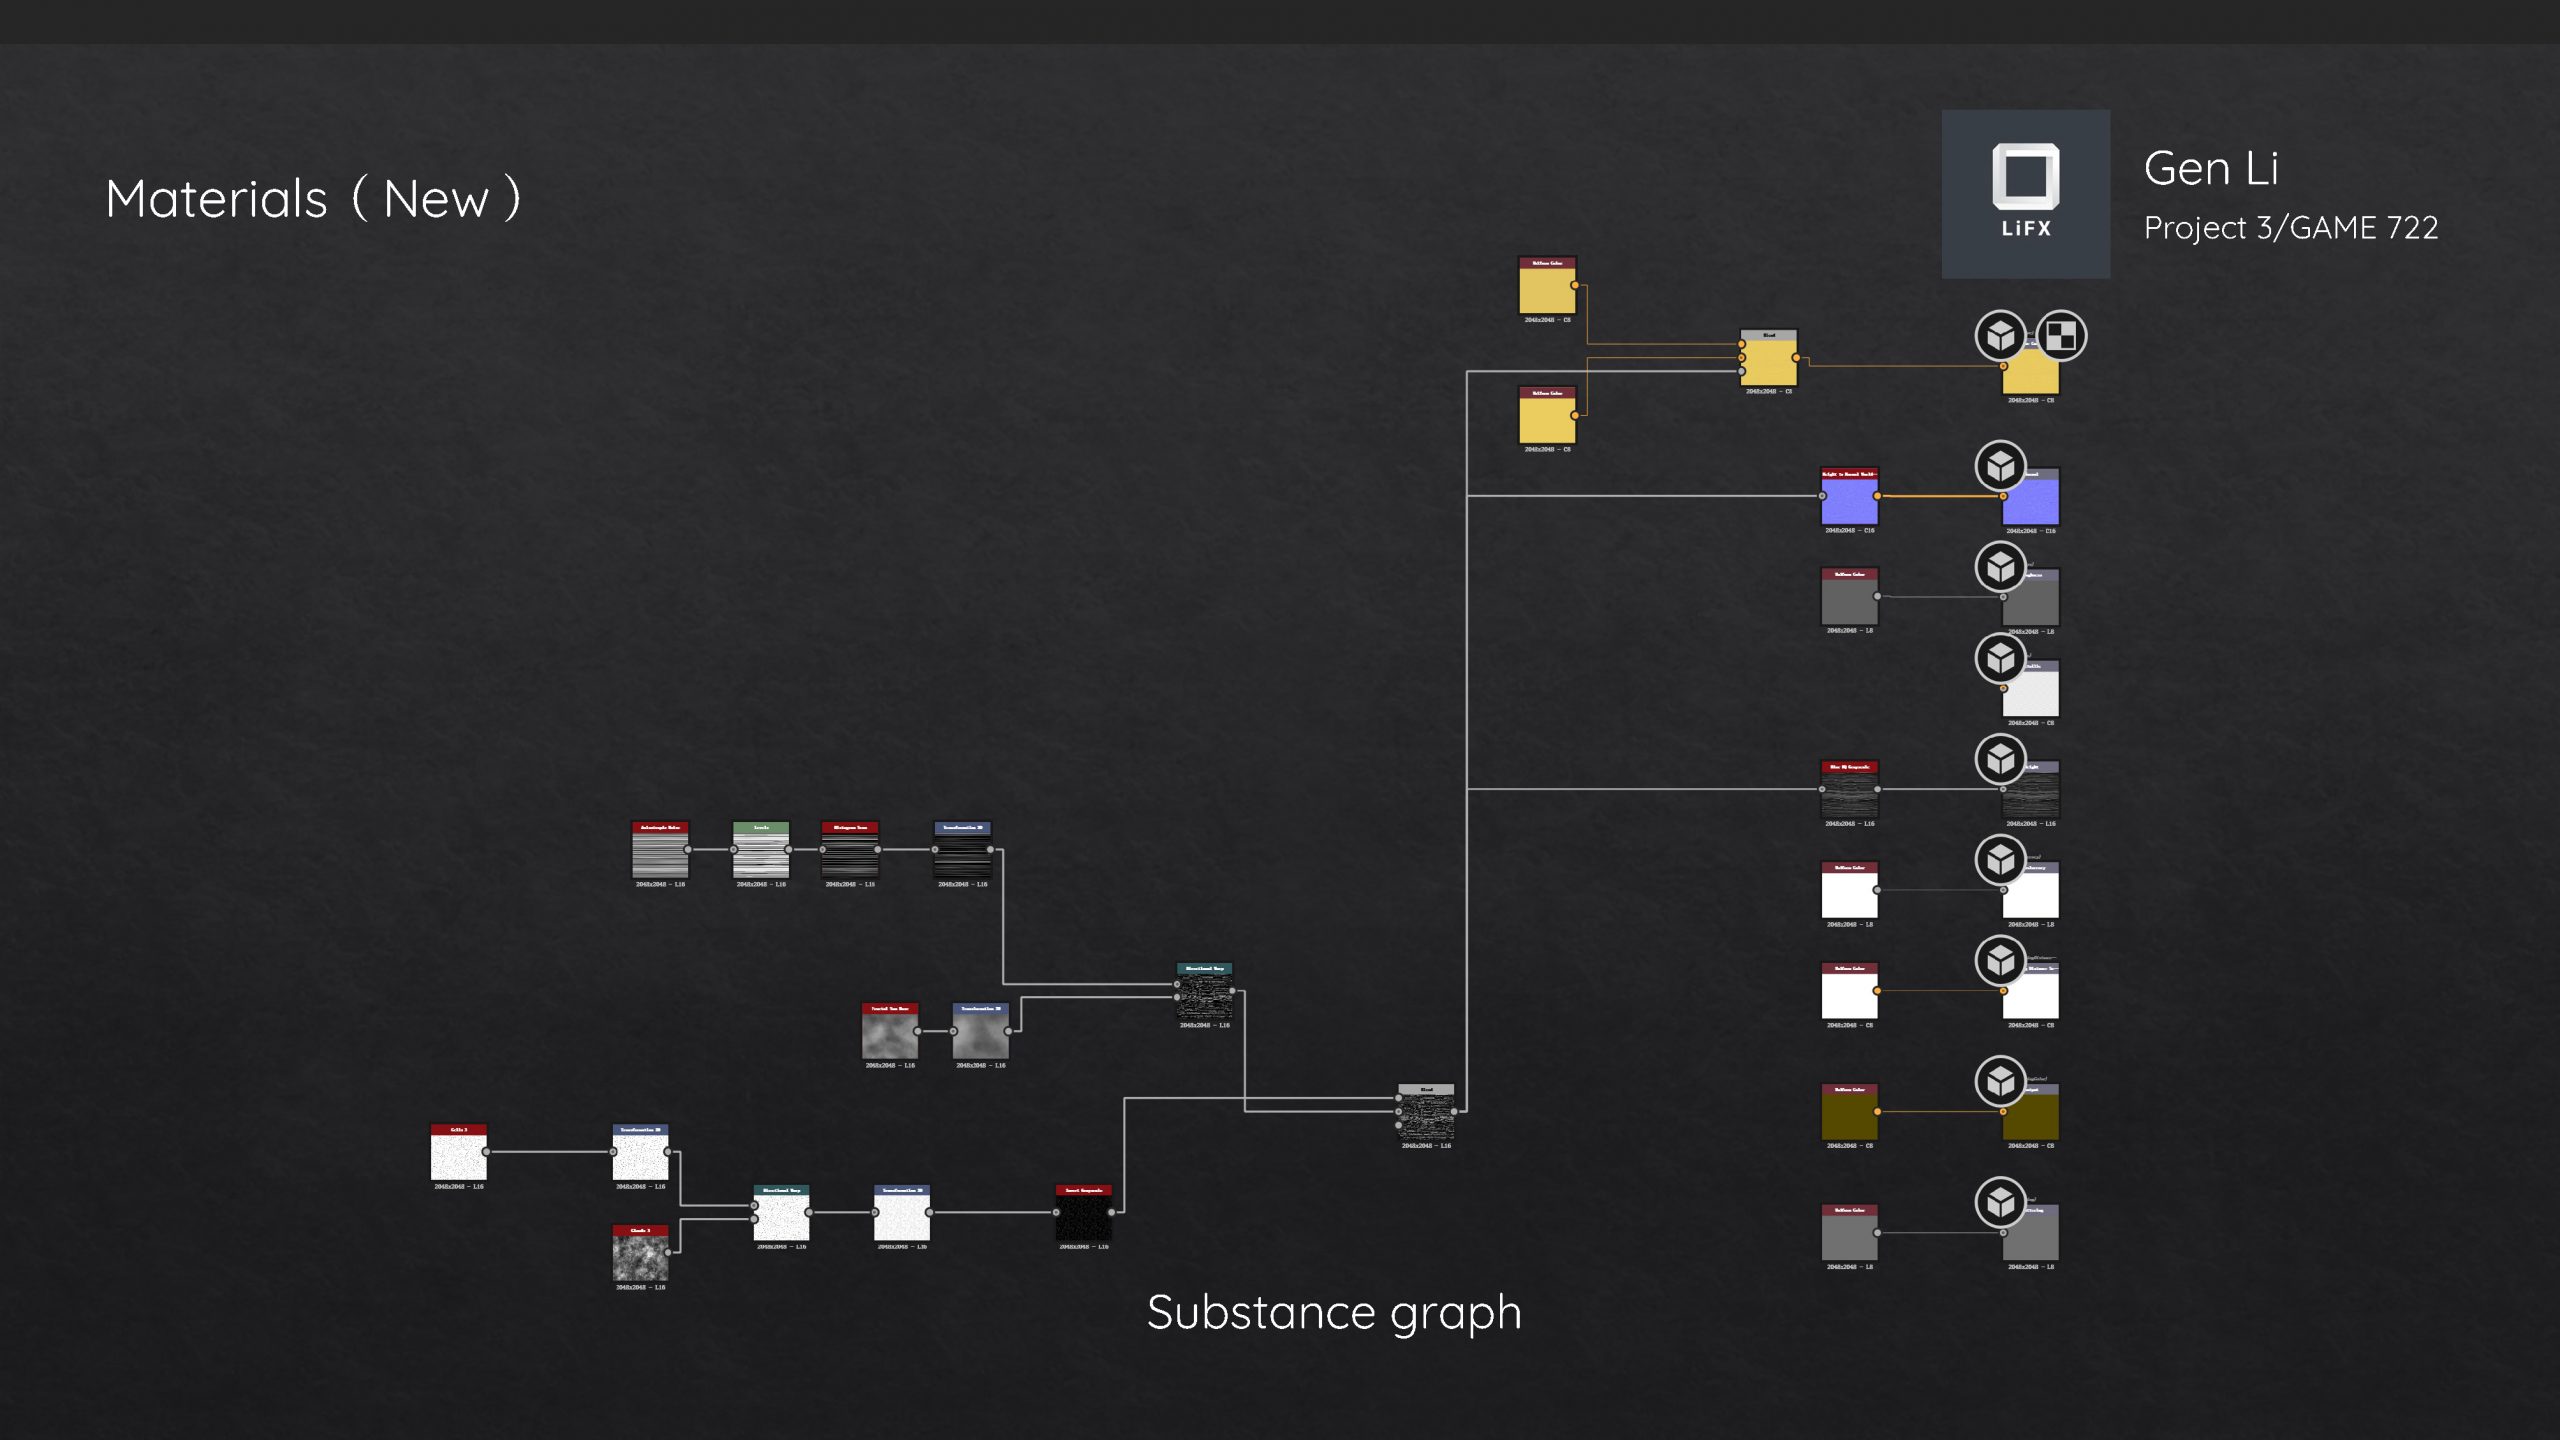
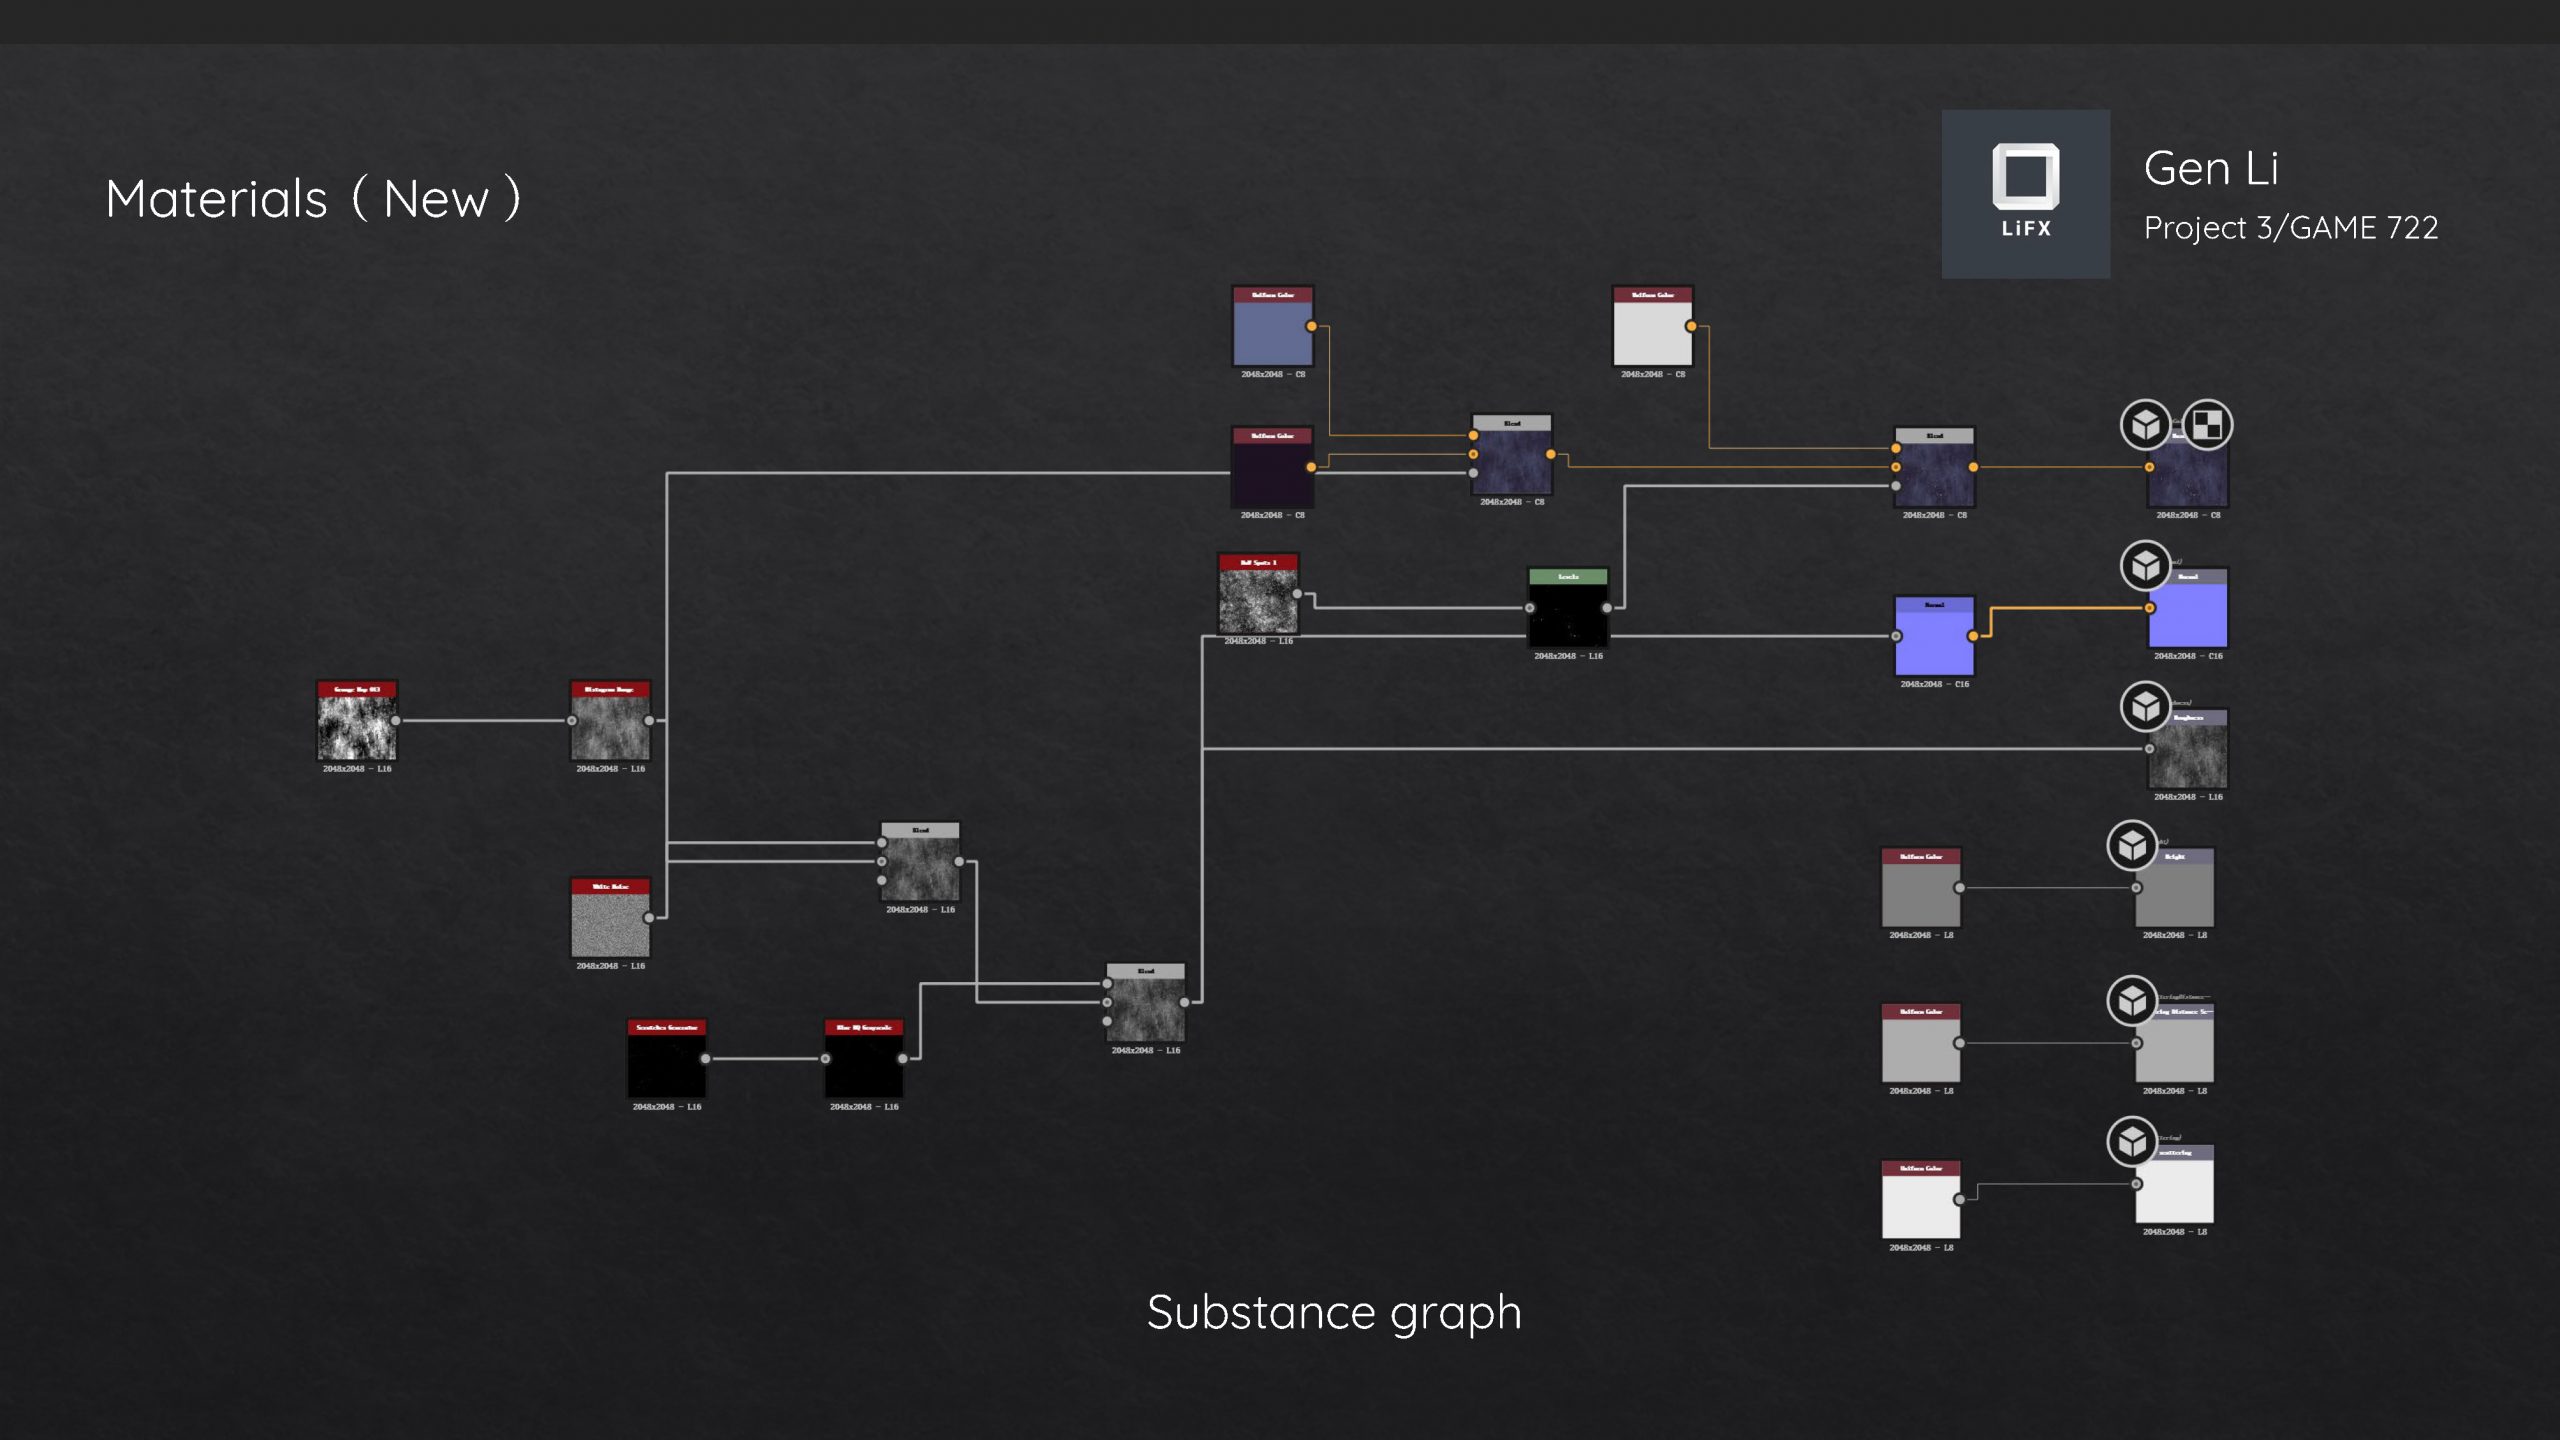
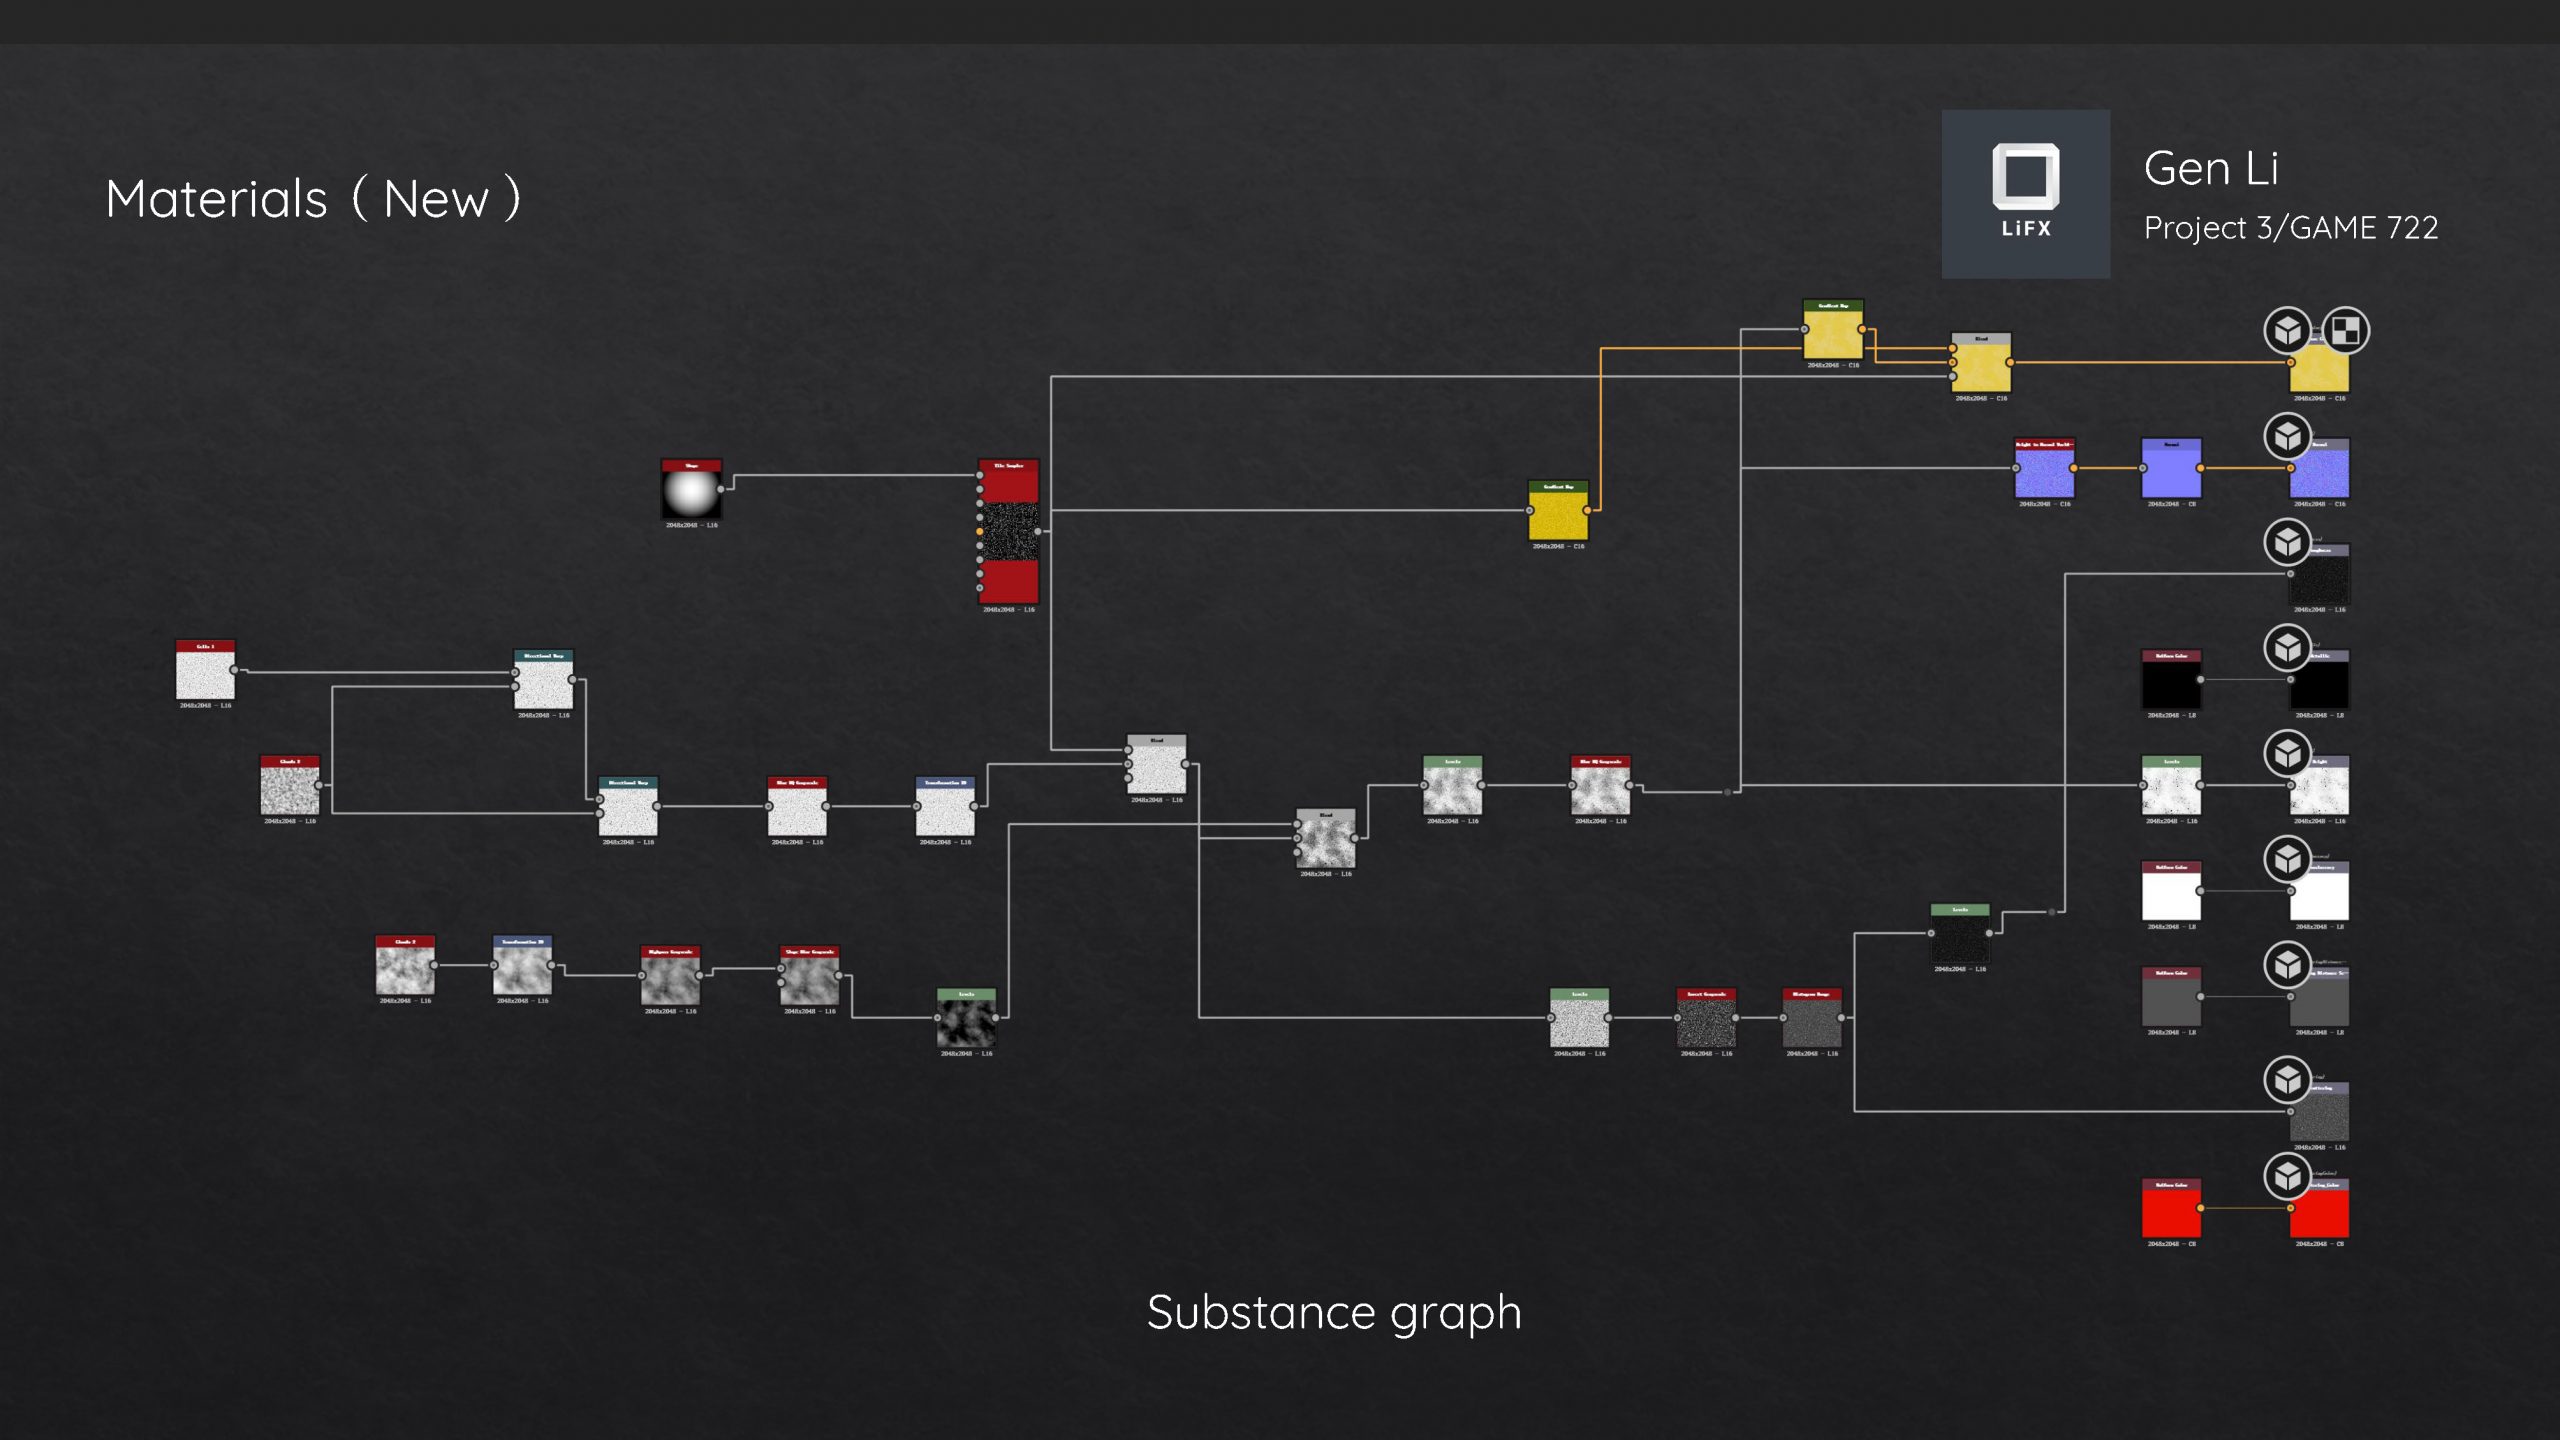
3. Making of the fresh materials in Substance Designer
I have built all the base materials for the fruits inside Substance Designer. Since most of these materials contain SSS layers, I switched the default material presets to "Metallic Roughness -SSS," which allowed me to control the SSS value using all the function nodes inside Designer. Some of the default noise patterns like Bnw noise and cell noise are merged and layered to generate specific noise shapes for those materials' normal and height layers. And because they need to be customized later in Substance Painter, I exposed some parameters such as base color during the export process. All the maps are set to 2K resolution for better performance balance when importing into UE4.
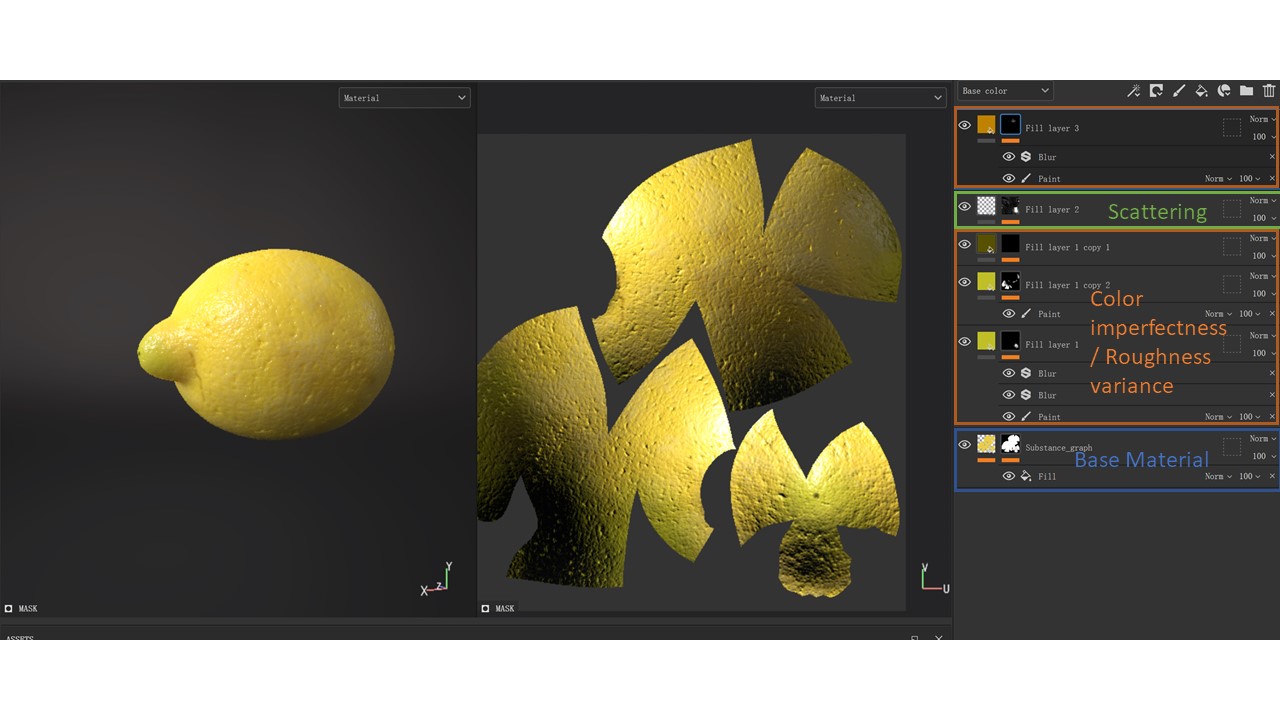
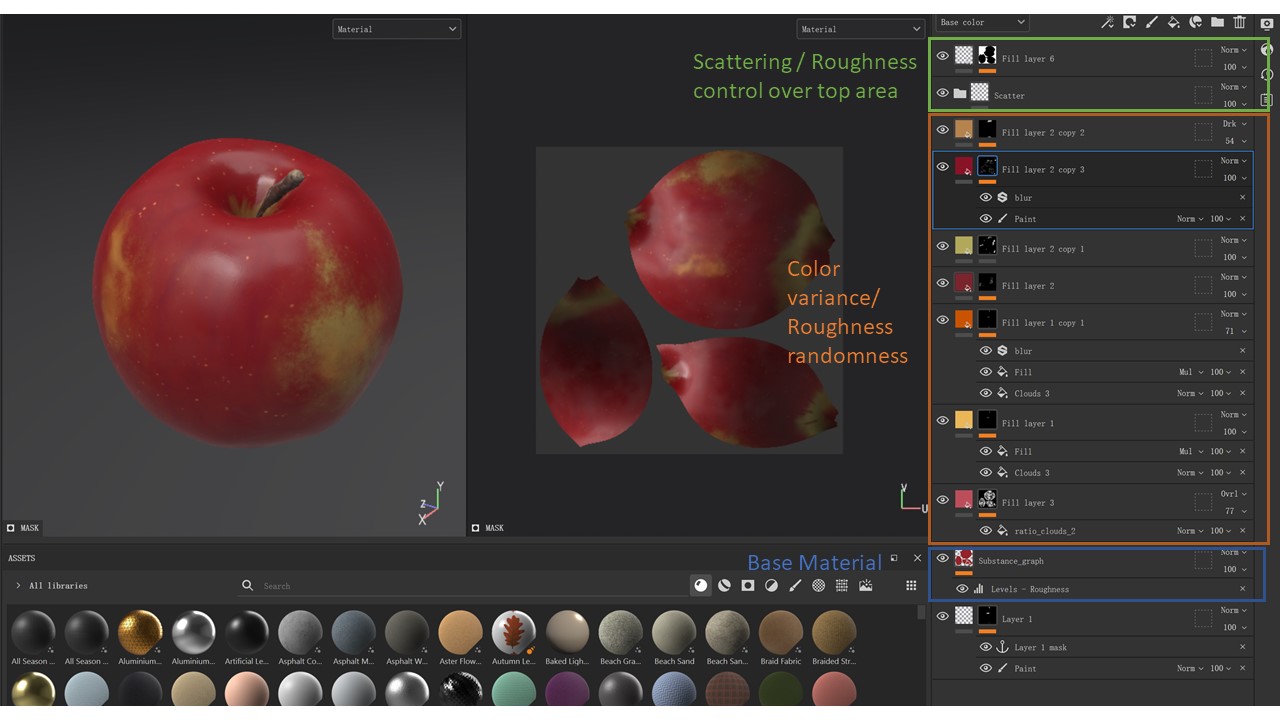
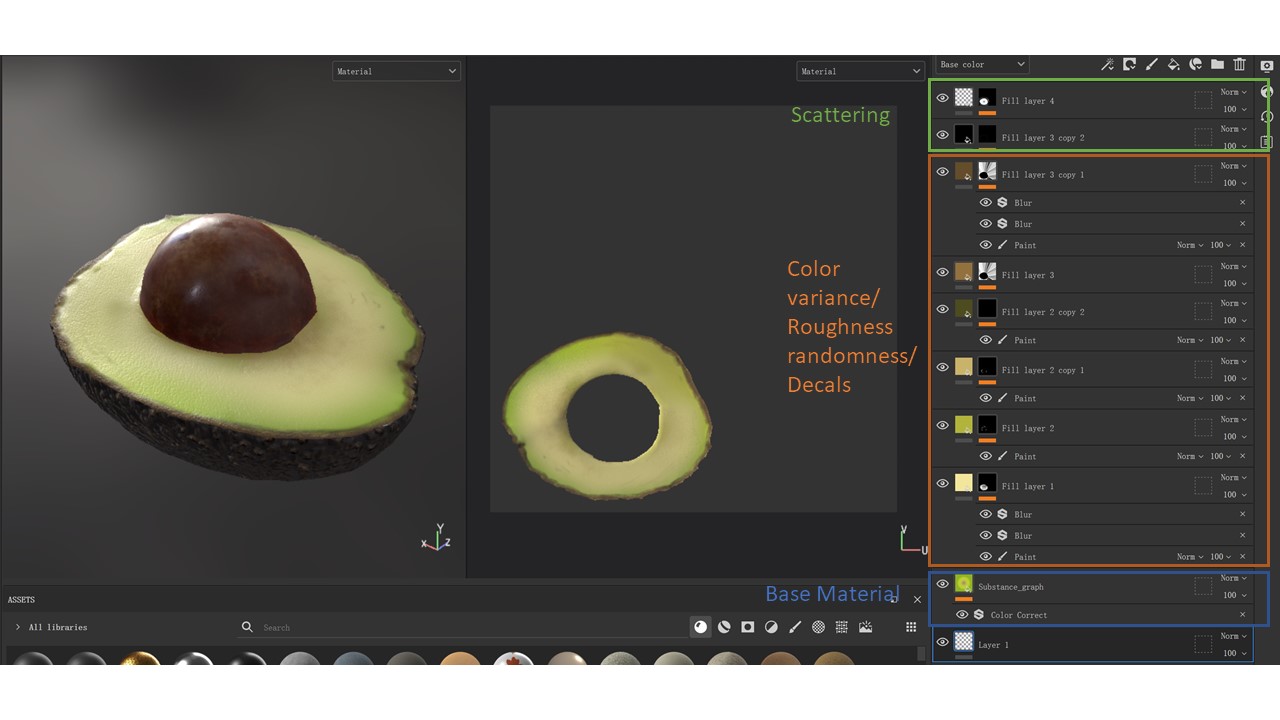
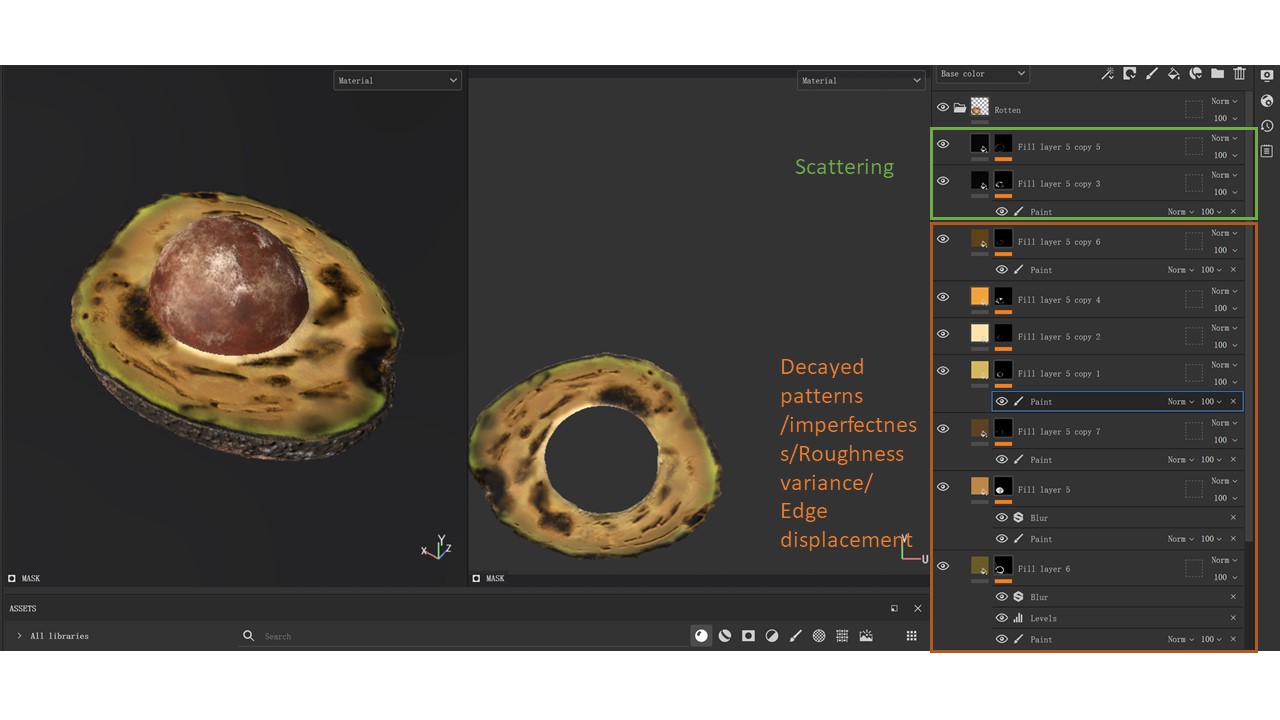
4. Making of the fresh materials in Substance Painter
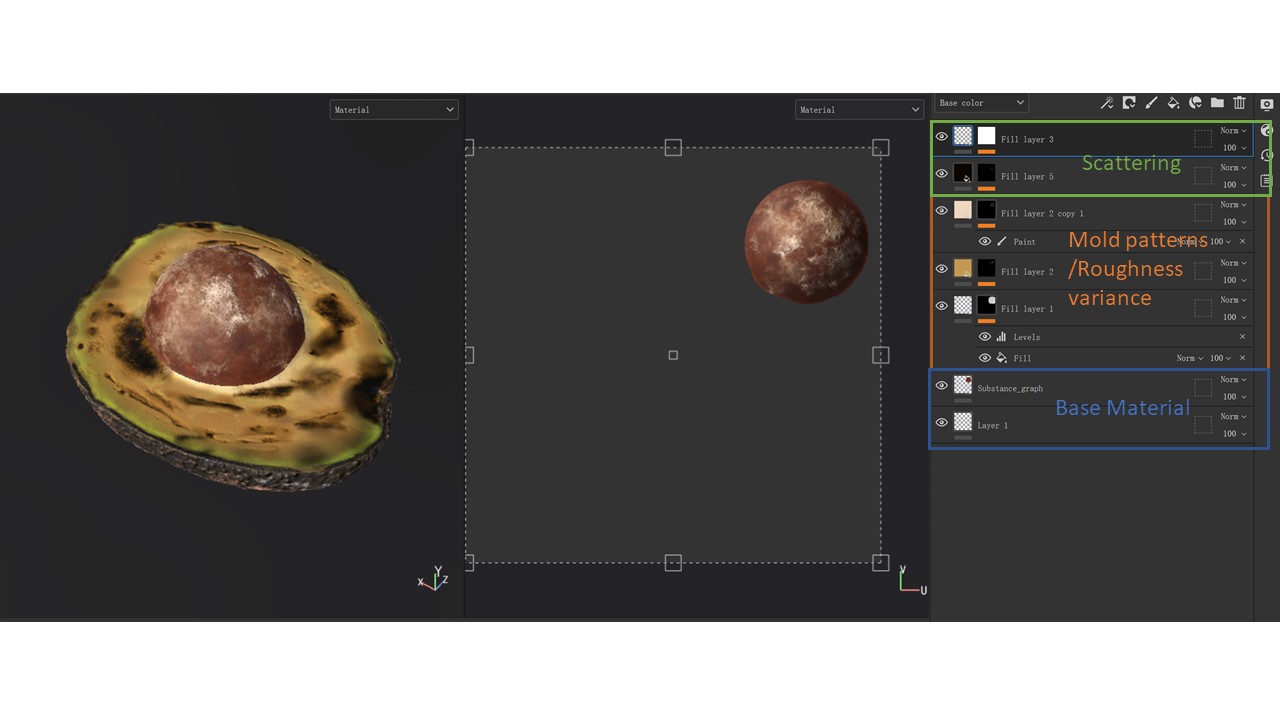
After bringing the models and the base materials into Substance Painter, I began to dive into the process of creating imperfectness and decal layers for each fruit. Substance Painter provides me with many brushes and alpha matte, which is very handy in generating noise masks for height channel, normal channel, scattering channel, etc. Since it offers artistic controls over customization on materials, I managed to create many layers that add extra details to the model surface, ensuring the texture quality even the placed cameras were closed to the models inside UE4. For example, I have specifically created five different material sets for the grape, which allowed me to vary the base color layer for each group to simulate the randomness color shift from the reference. Typically, the blending value for both normal and height channel can be decreased around 30% - 60% depending on the result shown in the preview.
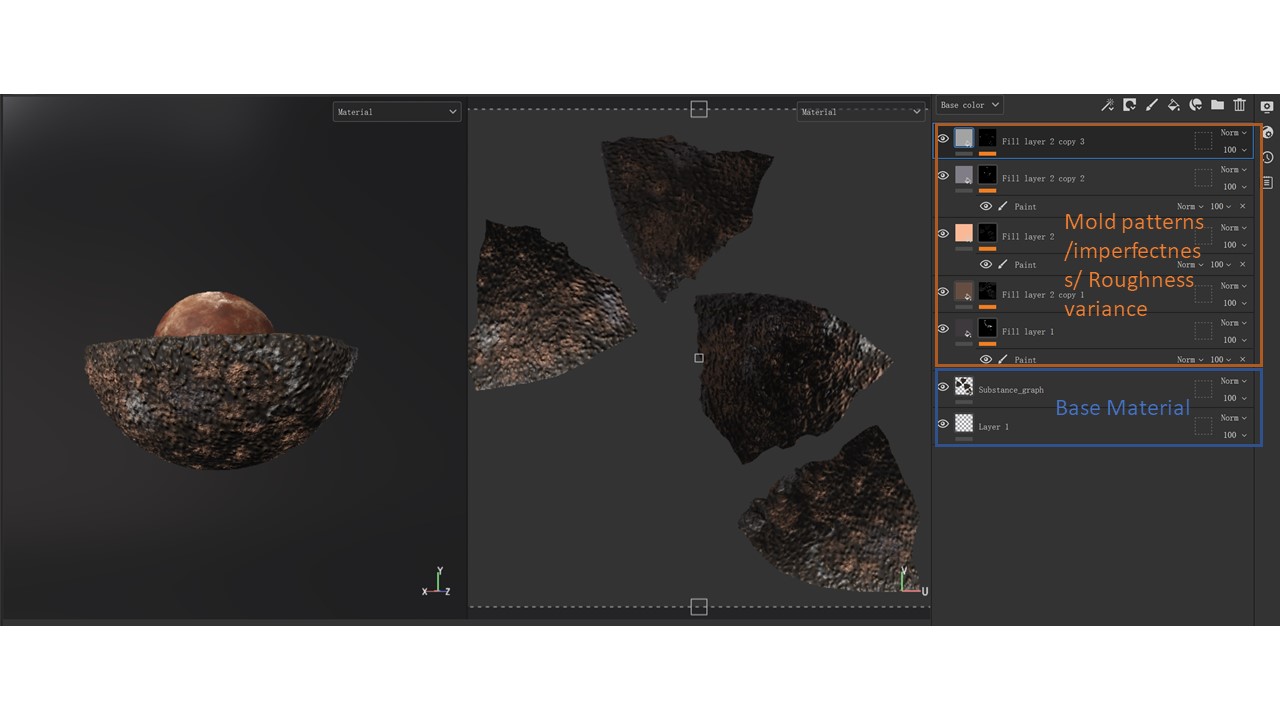
5. Making of the decayed materials in Substance Painter
Like the fresh materials, creating decayed materials in Substance Painter was easier for me to generate specific details about rotten areas. Decayed portions of the fruits can result in changes in specular value, surface roughness, geometry shape, and general color as well. Here are some reference pictures which show the changes in the fruit materials. Before creating extra layers for those materials in Painter, I used Maya to sculpt the model roughly, which displaced the model to match the reference look.
Reference 1
Reference 2
Substance Painter could maintain the layers changes you have made and transfer them to the new models. As a result, I managed to add several extra layers to override previous modifications. All of the maps are exported using “Unreal packed - SSS” presets with height information added as a gray channel. The resolution as well as the format was set to 4K and Targa for later usage in Unreal Engine 4.
I have created four cinematic cameras inside Unreal Engine, which last for 33 sec in total. Each shot maintained at least 5-6 sec, giving sufficient time to show the materials in various angles. Most of them are dolly shots with slight movement along a specific direction.
7. Lighting inside Unreal Engine 4
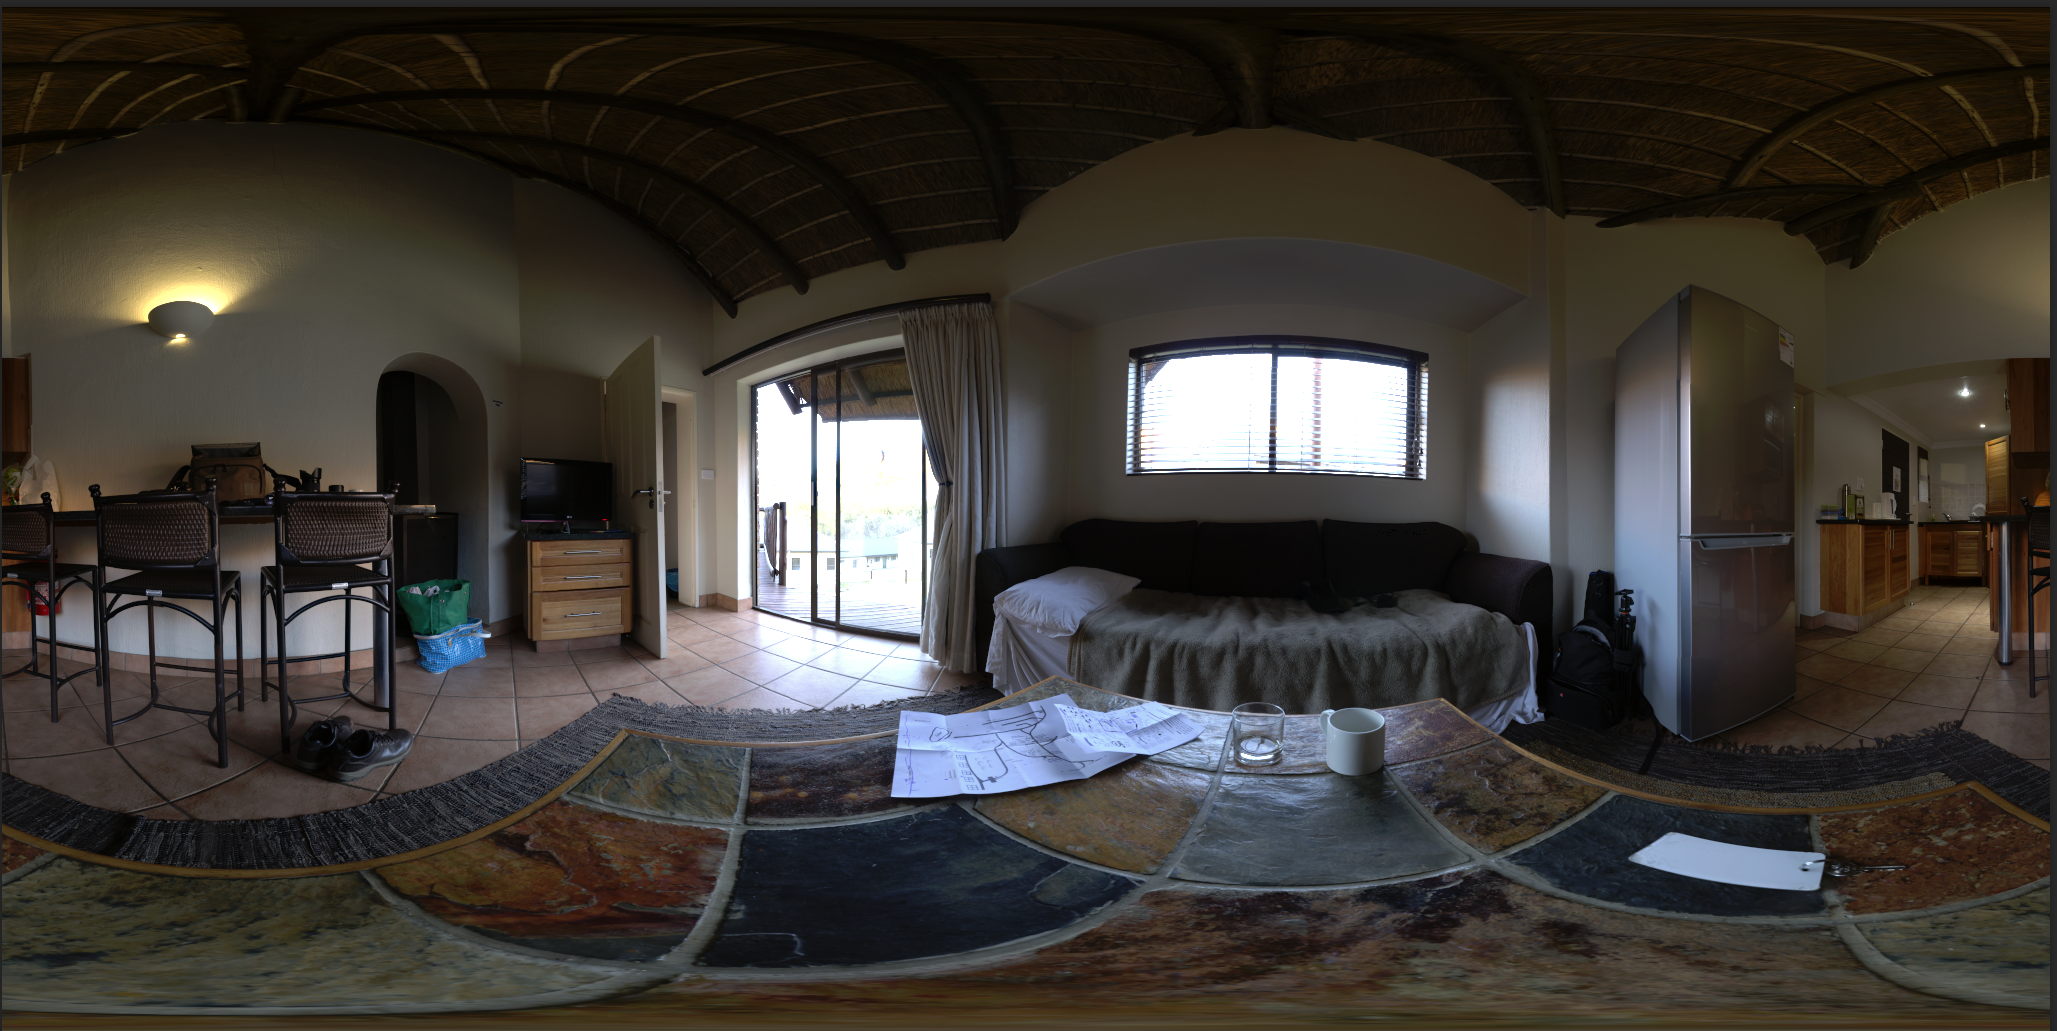
Analyzing the references is critical for rebuilding realistic lighting inside Unreal Engine. Basically, there are similarities in using a directional light source acting as the key light while another area light serves as a fill light. The position of the main light can be revealed by looking at the shadow areas. Besides, the edge of the shadow is blurred, indicating that Raytracing mode is required to simulate that look. The color temperature for those references is almost neutral. As for the HDRI environment, the website that I found online is HDRI Haven, which offers free samples of many HDRI textures of high resolution up to 8K. The map that I used provides interior daylighting with higher contrast which helps illuminate shadow areas and decide the key light direction.
HDRI Image
Since all the textures are exported from Substance Painter as 4K resolution, Unreal Engine will handle them as virtual textures, meaning that the details on those textures are streaming depending on the gameplay performance and camera view range. In this scene, I used a spotlight as the key light and set the color towards light green in order to match the HDRI backdrop lighting. A point light was placed near the right side of the models to act as a fill light. The intensity of this point light was set to 0.15 cd. It is definitely a low value when compared to the key light. The HDRI was placed in an HDRI Backdrop actor, which utilizes the texture as a dome light casting ambient light to the scene. As I mentioned before, the Raytracing mode is required to be enabled to simulate soft shadow. The official document for Unreal Engine lists essential steps for the users to enable Raytracing mode if their machines meet the minimum configuration requirement. https://docs.unrealengine.com/4.27/en-US/RenderingAndGraphics/RayTracing/ The default RHI should be set to DirectX 12 to enable the Raytracing mode to ensure the Raytracing is working properly. Then, some extra settings such as GBuffer format and reflection resolution can be tweaked based on the gameplay requirements.
Settings for Raytracing mode in UE4
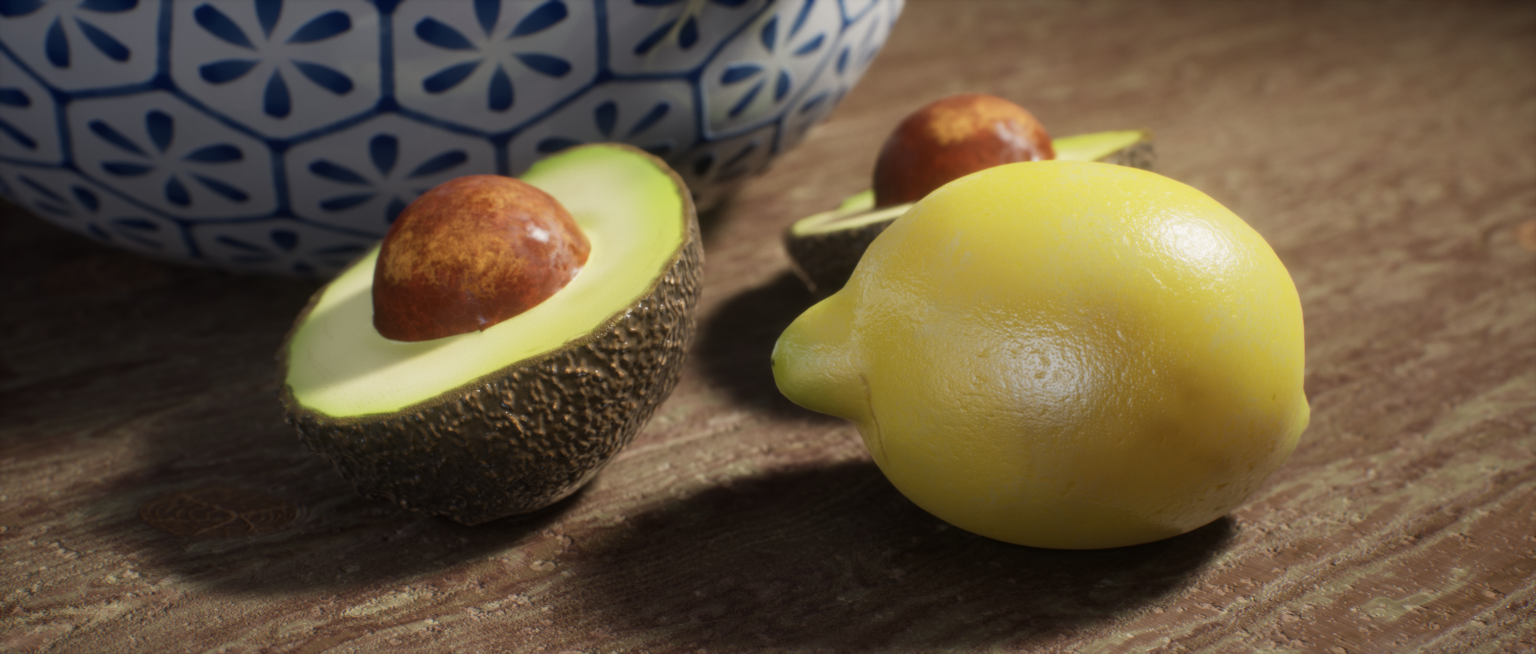
Raytracing mode will affect the scene after restarting the engine. The message log will show if the level runs under DX12 mode for debugging purposes. Once the Raytracing mode is enabled, all the light types will have options to control the source radius, which influences the shadow softness. (For reclight is the width and height) The post-possess volume also provides many settings which only work under Raytracing mode, such as RTAO and RT global illumination. Below this shows a comparison of two renders under the same lighting but with RT on and off.
Obviously, Raytracing provides a more natural look at the cost of framerate drop – around 15-20 fps in general. With Raytracing enabled, direct shadow areas are brighter, and the color gradient between the highlighted and the mid-tone regions is smoother than without RT. Notice that both screenshots may have model placement differences, but it won’t affect the lighting too much.
8. Enable SSS inside Unreal Engine
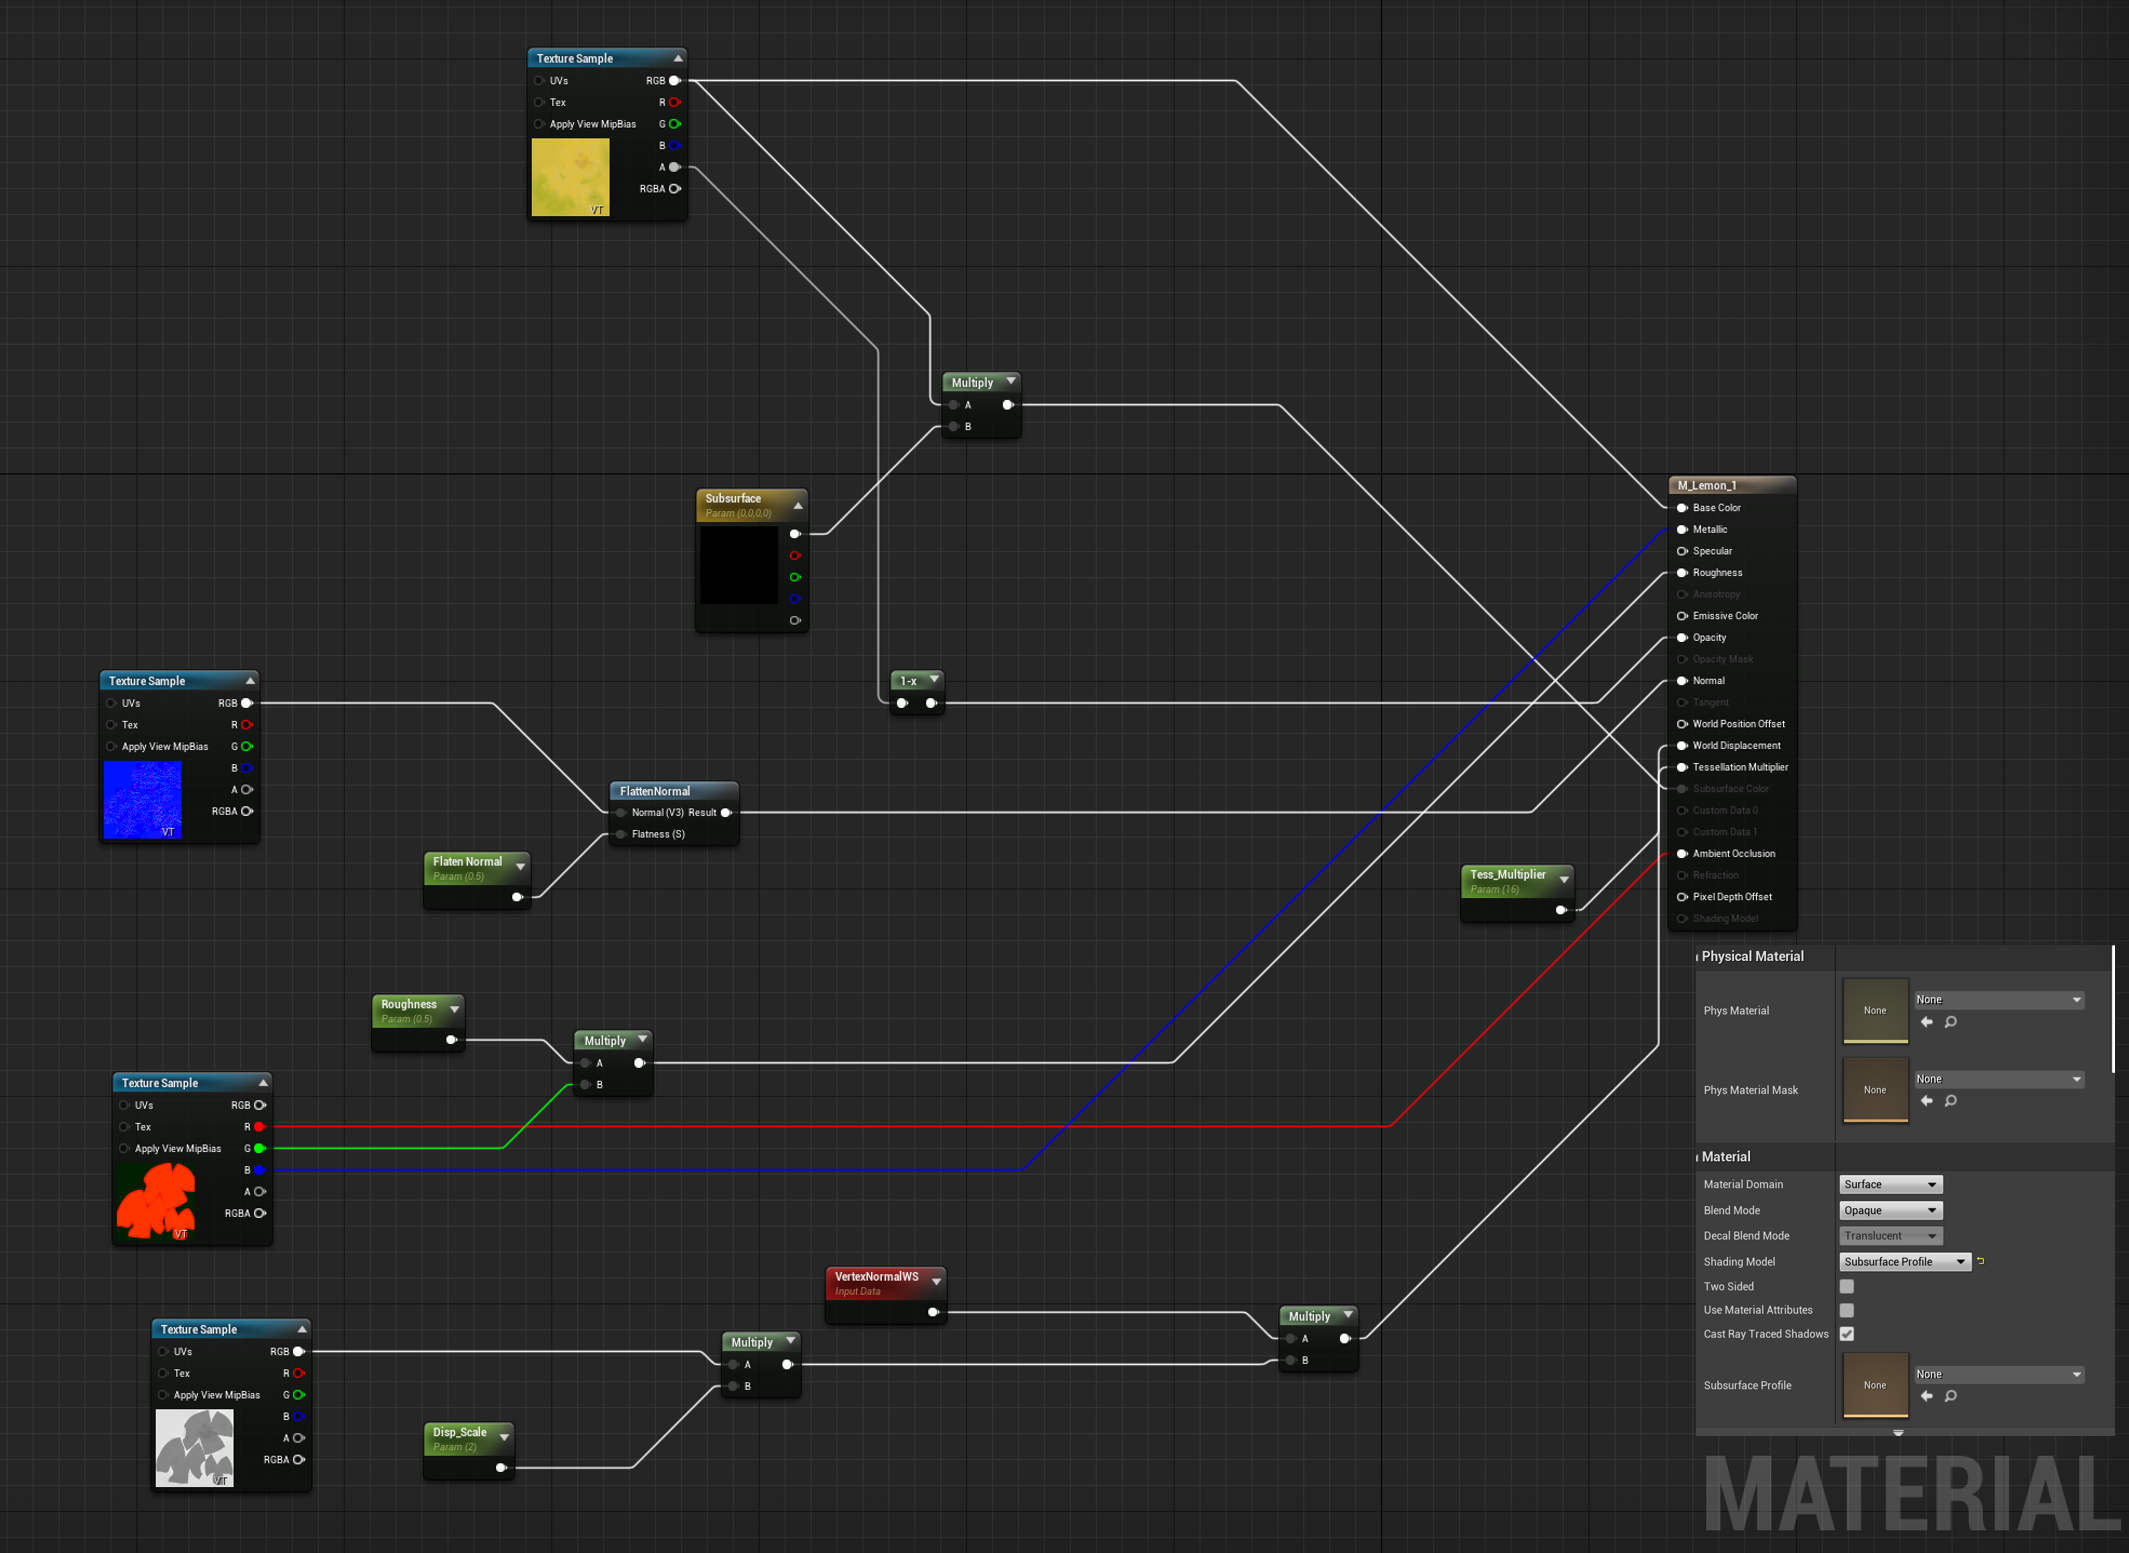
For the shaders inside UE, the shading model offers several presets representing certain material types. Typically, the “scatter” channel is stored in the base color map and extracted through the Alpha channel. To enable the SSS input on the material node, the shading model needs to be switched to “Subsurface Profile” mode, which gives the procedural control over SSS by adjusting parameters such as transmission scale and scattering distribution amount. Another method that can be used is the traditional “subsurface” mode, which allows users to customize SSS value by a mask painted manually. The detailed nodes map for a single material is listed below:
Nodes map for an SSS shader in UE4
All the texture maps are converted into parameters so the material instances can conveniently switch textures between fresh and decayed versions.
9. Render sequencer using Movie Render Queue
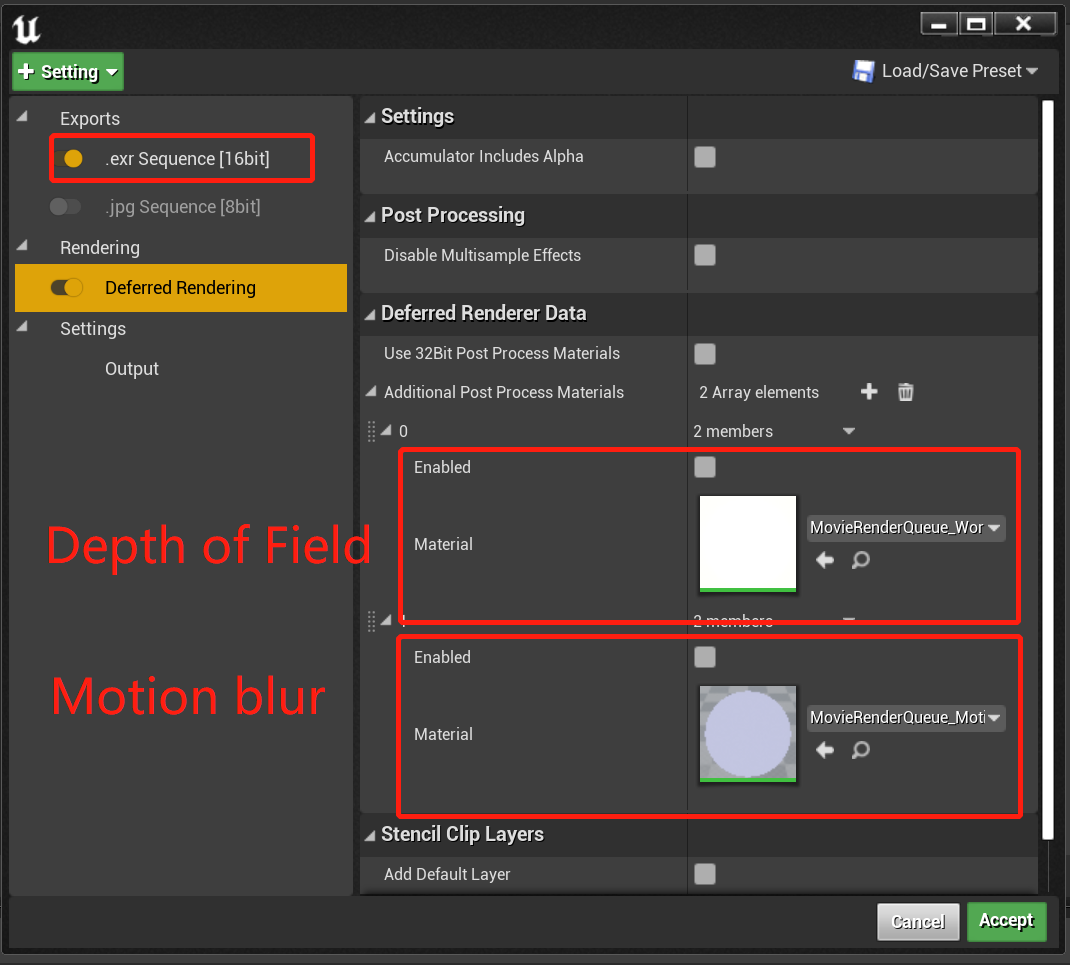
Unreal Engine has a built-in plugin named “Movie Render Quene,” which offers more advanced options for custom render outputs than default movie render settings. First, it can export the movie as EXRs sequences, saving room color correction during post-editing using Adobe Premiere Pro or Nuke. Apart from that, the “Deferred Rendering” tab has extra render layers for camera AOVs like depth of field and motion blur, which are also beneficial for composting. Additional color adjustments like overall brightness and contrast are adjusted inside Adobe Premiere Pro.
Movie Render Queue settings
10. Final thoughts
The general purpose of this project is to practice organic materials’ creation using Substance Suite and rendering techniques inside UE4. By combining several techniques in those platforms, plenty of elements in the references is presented successfully. The whole process also improves my skills in building real-time scenes with the Raytracing technique.
One thought on “Creating realistic fruits in UE4 with Substance Suite”
Wow, a very informative post, thanks. I wonder if sources of these materials are available for download? (I'm new to Substance Designer, and I'd be glad to learn how to make them)


Wow, a very informative post, thanks. I wonder if sources of these materials are available for download? (I'm new to Substance Designer, and I'd be glad to learn how to make them)