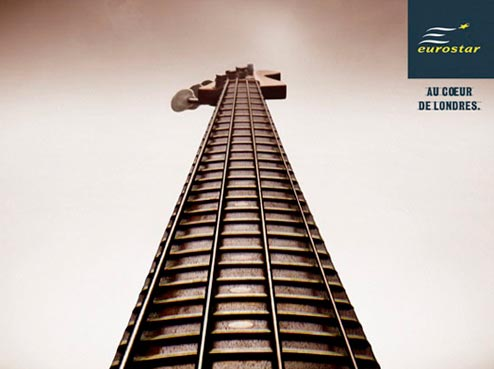
This project aims to create a commercial-style video for one certain company that focuses on vehicles. Our team members decided to choose Amtrak combining a story of concert stage to demonstrate the meaning of the company’s tagline better. A train will travel across a guitar “Track” and the strings trail behind to the beat of the music. As for the theme, we would like the audience to feel like life is a euphoric journey, and being a part of something bigger than yourself is important.
Mood: Nostalgia, awe, anticipation of adventure
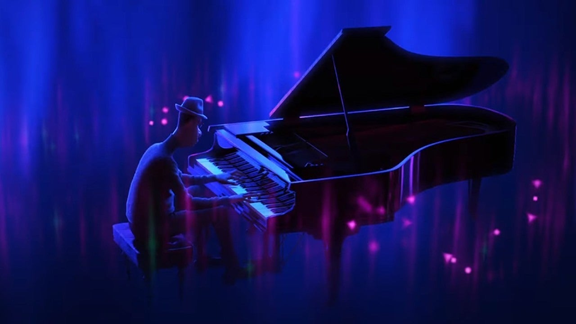
Vehicle: Amtrak Train
Tagline: "Enjoy the Journey"
Final Version
FX Breakdown
Weekly Update Navigator
Week 9 - 10
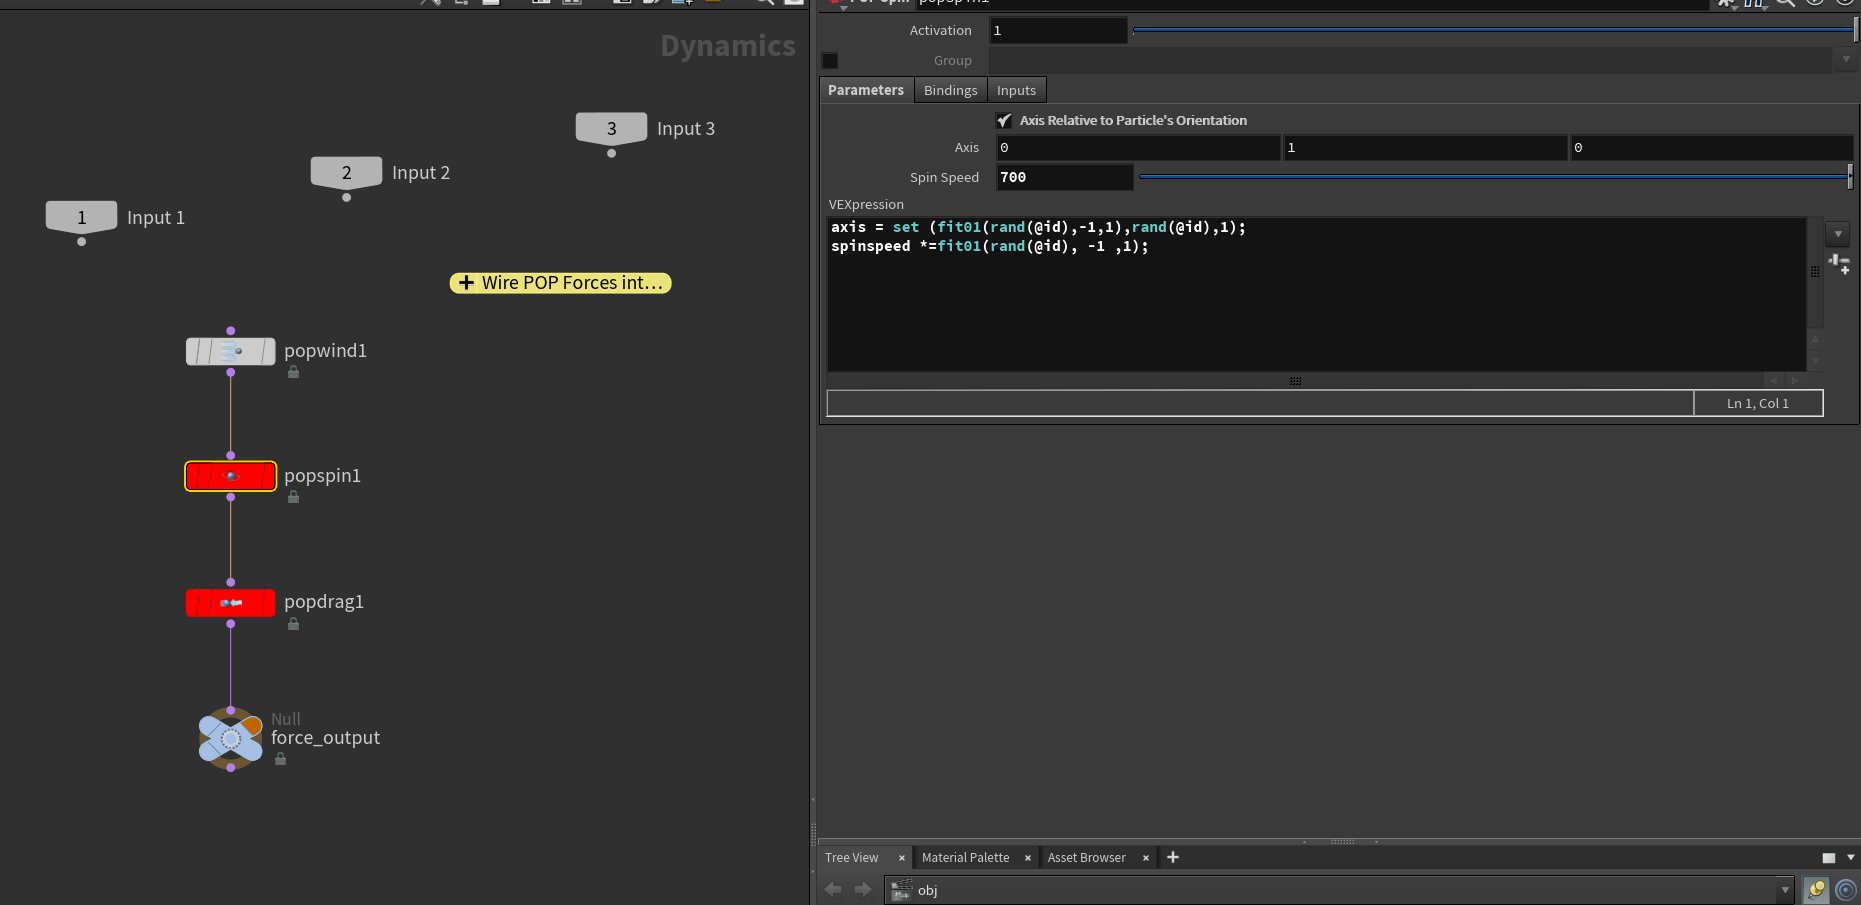
During the last two weeks, I have fixed the black edge line on the guitar using lightwrap and edge detect techniques in the comp and adjusted the camera bokeh shape from hexagon to circle shape according to the feedbacks. In shot 04, I managed to extend the logo fade length to match the BGM precisely.
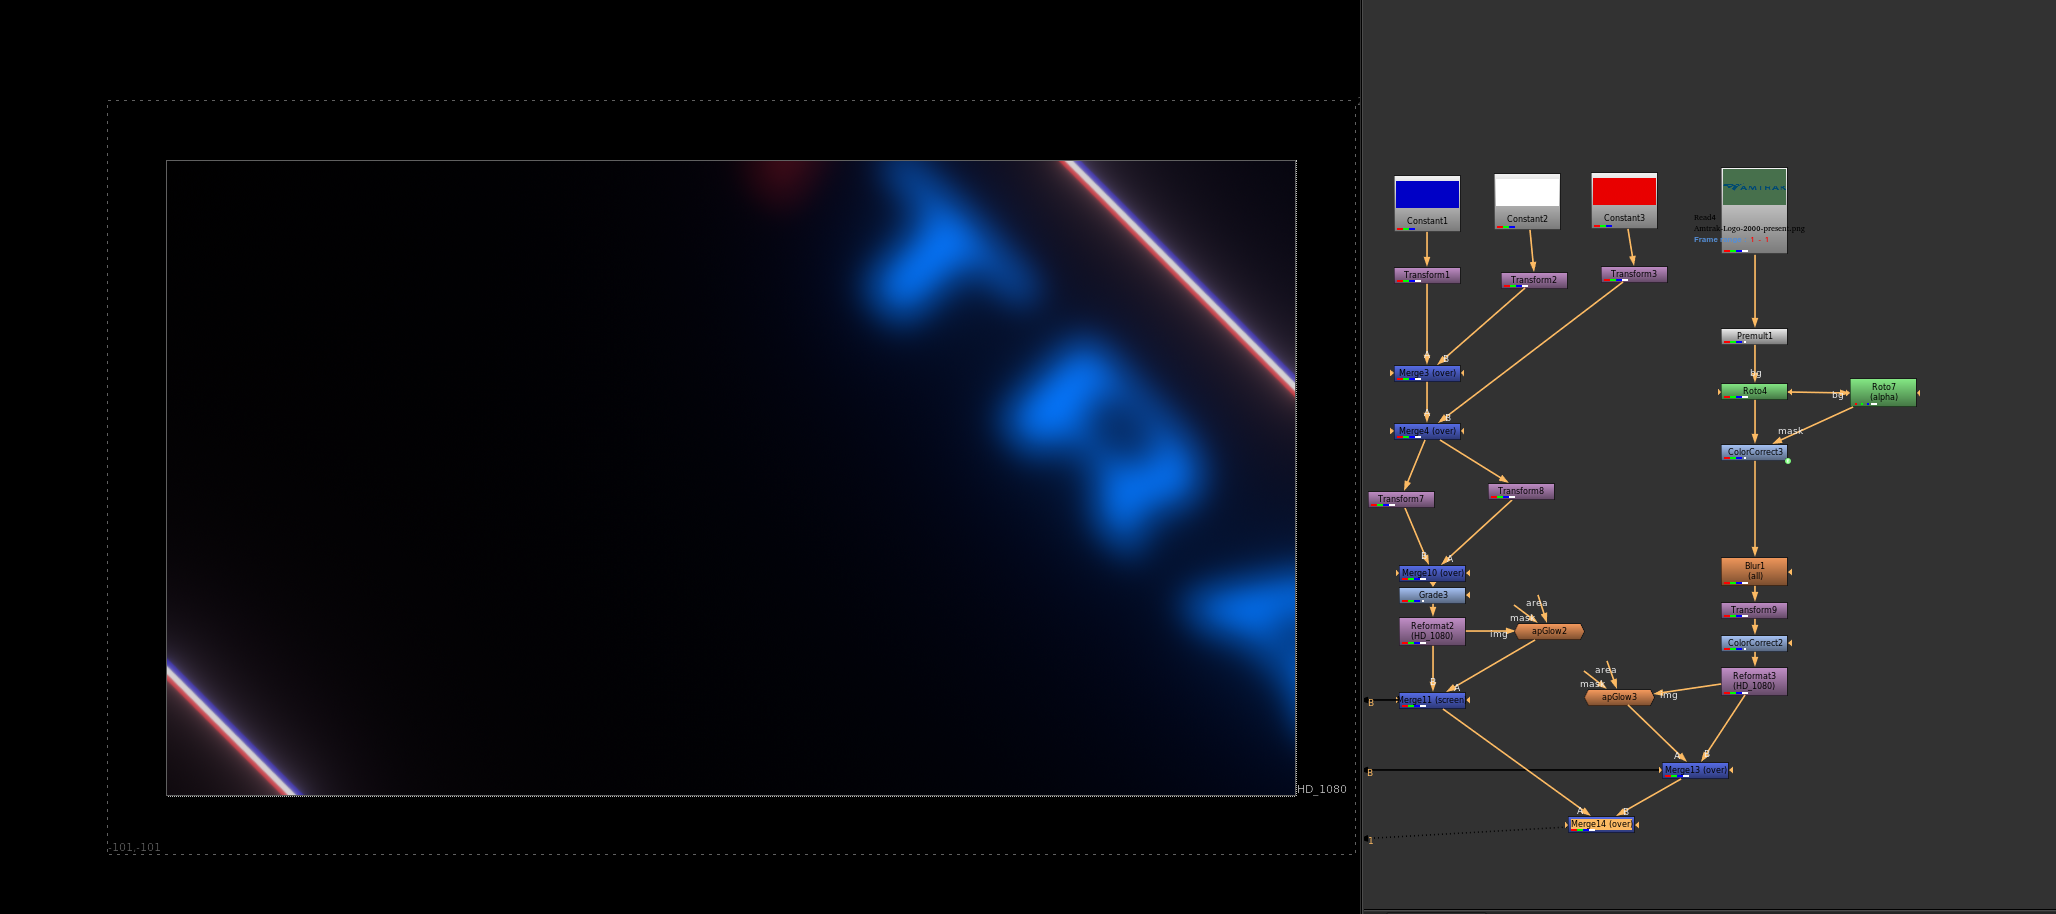
Here is one breakdown video of how to achieve the fix inside Nuke. Basically, the “Edge Detect” node will generate a wireframe alpha mask for the input. Then, I used the rotoscope to mask out the section that needed to be fixed and increase the intensity to that specific area. After that, the area will be used for generating lightwrap to brighten more blending with the atmosphere. I also did rotoscopes for the atmosphere layer to match the overall brightness.
Walkthrough video
For the camera bokeh changes, the previous one used “blade” filter type to generate the hexagon type in the background with the Z-depth added. Now, through adding extra png image to the comp, the deforce node could use the png for the “image” filter creating circle shape since the image would control the final look.
And here is the final render video I would like to present! There is also a FX technique breakdown included. Thanks to all my team members Amanda Jayapurna, Miranda Leighr, Ken Kuroiwa, and Yash Patel for their contributions to this project!
Week 8
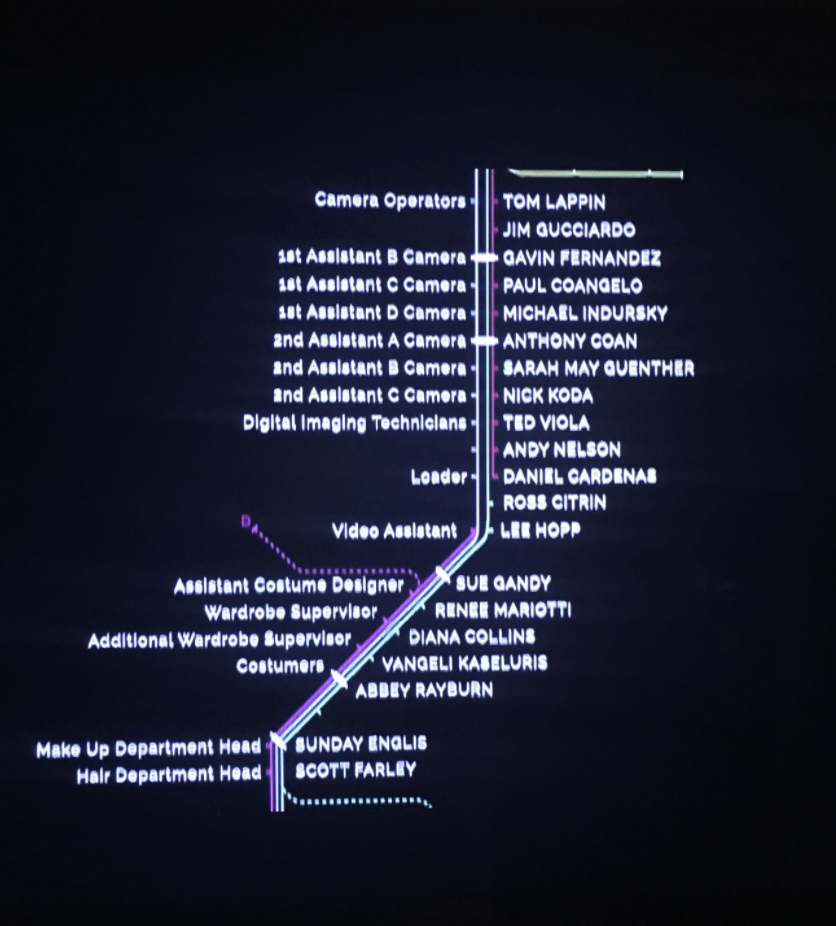
This week, I began to work on the new credit video based on the inspiration of subway map view, combining with neon light style. And I also helped to troubleshoot with the first shot compositing issue in Z-depth channel merging. Since the separate layer rendering in the first shot helps reduce noise in the highlighted area, it also separates channels, so it is necessary to merge the channels to have complete control over some values, for example, the global Z-depth value.
Going to the Nuke script, we could notice there are two separate renders with the guitar; one contains the fret, and another one is string only. If we shuffle the depth channels for both, merge them with the “Channel Merge” node. The result should be a full image containing all the depth information. However, there are still more steps needed to be done inside this node. By default, the operation is set to “union”, which performs the combination operation. We need to set it to “b if not a”, allowing the channel information to merge without edge overlapping. After that, the whole depth channel could be copied to the primary RGBA layers for Z-depth blur. Special thanks for Miranda Leighr pointed out this issue and together figured it out!
Channel merging process
For the new credit video, the concept coming from multiple train map sequences. To indicate the characteristics of Amtrak’s logo, I have made the same base color strips for the additional background plate, also scale the logo a lot to create the depth between the foreground and the background. Apart from that, the neon style is generated by a customed node named” apGlow”. It transforms the input to a glow layer and can be merged to enhance the overall intensity. For the animated train icon, I took a vector train png file and animated it with keyframes aligned with the train line to move in linear speed with the credits starts appearing.
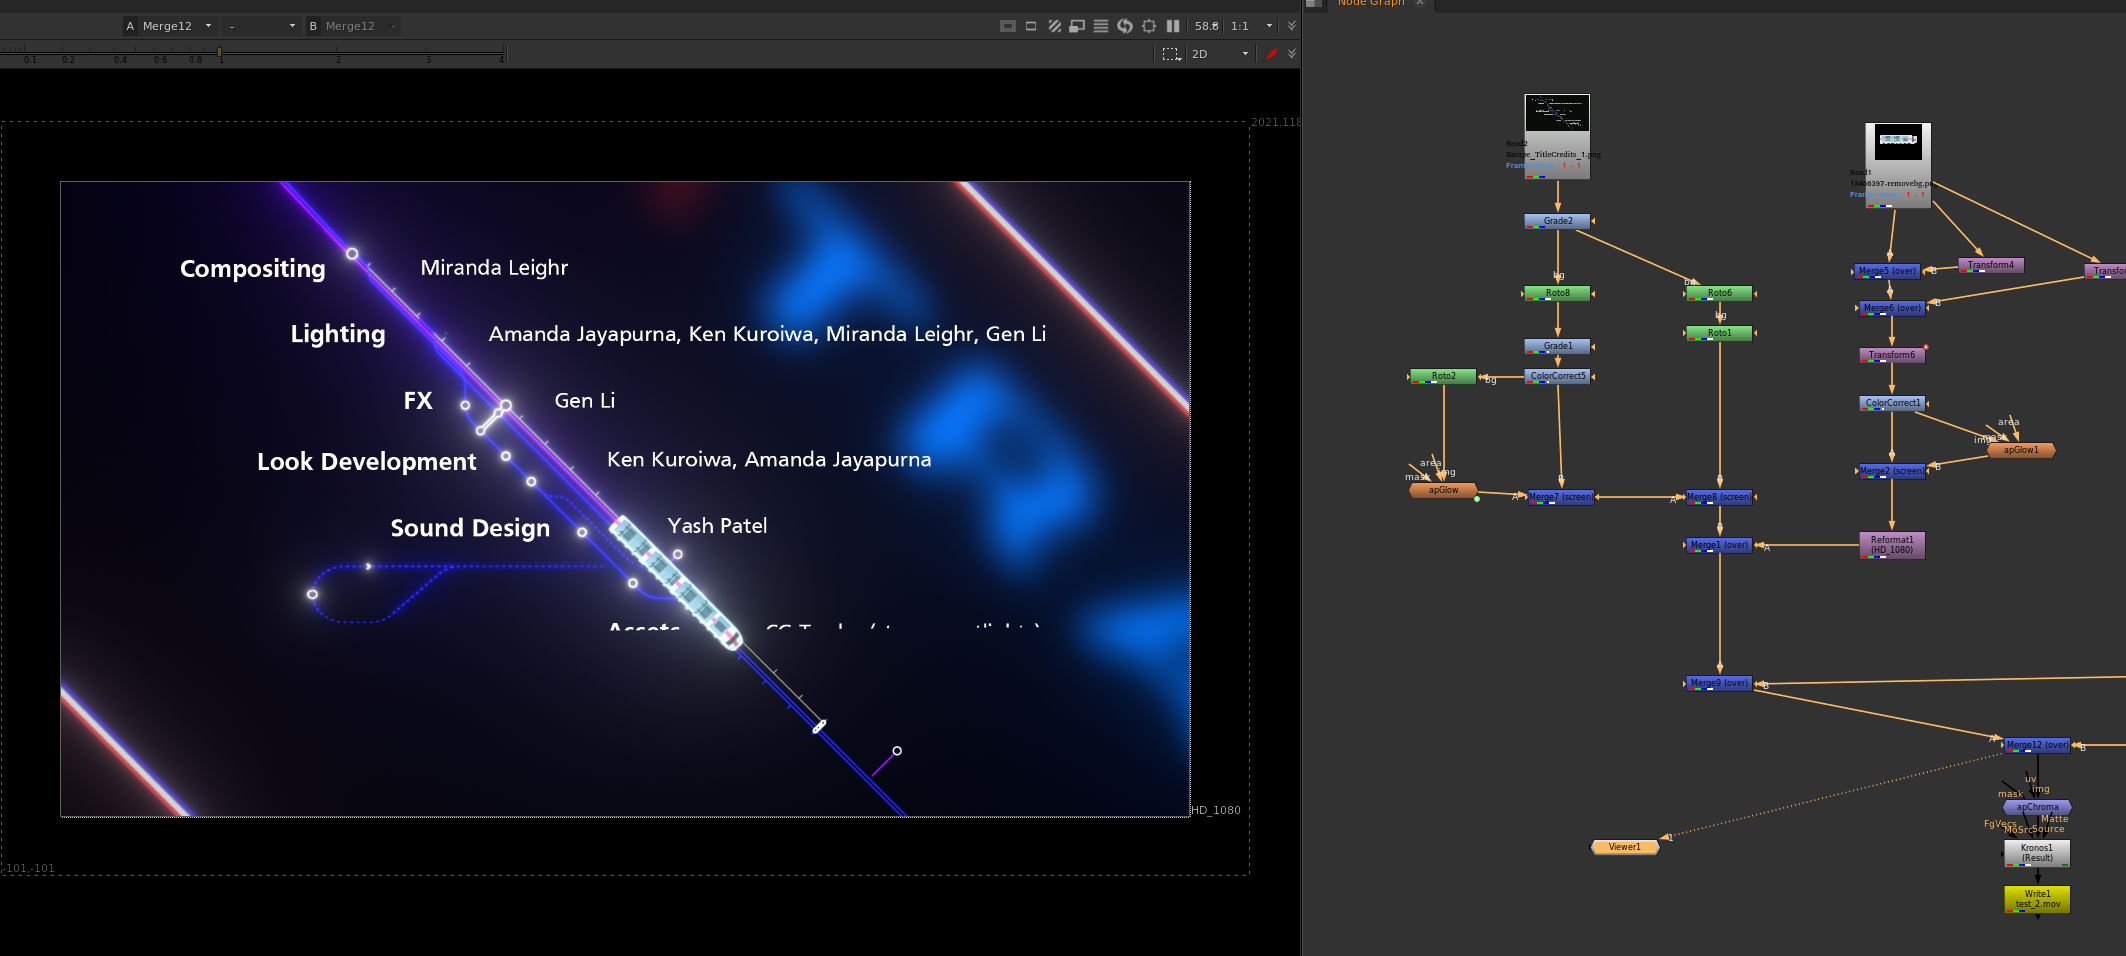
Inside Adobe Premiere Pro, I have also made some color corrections using Red Giant Mojo plugins, adding some saturation and contrast to make the final renders more vibrant in colors. For different shots, the color preset is different to ensure the consistency of standard color balance. And here we have the latest rendered version with the SFX from Yash added!
Latest Version rendered
Week 7
This week, we started to render the sequence as 1080p to test the render time on the farm, and refined shots based on last week’s feedback on the train itself, specifically the light temperature transition on shot two and the train window light variation. Meanwhile, we re-lighted the previous shot to create more contrast on the background, increasing the black level to the renders as well.
For the train light variation, it is great for me to know that the transparent value can be controlled by a custom value inside the material editor in Maya. Since the main window light is an area light coming from inside the train, variations on the transparent value are effective for most situations. Based on the actual size of the train window, the noise texture frequency and the amplitude are required to be adjusted for a larger value to generate smooth intensity change. By default, the “Depth Max” value is set to 3 for more fine details, but I also reduced it to 2 for the smooth look. All the other objects are matted in the render layers, so the train windows could have its own render layer for compositing.

For the render quality at 1080p, the camera AA samples and the specular samples have been increased to avoid the possible flickering issue in sequence rendering. However, it turned out that we also need to increase the diffuse sample also, since the diffuse direct layer has plenty of noise, specifically in the dark area, and we still have some “fireflies” jittering on the amplifier knobs. The atmosphere and smoke layers are working fine even with default volume samples.

In shot two compositing, I have found a way to generate the reflection on fret by using the existed train window layer. Basically, the RGBA layer of the train window has been mirrored and placed in the correct position with scaling in the Y-axis, making the layer looks thinner on the fret. Then, adding a slight blur and glow to that mirrored layer is essential to keep consistency with the primary layer. After that, I merged them and attached a grade node to increase the general brightness. The result looks like this:

In the end, we have the new background music added, and it is now less metal rock feeling but more like a country style, which is more suitable for our commercial topic. All the FX elements have been re-rendered with new lighting in each shot. We did change the amplifier texture and position, so it now looks more detailed in the closed-up shots.
Week 6
This week, I worked on adding additional train wheel animation mainly, also helped team members refining scene lighting setup, and re-rendered the confetti and smoke under the latest lighting condition. The wheels are animated procedurally in Houdini basically and exported as an alembic file for the Maya scene later.
To start with, the train animation has been imported into Houdini. Since it is not aligned to the axis, I use the transform node to move the cache to the scene origin for a better view. Then, the wheel part has been blasted based on an alembic path. Every wheel is recognized as an individual during the foreach loop, which ensures the wheel animation could be copied repeatedly after the loop is finished. Inside the foreach loop, I use the “centroid” expression to center the wheel to the origin pivot, then add the rotation animation based on timeframes. Those nodes can be used multiple times for other train alembic caches since they share the same group structures. Before this method appears, I need to manually delete wheels and apply animations to them and merge the results in the end. It is very time-consuming and not compatible with other train caches.
Manually select every wheel (Not suggested)
Procedurally animated those wheels(Recommend way)
For example, here is the final look in shot 01 with the wheel animation. It is challenging to realize the wheels are moving because of the train speed, but the wheels are rotating for sure, especially when noticing the back part of the train.
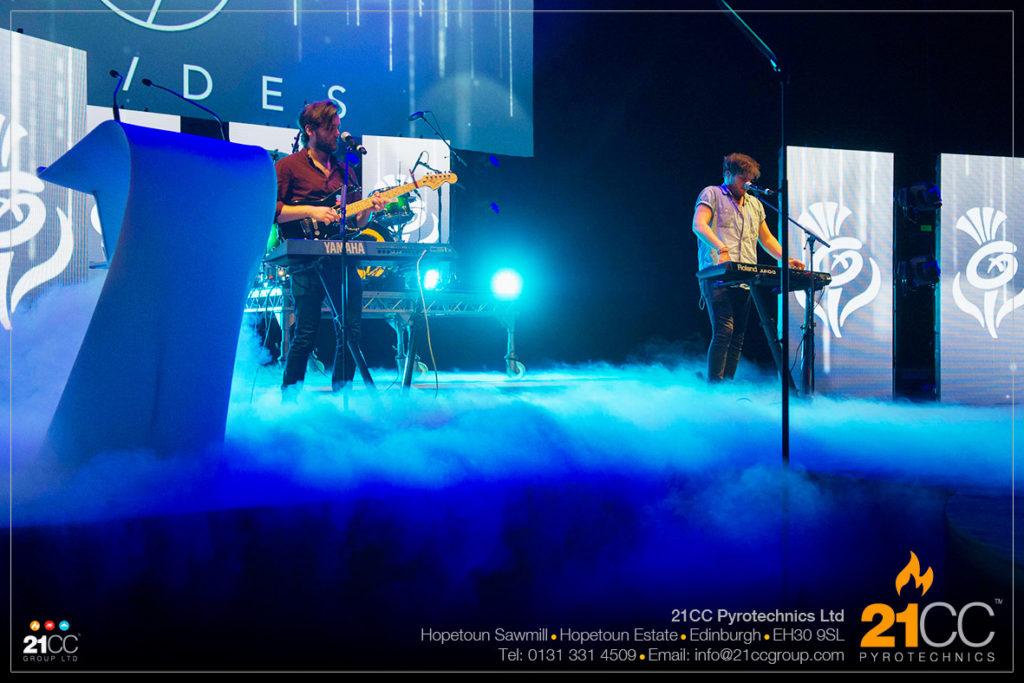
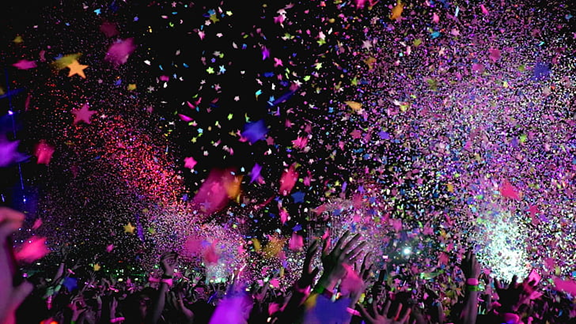
Finally, we have the latest version renders for the commercials. In shot04, the confetti and smoke cache are re-rendered under the refined lighting condition, so the smoke's highlighted area has more contrast than other parts. The image now feels more like a live stage with crowds staying at the correct angle. We also have a new sound designer to join the team and creates the rock BGM which brings lots of energy to the footage.
Week 5
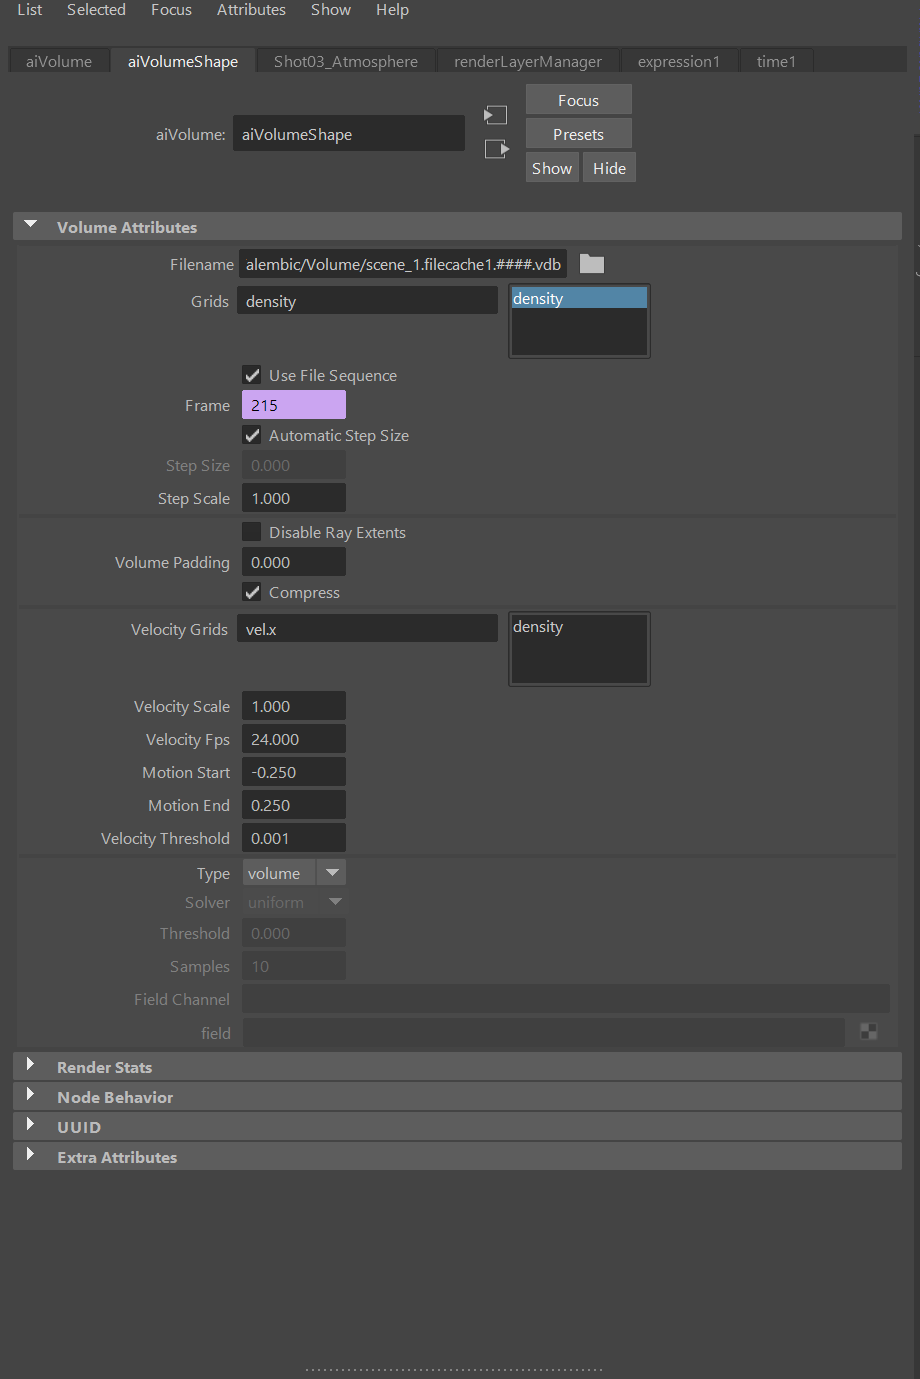
This week, I have worked with my teammates to troubleshoot the render layer issues, specifically the motion vector layer, focusing on resubmission of Fx elements and setting up render quality. We aim to render the final image at 1080p which requires more render resources than the previous version. The default relative path method won’t work for the imported vdb file when rendering Arnold volume in the render farm. Thus, I have tested multiple times and found some guides online to help me figure out the issue. Luckily, this website provides a practical way of setting up the “Texture search path” parameter, which inspires me a lot: https://arnoldsupport.com/2018/01/31/mtoa-cross-platform-volume-file-names/ Basically, it enables a global searching path inside the render settings and automatically set relative paths for the imported cache. For the school render farm, I have found that the reading path always starts with “root/farmhome/genli20/project name….”, so I replaced the path in the render settings, and it works as it should be.
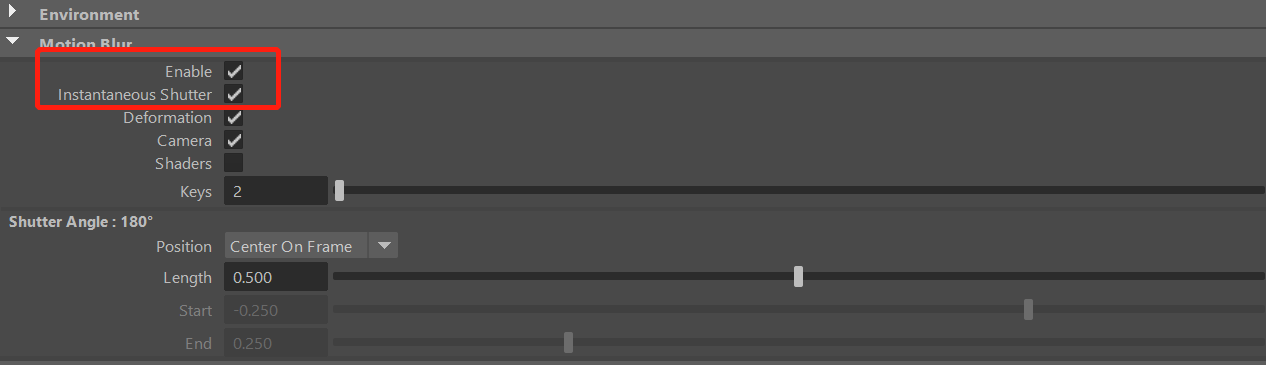

For the motion vector pass inside Arnold, at first, we decided to compute the vector blur directly inside Nuke, which works most of the time, but it still not entirely accurate. Then, I tried to render out the motion vector layer without affecting the diffuse layer by enabling the “Instantaneous Shutter” function. Moving to Nuke, the motion pass will not function well even following the official guide: https://docs.arnoldrenderer.com/display/A5AFMUG/Motion+Vector+AOV/ The vector blur seems going in the wrong direction because of the channels default setup. Then, I have found a tutorial to fix this: https://www.youtube.com/watch?v=GkFztin-M2A. The author transferred the motion vector information by building UV direction inside Nuke, and it helps the vector blur node to recognize the correct velocity direction. As a result, I could adjust the intensity of vector blur by tweaking the “motion amount”. Here is a video process of fixing the issue:
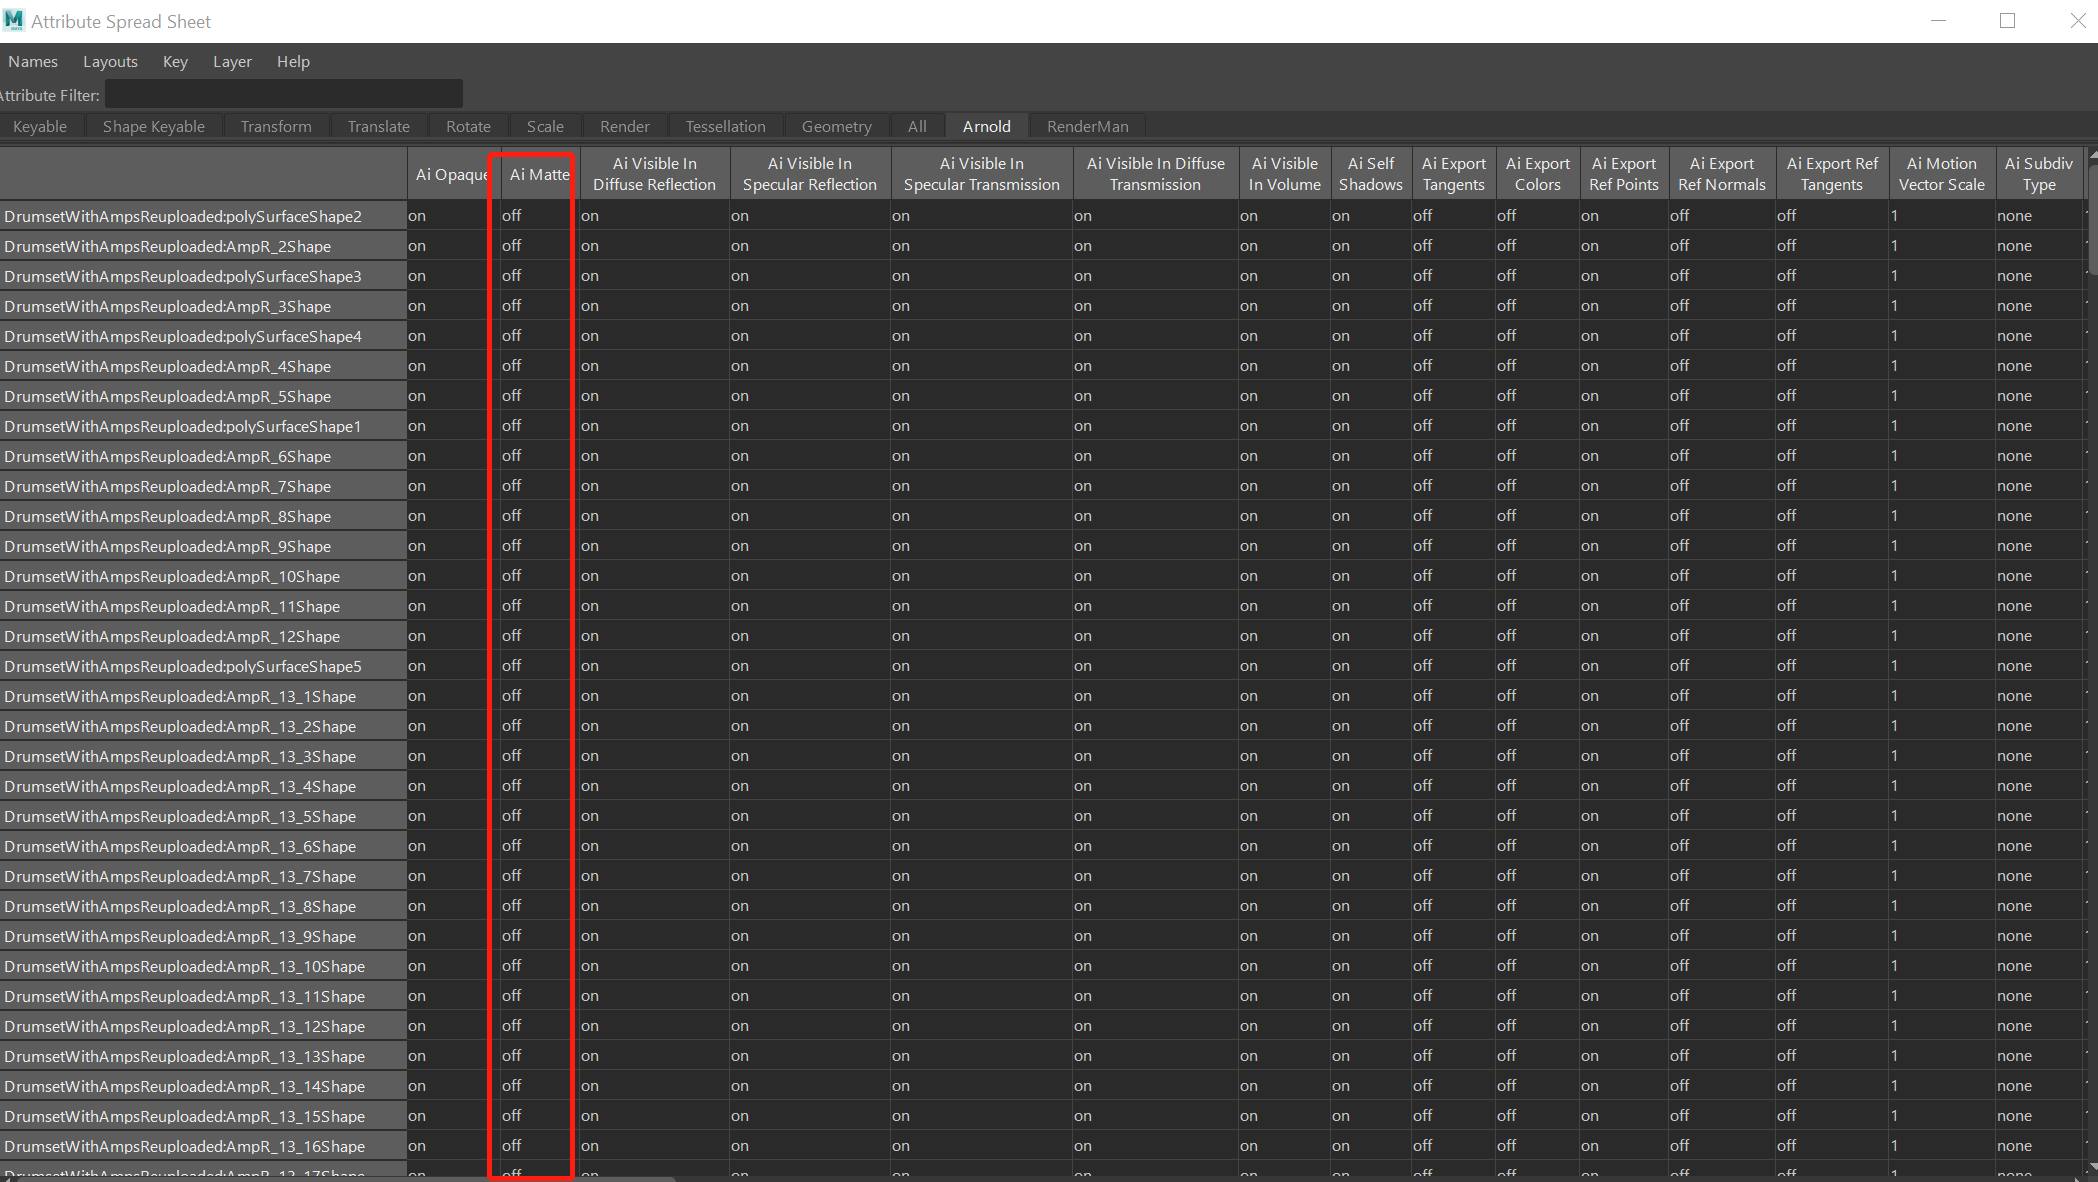
I have also found an interesting feature inside Maya named “Attribute Spread Sheet,” which allows users to control attributes over multiple object shapes. It has changed my workflow entirely since I used to combine some models to adjust the matte attribute under Arnold tab. Now, I could group select those polygons and change parameters without spending tons of time combining them.
Finally, we finished the second version of the visualization with compositing of new crowds footage, a new train with textures, and re-rendered FX elements such as confetti and background smoke. Here is the video for all four different shots and the final logo transition:
Week 4
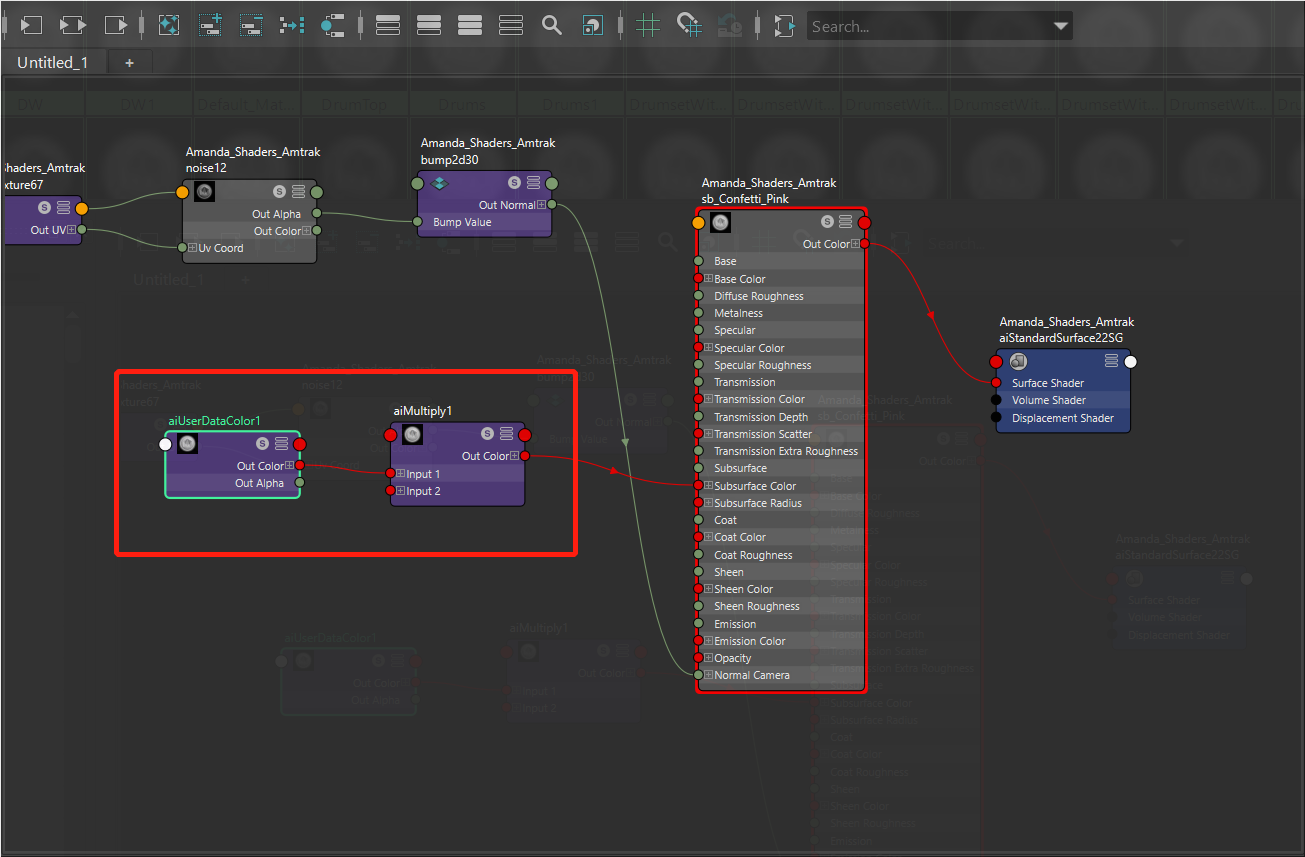
This week, since all the FX elements dynamics had no major changes, I started to dive into the shader development for the background smoke as well as the confetti shaders. Now the confetti caches have been divided into three parts based on the camera distance, which ensures more space for the compositing since they all have separate RGBA channels for color grading as well as Zdepth. At the beginning, the confetti caches were directly exported with all the attributes from Houdini, and it made Maya crash every time during importing. Later I found that before exporting caches, plenty of attributes such as primitive names, ages, or particle life could be deleted to save disk space, also solving the crash issue in Maya. To use the vertex colors inside aiStandard shader, the “aiuserDataColor” node is necessary for loading the color attribute first, and then the color attribute could drive channels like diffuse color, subscatter surface color, and transmission color.
Confetti render in Shot 04 (with lighting setup)
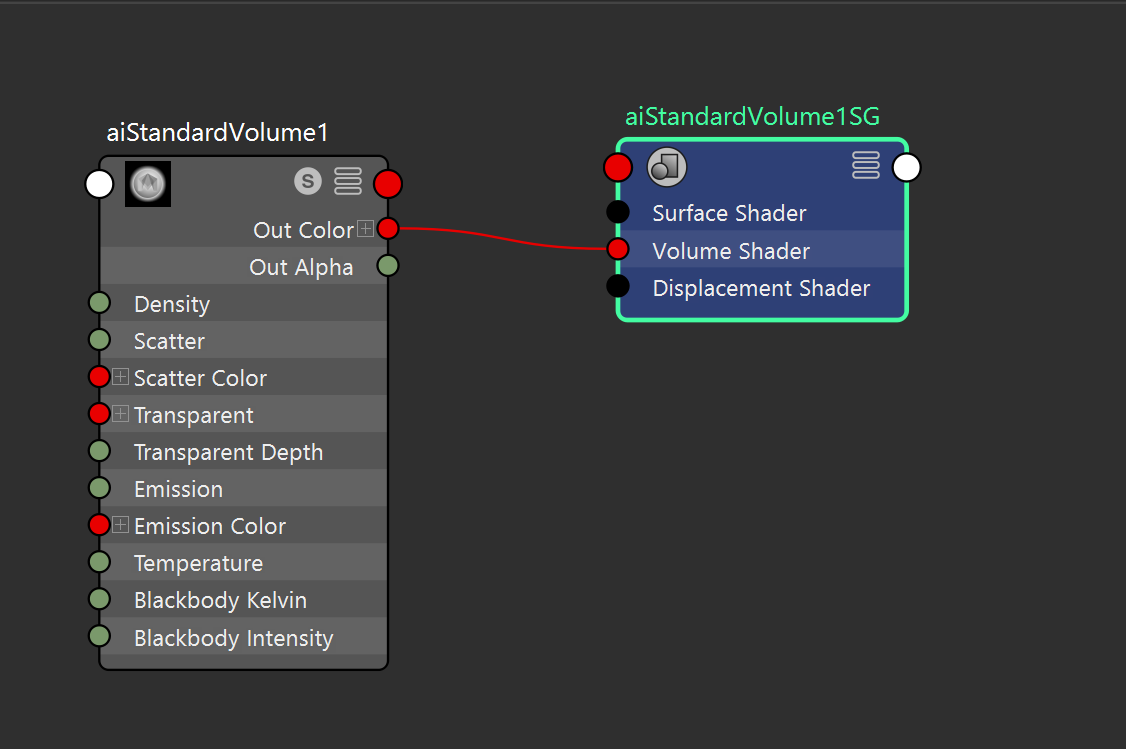
The cache was exported as a VDB file for the atmosphere smoke since Arnold Maya only read VDB as a render proxy. The smoke did contain multiple VDBs such as velocity grid as well as temperature by default. However, the velocity grid took much more disk space as it includes all the accurate volume velocity information. Since the smoke was almost transparent with high defocus in the comp, it might no longer need the velocity blur for the render, so I only keep the density VDB grid instead of writing out all the VDBs. The default aiStandard Volume shader did a great job for the draft rendering. Notice to change the “scatter” value in the shader to ensure the highlight area is not overexposed.
Smoke render for Shot 04 (with lighting setup and matte)
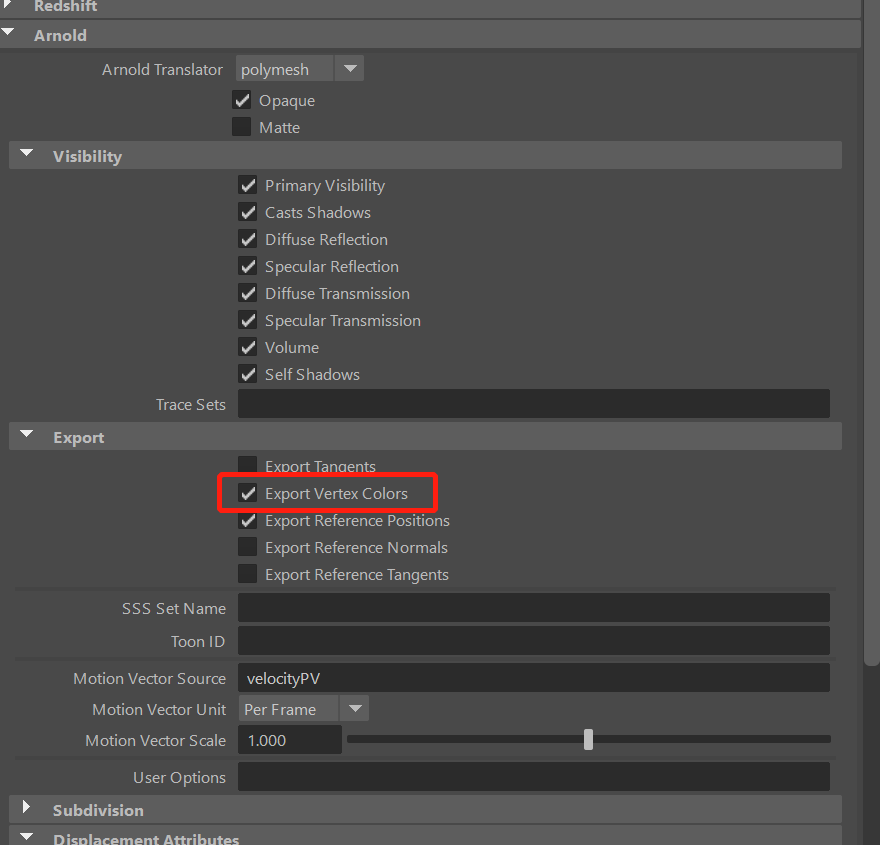
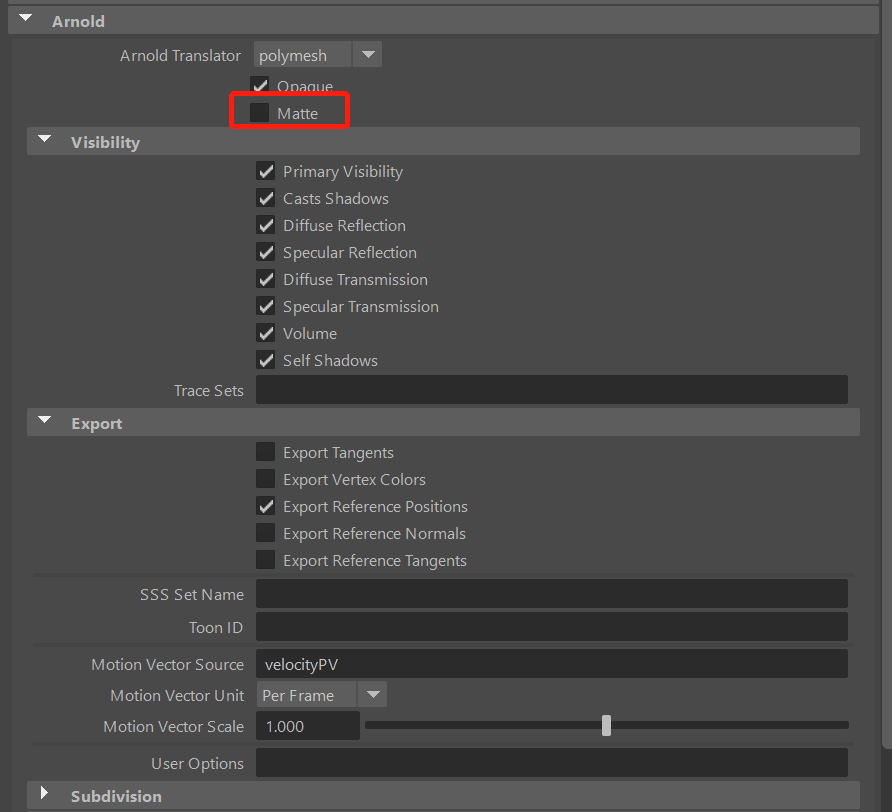
For the general matte, because Arnold only has the “matte” option available under the geometry shape level, it is required to combine some of the individual models and assign them a single aiMatte shader to prevent exceeding the shader number limit. After that, make sure to check the “Matte” enabled before the rendering process. The “Matte” function provided the geometry mask for RGBA channel, which is very useful for compositing.

Finally, we finished the first version of all shots with basic lighting setups and crowd greenscreen plates. Here is the visualization of the final comp version:
Week 3
This week, I spent some time refining those FX elements and combining them with other contents as well. Since our team has decided to make the environment a bit larger (From a closed room to an outdoor stage), the range of confetti falling has been extended to generate a feeling that some confetti is flying over the crowd in front of the stage, which is actually keying footage. The confetti seems to lack of twist from the latest feedback at some point (especially the round shape), and the general mass needs to be adjusted. Some references display those key points: https://www.youtube.com/watch?v=ix9_Jvt-UYU/ https://www.youtube.com/watch?v=kAqc_BOVIDc&t=12s/
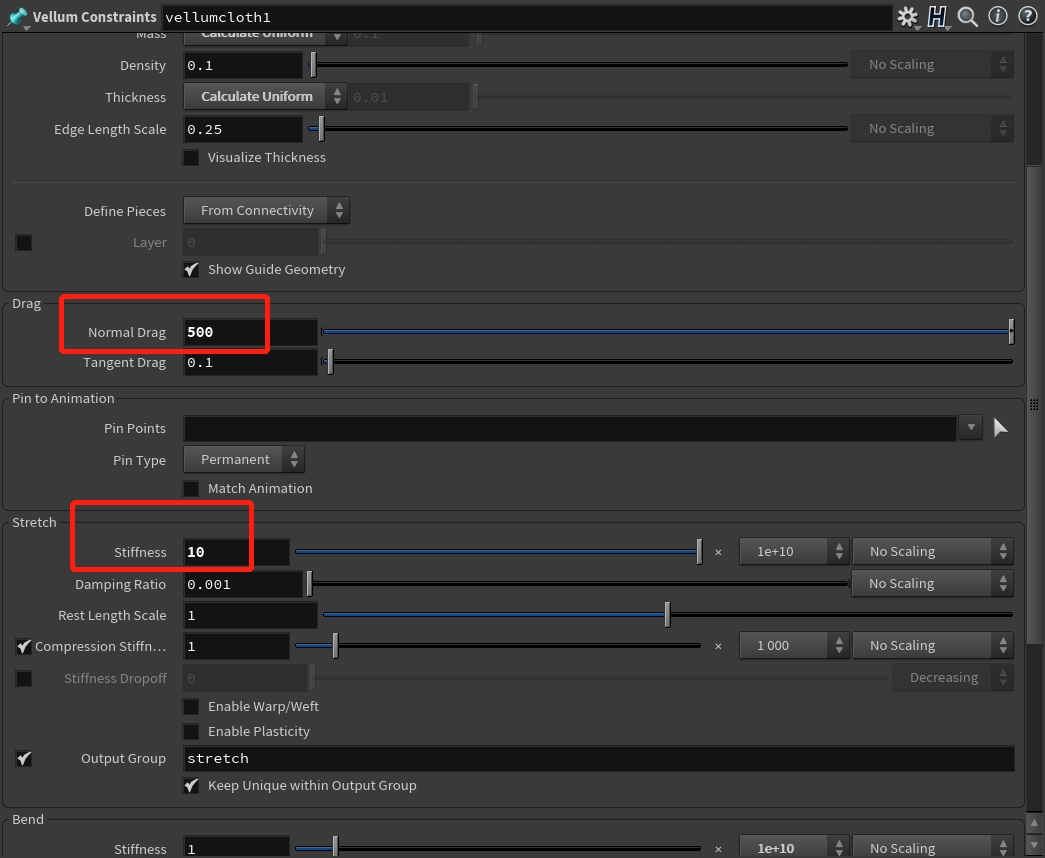
There is an excellent approach to adding additional pop spin to the vellum cloth geometry during simulation: http://deborahrfowler.com/HoudiniResources/Topic-RubiksCubeDisintegrate.html Special Thanks to Professor Fowler for sharing this! It randomizes every single point in the axis as well as rotation speed. Also, I have increased the Normal damp in the vellum cloth node to offer those confetti more time floating in the air.
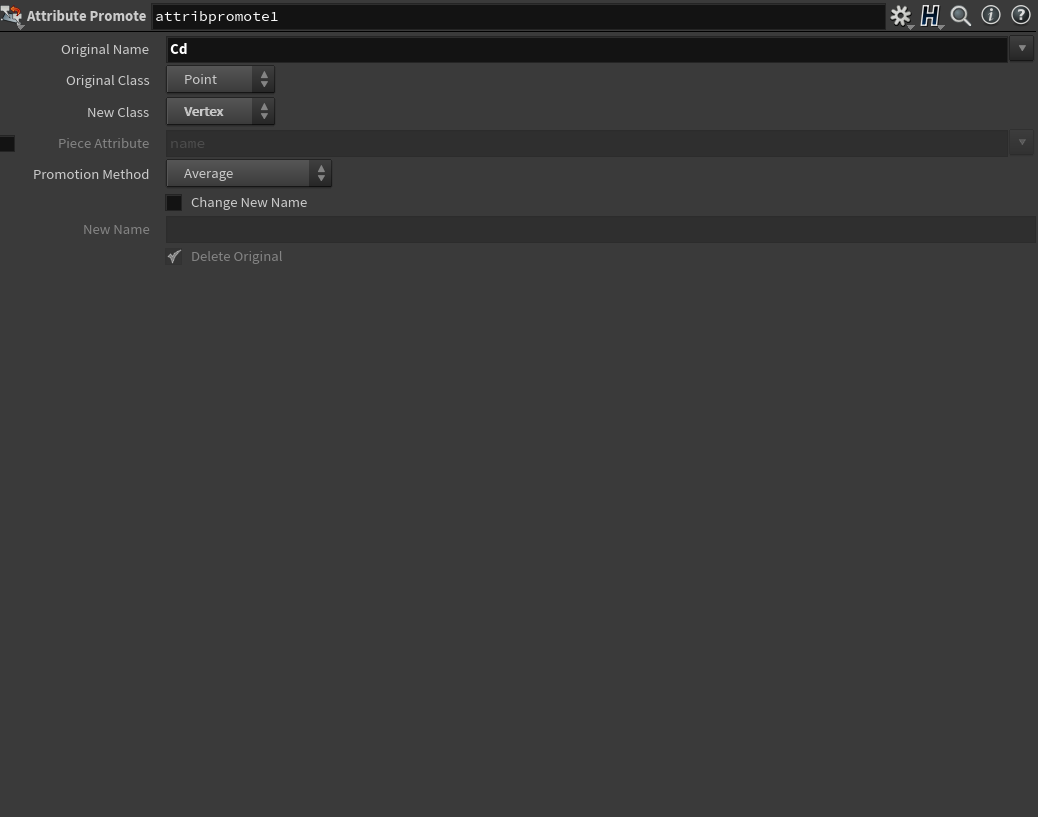
After the simulation, the color attribute in Houdini is on the point level. However, Maya does not recognize that attribute unless it has been promoted to the “vertex” class. Then, when the alembic cache has been referenced in Maya, the color attribute will be put in a “Color Set,” and Maya will read those values, offering them random colors.

Confetti simulation result
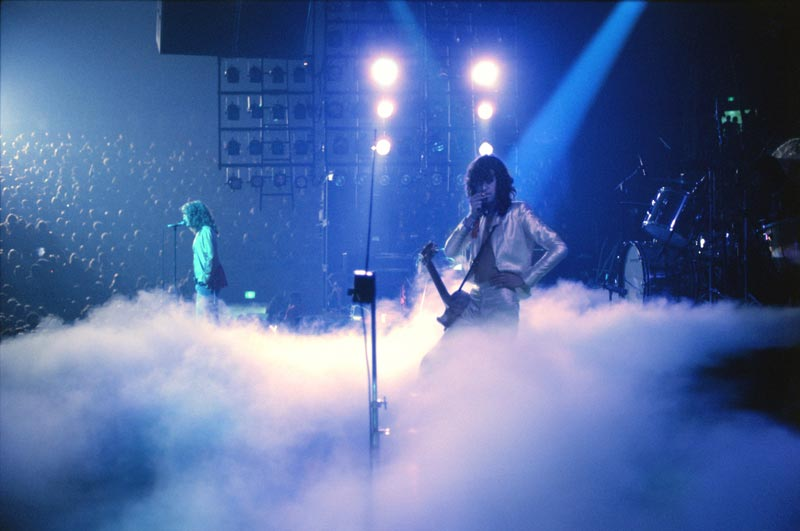
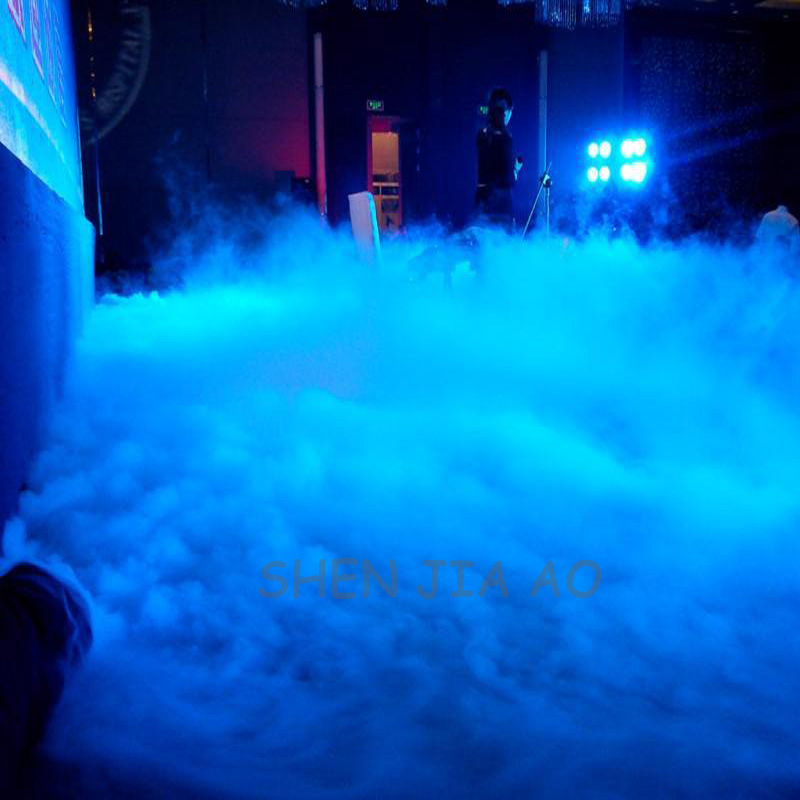
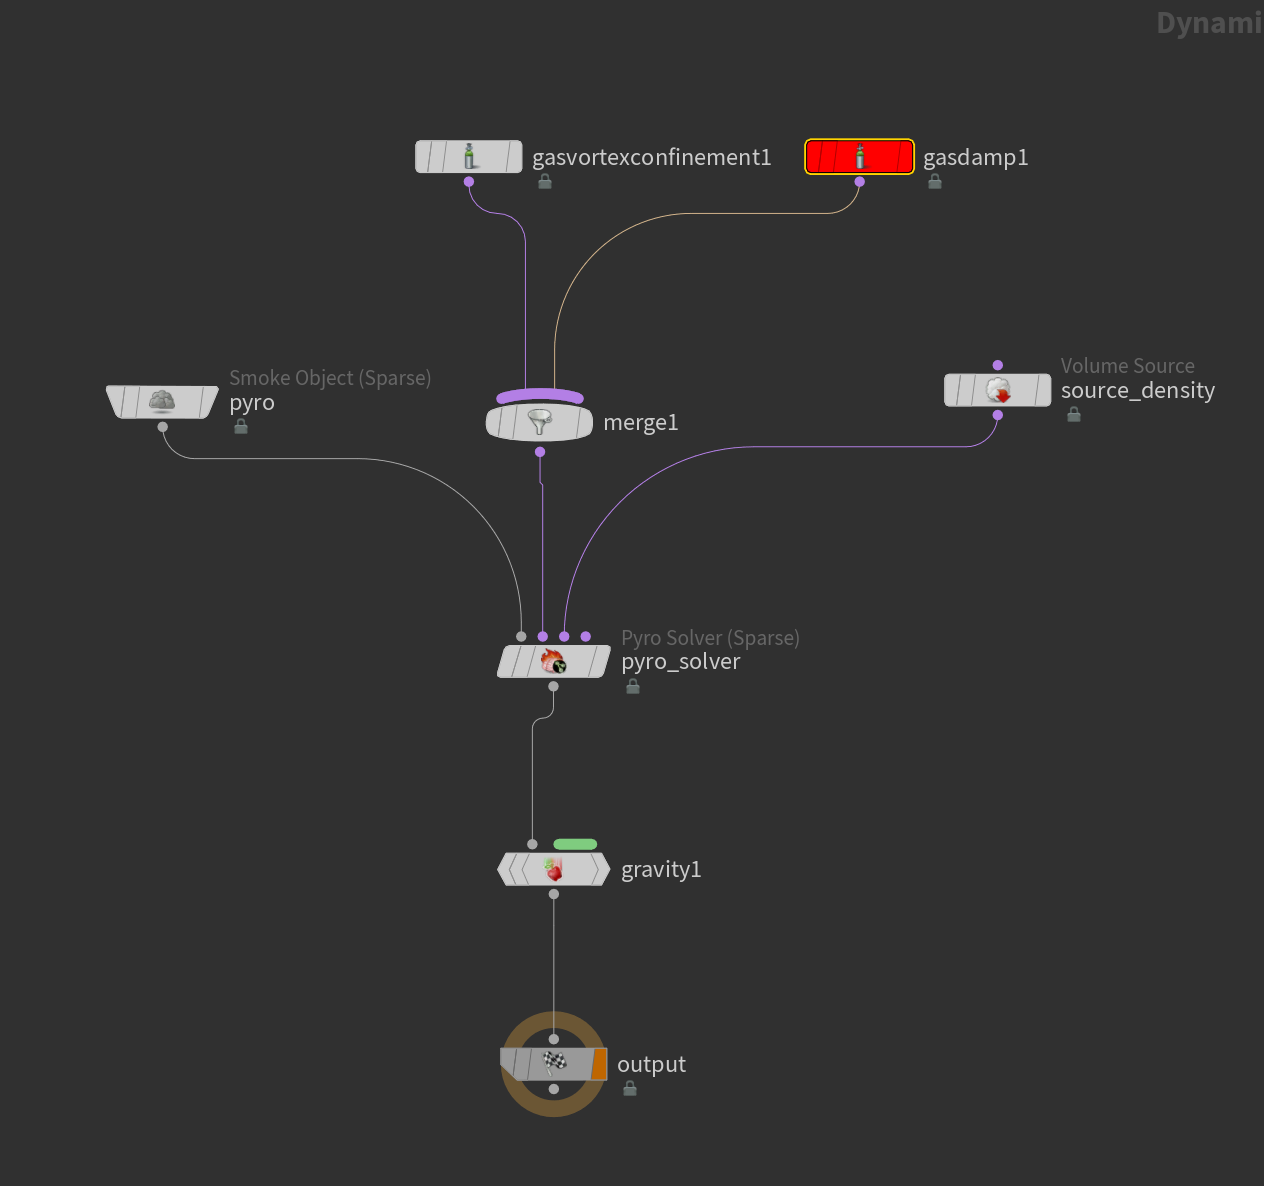
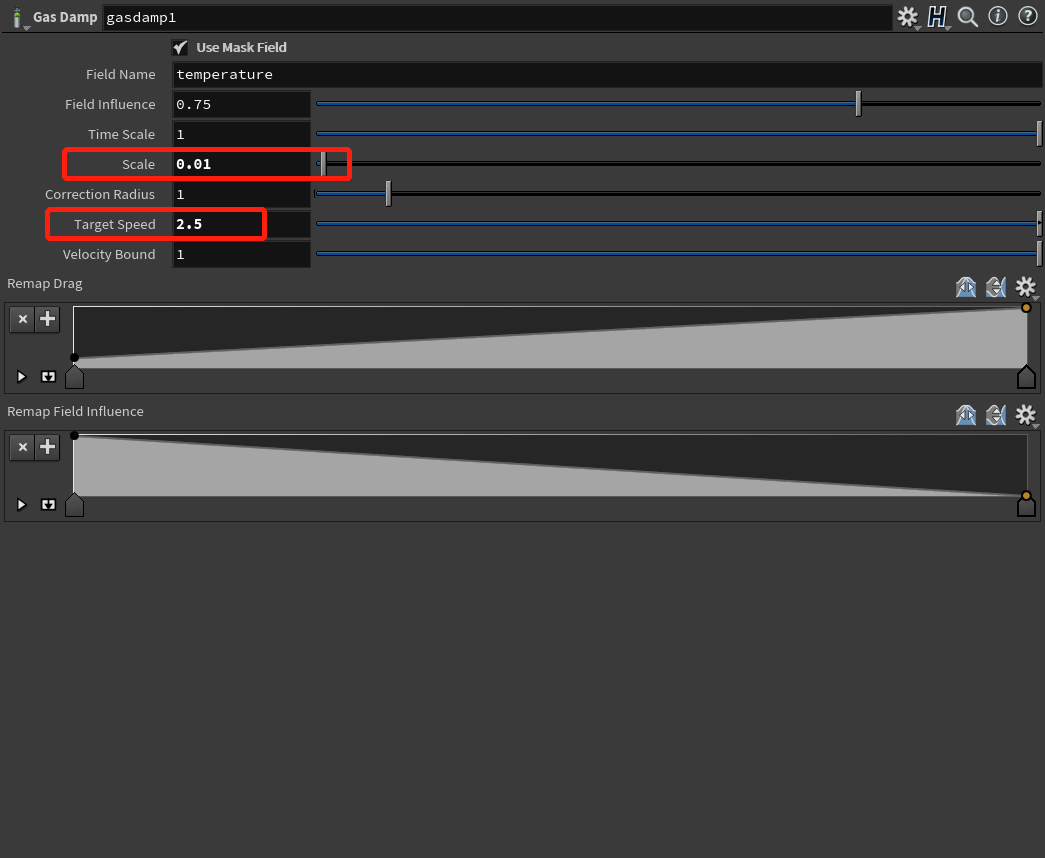
For the atmosphere smoke, there are also some reference videos and pictures that worth viewing. For instance, here is one reference for the stage dry ice effect. We can see that the smoke height is relatively low and closed to the stage floor, and the density varies depending on the dissipation speed. As a result, the smoke source has been mirrored in 3d environment to reproduce the actual emitting machine for the dry ice. Meanwhile, the “Gas Damp” node has been connected to the sparse pyro solver to slow down the smoke when they reach the max speed limit.
After simulation, the shader is generated by the “Pyrobakevolume” node, which provides user-friendly controls over necessary shader parameters. When the final look has been decided via the viewport display, all the parameters can be copied to the shader linked to the pyro cache, and it is ready for rendering.
Atmosphere simulation result
Week 2
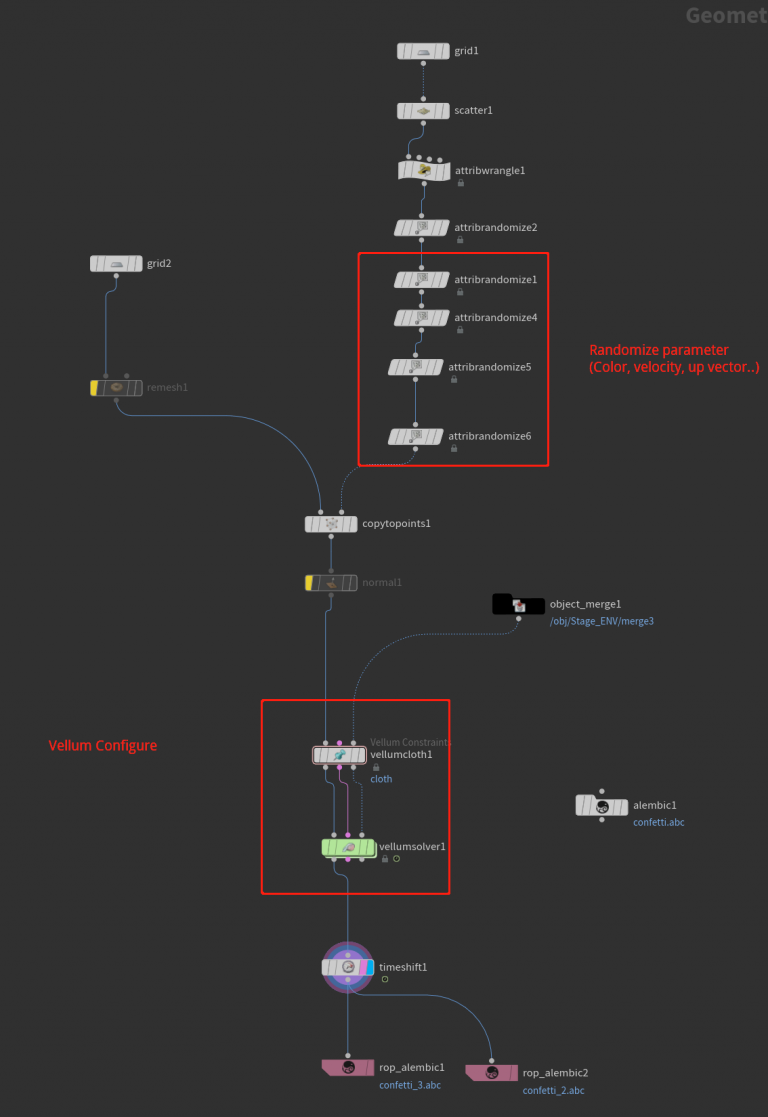
This week I started to dive into the FX that required for the project. For the confetti simulation, the individual grid-scale has been scaled down to match the global scale (all the confetti looks giant in the previous version) before the “copy” operation. Also, color randomization has been applied before the simulation to ensure every single confetti has a different color. Since the confetti may collide with the stage at the end of the shots, the collision detection has been added by configuring the stage collision proxy during the sim.
Confetti simulation in Houdini
Caches in Maya Viewport
For the string animation, there is a reference that shows the guitar string vibration in slow-mo which indicates how the string actually moves during playing. https://www.youtube.com/watch?v=8YGQmV3NxMI&t=1s/ To simulate that behavior, the first approach is to use the vellum solver with high stretch stiffness when turning the string model into vellum objects, and create the pin points at the beginning and the end. Then assigned them with a CHOP animation (For test purpose, no music sample has been imported so the sine wave has been utilized), and we have such a result:
Vellum simulation for the strings
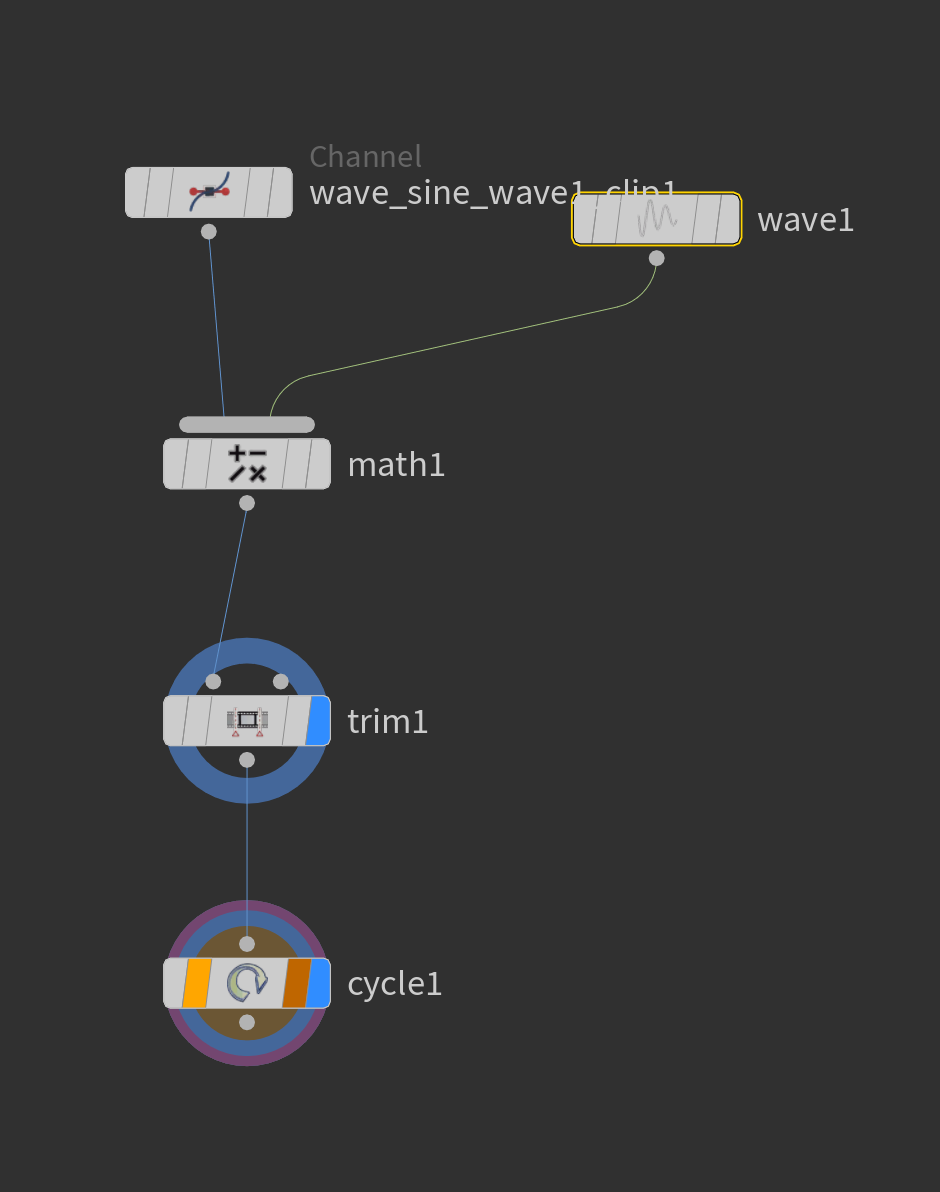
However, this one appears to be a “loose” look since the string is taut and made of steel so they resist movement much more. To achieve this, another approach is introduced to make the simulation fully rely on CHOP network and can be controlled manually to match the train speed. The sine wave still works inside CHOPs but attached with a “cycle” node to extend its range. Meanwhile, the string can have an attribute called “curveu”, which indicates the point position order in each line. Use that information as a” bias” to drive the blendshape process between static models and animated models, even the ramp value can be included to provide more artist-friendly interface control.
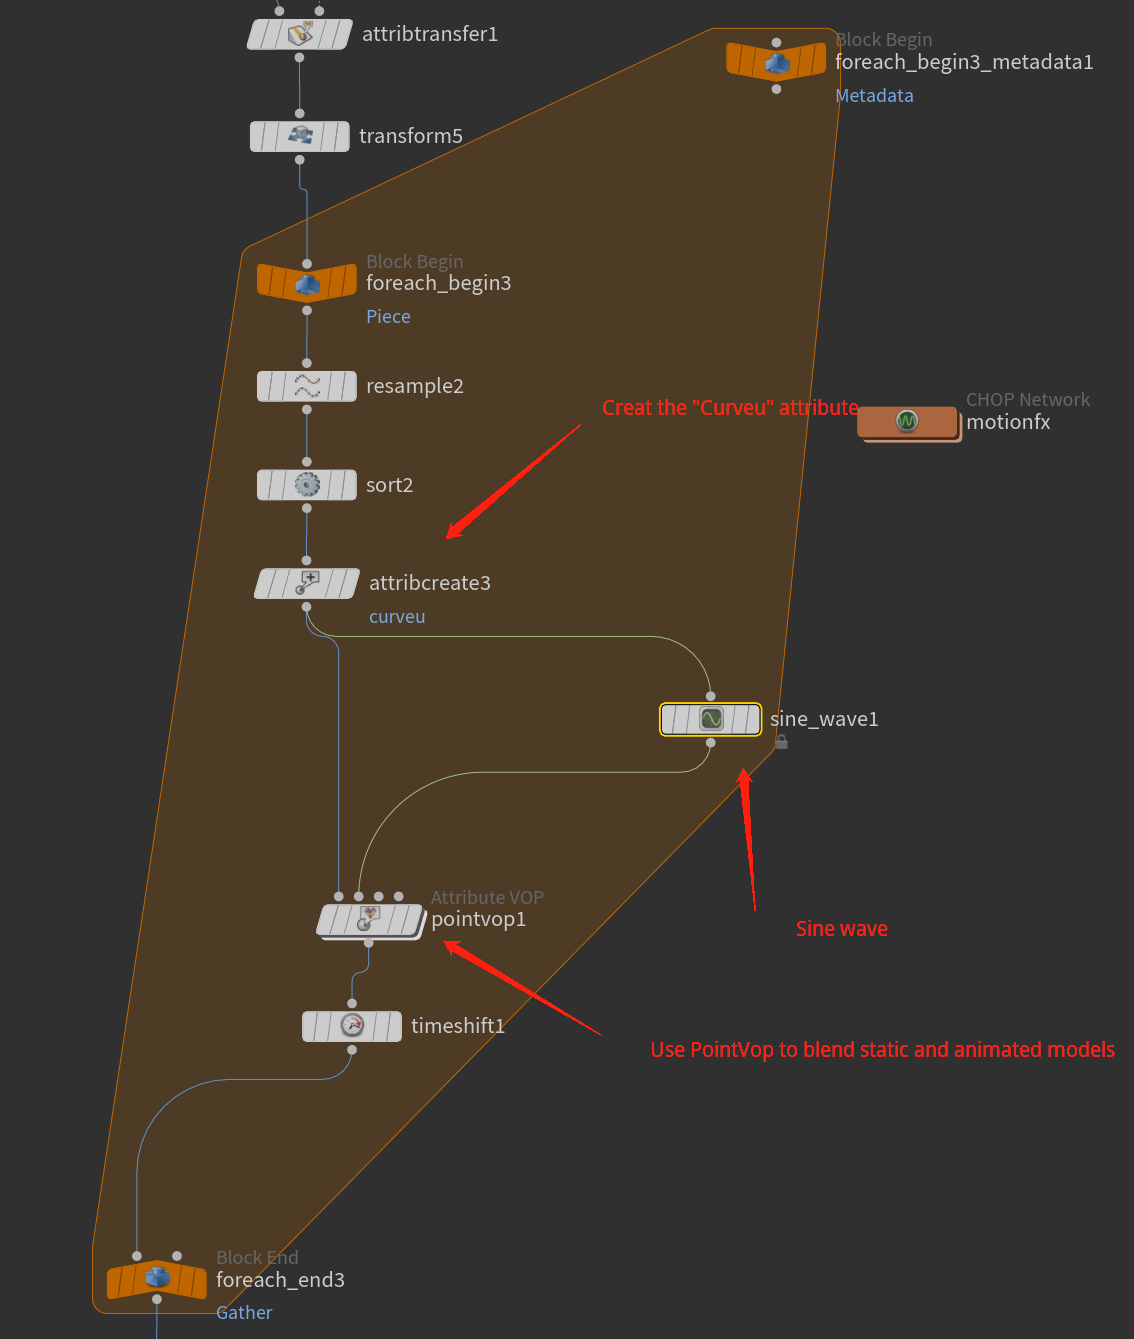

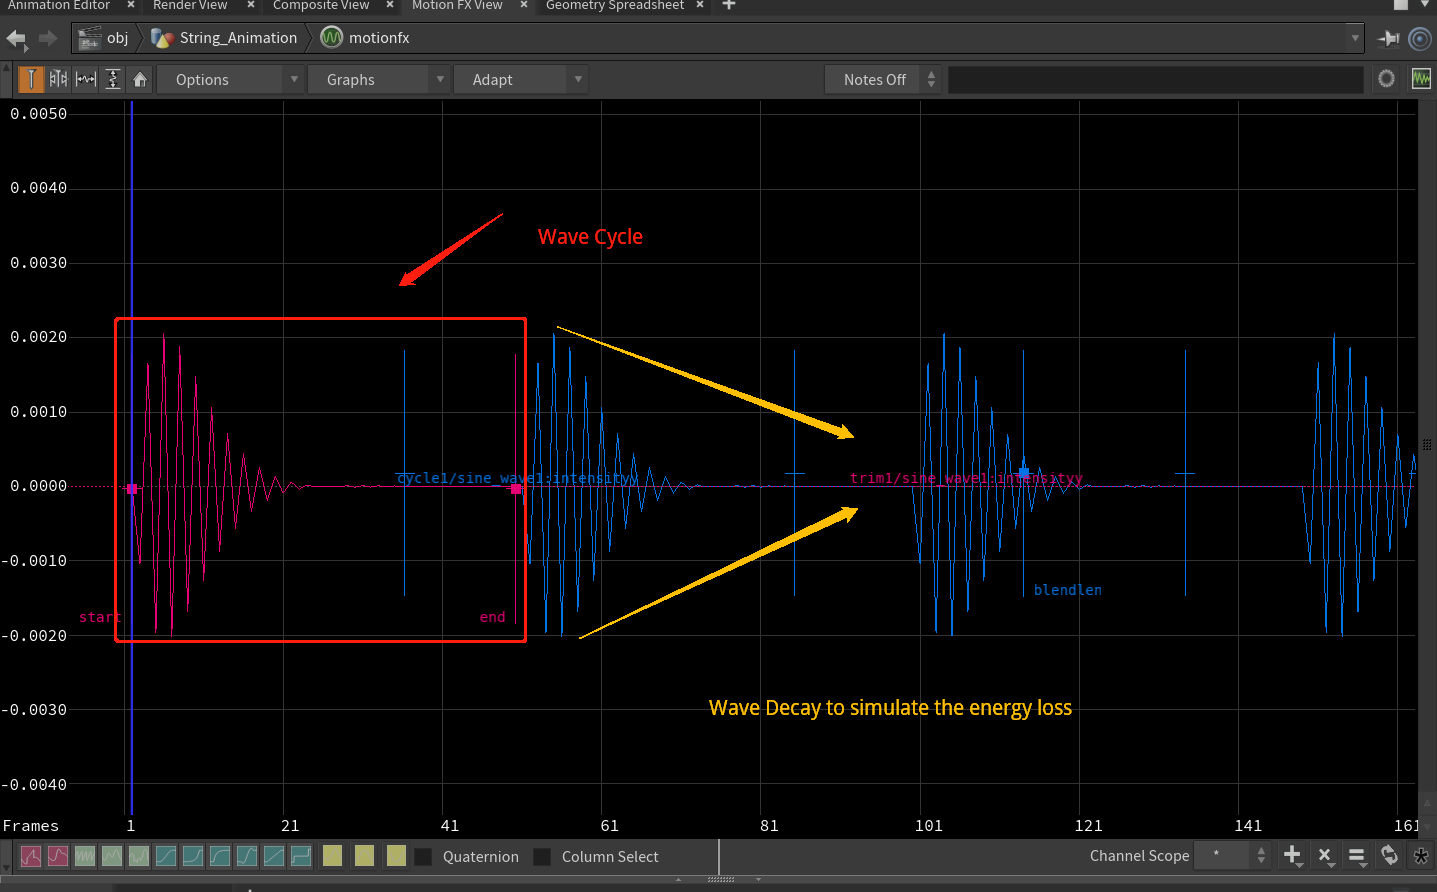
Finally, the simulation would be like this: The vibration has a fast decay rate so it is more closed to the reference.
CHOP animation with manually offset control
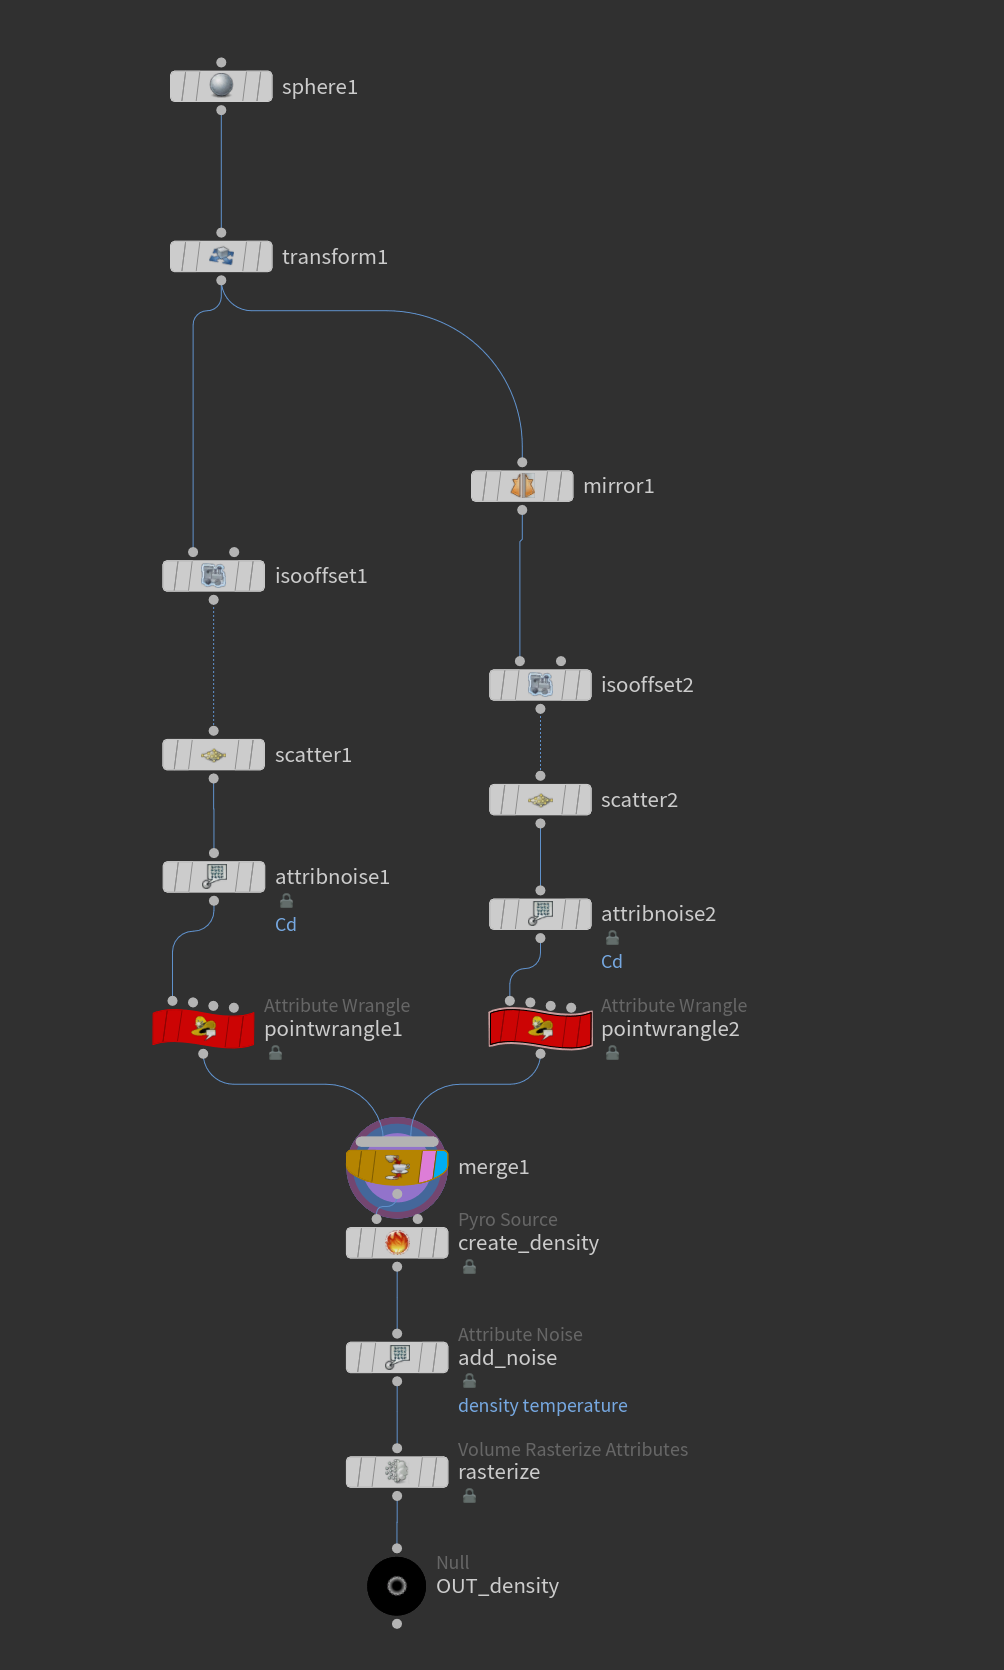
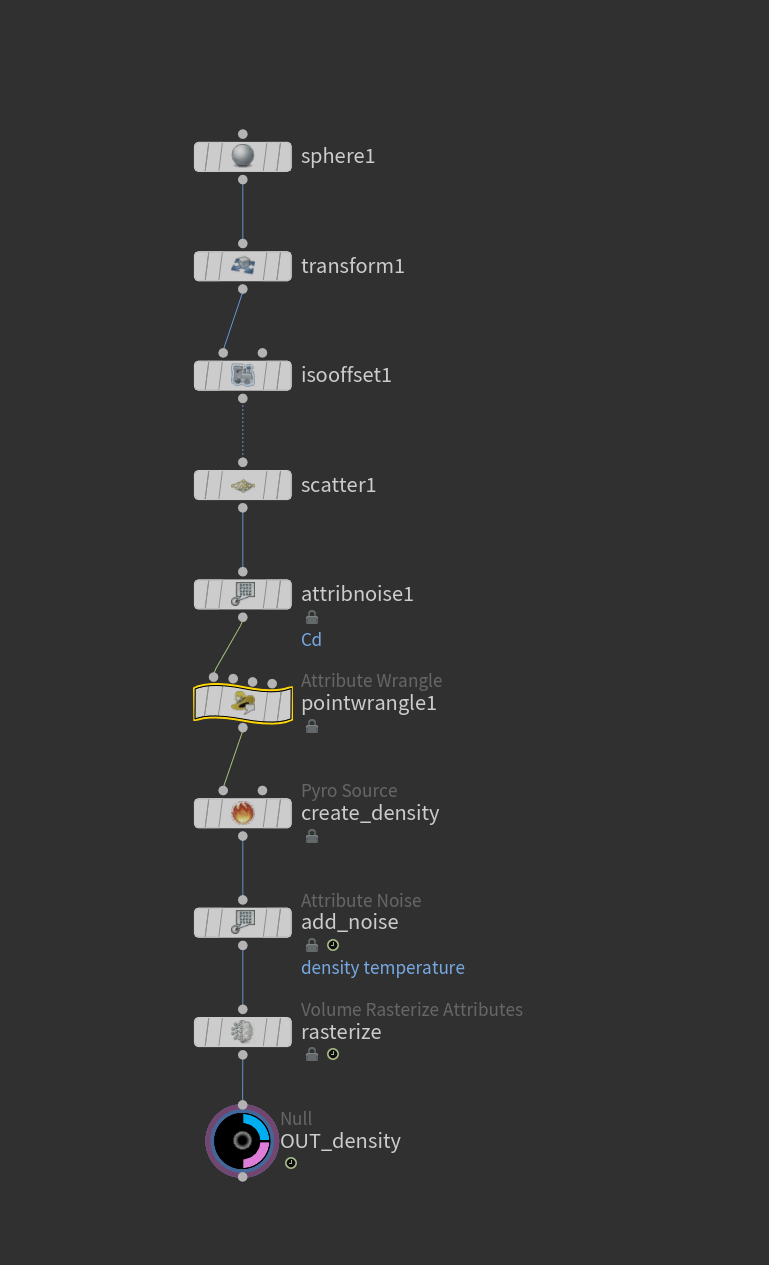
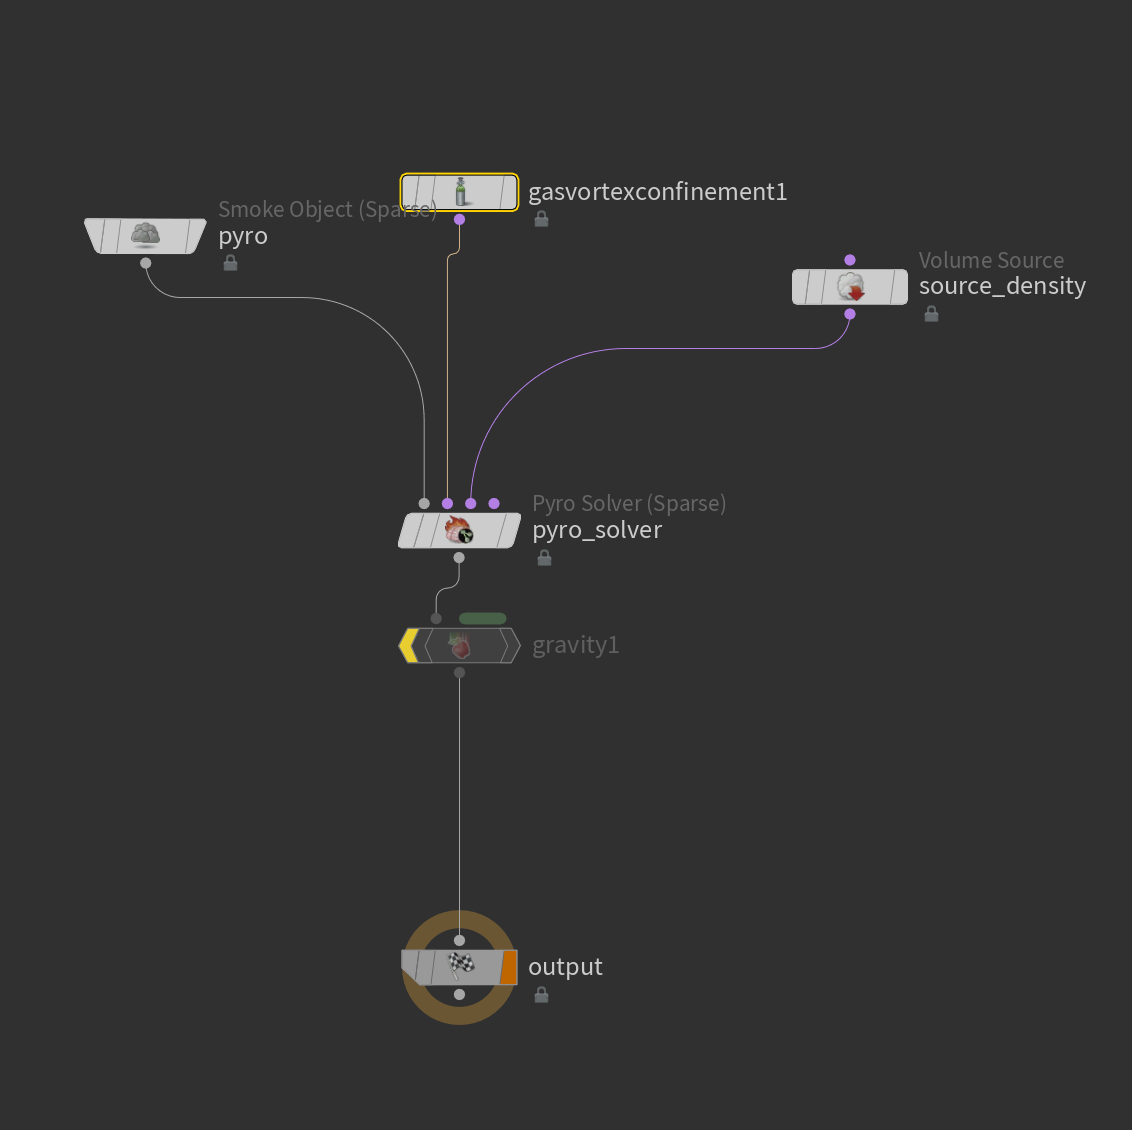
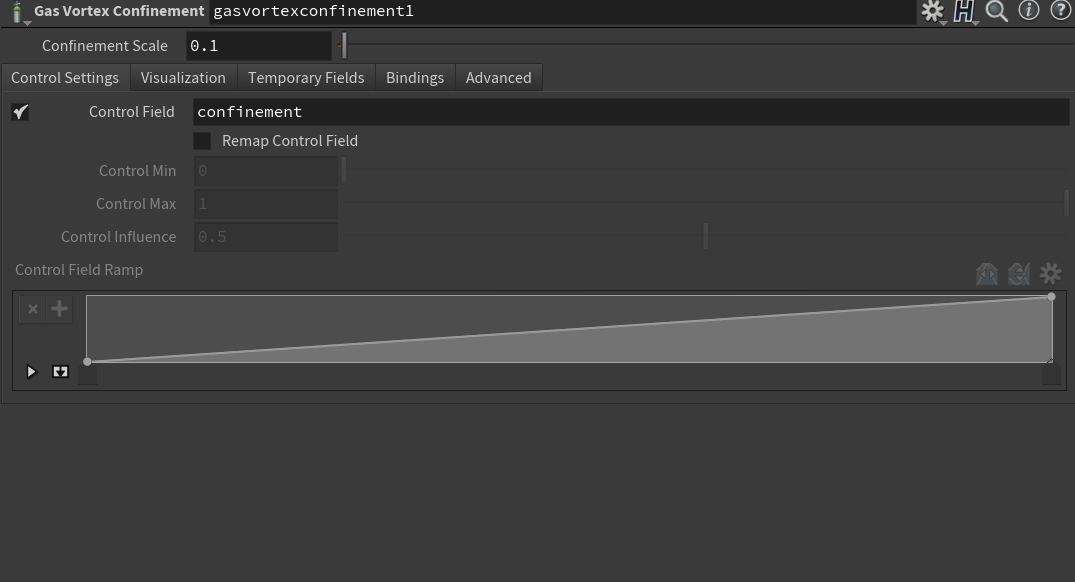
For the atmosphere fog, the Pyro module in Houdini is the best choice. In this sim, a simple sphere with noise attached acts as the smoke source. To prevent the confinement loss during the simulation,(the sparse solver does calculate the confinement parameter but it is not efficient as the old Pyro system) adding an extra “gas vortex confinement” node is necessary. Other than that, the simulation is pretty out-of-box settings and it is ready to render after attaching the “Pyro post-process” node.
Atmosphere in Houdini Flipbook
Week 1
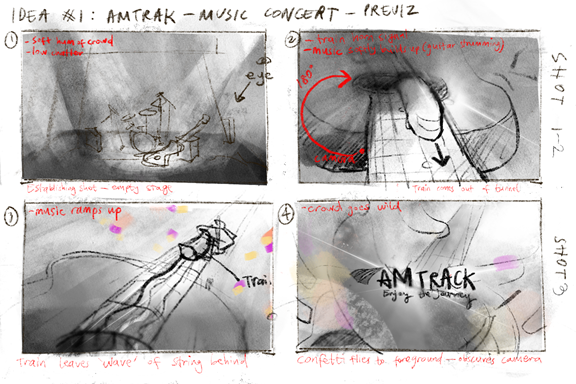
Found some general references for mood variation as well as materials for the look dev. Also finished a previz with all the camera shots and a draft confetti sim.

The environment starts with a warm and calm silence as it brings a sense of the audience waiting before the show begins. The camera does a slight zoom past the seats and focuses on the main drumset. With the spotlight intensity increasing, the show begins and the cam starts to transit to the next shot, where the train appears and moves close to the camera, generating a sense of the high-speed look. After that, the camera will change from a low angle following the train, when the confetti starts to fly randomly in the air. A specific one will cover the camera lens, which leads to a transition to the last shot——the logo appears as well as the tagline.
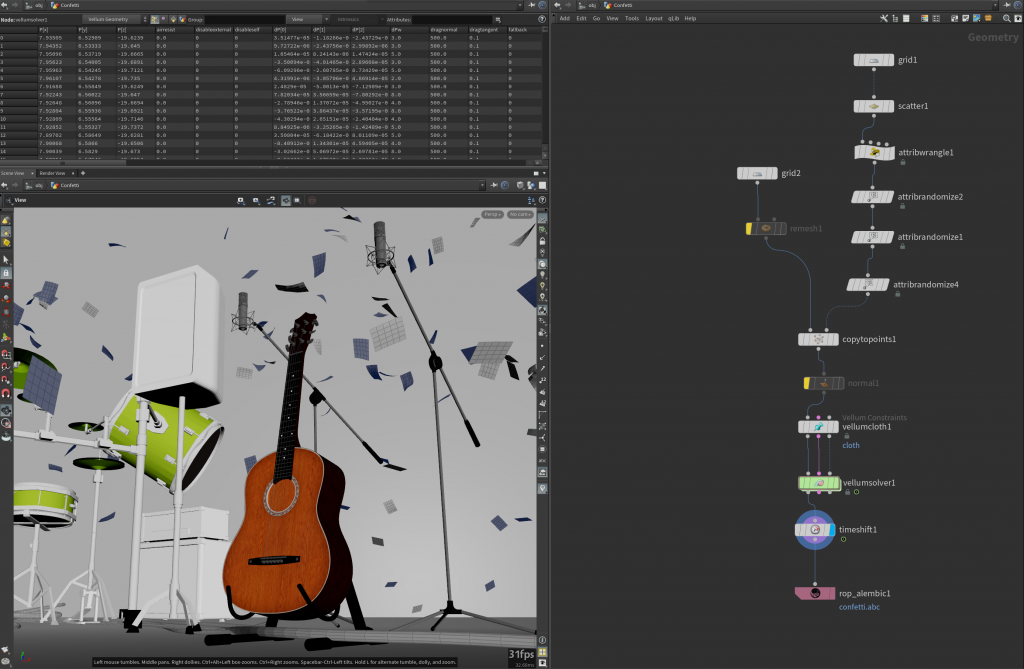
As for the confetti simulation, it starts with a grid with points scattered randomly. Since the points carry all the attributes that need for the copy operation, normal and pscale can be varied by randomly assigned numbers and ranges. After the copy node, use the Vellum Cloth node to transform all the polygon to the cloth type and adjust the stiffness (Notice the stiffness number could bring lots of simulation changes so deal it with care). And everything could go into the Vellum solver directly with an additional wind force added to influence the simulation behavior. One possible way to ensure there is no weird speed is to set a max acceleration for the confetti, which can be tweaked to match the timing and final look. Finally, export all the caches as an alembic file and imported them into Maya for scene integration.
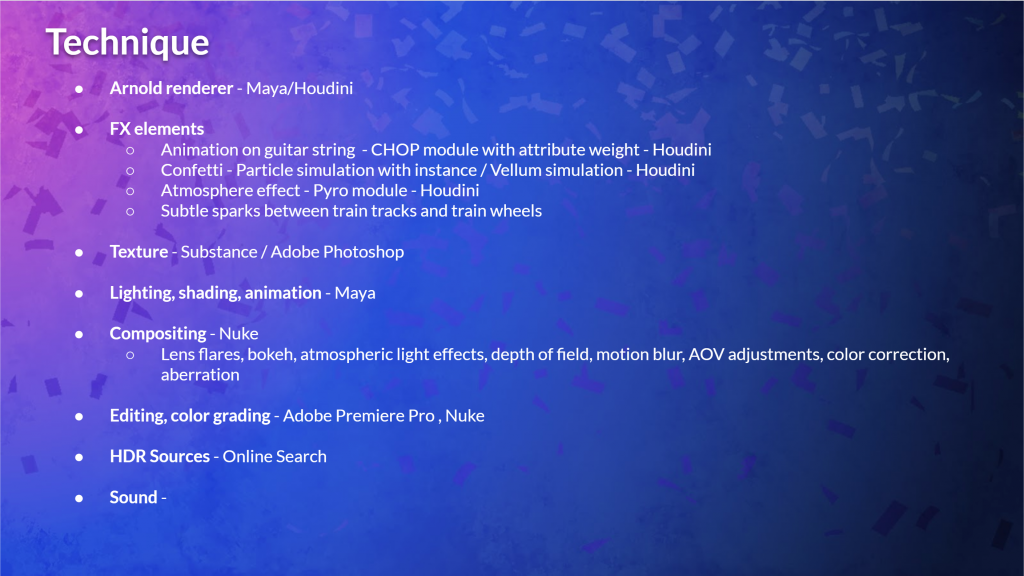
For other techniques in this project, here is a brief outline for possible fx and software that may be used.
Special thanks to Amanda, Miranda, and Ken for creating the previz and the storyboard!


You guys are nailing those renders!
Thanks Felipe! We are getting close to the finals!